How to connect to VoIP service providers
If you want to make and receive VoIP calls, installing a VoIP service provider connection is essentially needed. With this, you can make and receive calls to and from landline, mobil, or even analogue networks through a VoIP provider on the Internet. Such a VoIP service provider connection can be used to connect to an Internet telephony service provider (ITSP) that offers digital telecommunications services based on VoIP. If you already have a PBX (Cisco, Asterisk, PBXnSIP etc.) system and you want to keep it but you would like to use the functions of the Ozeki Phone System, you can connect them easily. If you follow this guide, you will be able to setup a VoIP service provider connection in the Ozeki Phone System in an easy and fast way.
Step 1: Login to the Ozeki Phone SystemStep 2: Add new VoIP Provider
Step 3: Setting up Dial plans
Step 4: Make a test call

Prerequisites:
- a computer with the Ozeki Phone System installed on it
- broadband high speed Internet connection
- a subscription at a VoIP service provider
- a VoIP capable device (for example: PC with a headset, VoIP phone, traditional phone device with ATA)
Note: Please choose the VoIP service provider that offers plans best fitting your corporate needs. Once you have subscribed to its service, the provider gives you access to its network by providing all the connection information: hostname, port, user name and the password. You will need to enter this data into their respective fields in the Ozeki Phone System during configuration.
If you or your corporation already have an operative PBX but you would like to use the useful and particular features of the Ozeki Phone System you can easily connect them by using the Ozeki Phone System VoIP service provider. It is also useful when you want to connect your system to an outer service to make and accept calls by using outside lines.

It could be very effective to use the features of the Ozeki Phone System like the
sending and receiving SMS messages besides VoIP calls and services and you can use the
benefits of the Ozeki's Webphone.
By connecting a webphone to your PBX you can make
it possible for your customers to reach your support staff easily. Any web browser is
capable of handling microphones and web cameras, making voice and video chat become available.
And the visitors of your website can call your corporation for free because they can connect to your phone system.
You may find that you have an analog/digital PBX and you would like to make calls to outside telephone networks
(e.g. GSM network) or you just want to call a VoIP desktop phone or a softphone, this is a very good option to use the features of
Ozeki Phone System.
You can read more informations about the connection between your PBX and the Ozeki Phone System
on this site where you can learn how to connect various PBXs with Ozeki Phone System.
How the VoIP connection works
A VoIP connection consists of a VoIP Service Provider and the devices connected to it.
The VoIP Service Provider offers internet telephony services to the customers at a monthly rate.
The advantages of VoIP calls are that these calls are
made over a high speed internet connection, rather than over a regular phone line, so
this technology is much faster, stable, and provides a better sound quality.
The devices can call each other within the range of the VoIP Provider, and they are
also able to dial devices which are outside of it. This is possible, because you can
connect multiple VoIP Service Providers to each other, and you are able to
make cross-dialling possible between all of them.
The configuration of a VoIP service provider connection in the Ozeki Phone System is necessary to be able to make and receive phone calls. A VoIP service provider connection makes it possible to connect local phone numbers of one or more cities or countries. VoIP service providers often can provide higher quality services than standard PSTN (Public Switched Telephone Network) systems and they offer more functionality.
Please follow this step-by-step guide in order to configure a VoIP service provider connection in the Ozeki Phone System effectively.
Step 1. Login to the Ozeki Phone System
First of all, start the Ozeki Phone System and log in with your username and password (Figure 2).

Step 2. Add new VoIP Provider
Click on Create new phone line at the Outside lines section, then click on Voip Service in the VoIP Phoen line details section (Figure 3).

Now you have to fill the following data fields:
- Username: This will be your username for the VoIP Service. Using this, the Ozeki Phone System XE will be able to connect to the VoIP Service Provider, in a similar way like a softphone extension does.
- Register name: This name is usually the same as the username. It makes managing multiple services and extensions easier in the Ozeki Phone System.
- Password: This password protects your VoIP Service Provider from unauthorized connections. You have to provide this along with the username to connect to the VoIP Service Provider
- Domain: This is probably the most important data field. Here you have to provide the IP address of your VoIP Service Provider, to make it possible for the Ozeki Phone System to identify the VoIP Service Provider. The VoIP Service Provider will give this data to you.
- Port: The 5060 port is for the Session Initiaiton Protocol.
This section you also can specify the maximum number of simultaneous calls. If it is -1 then the number of simultaneous calls is unlimited.
For example you have set this number to 2. Then you only can start or receive 2 calls at the same time, no more.
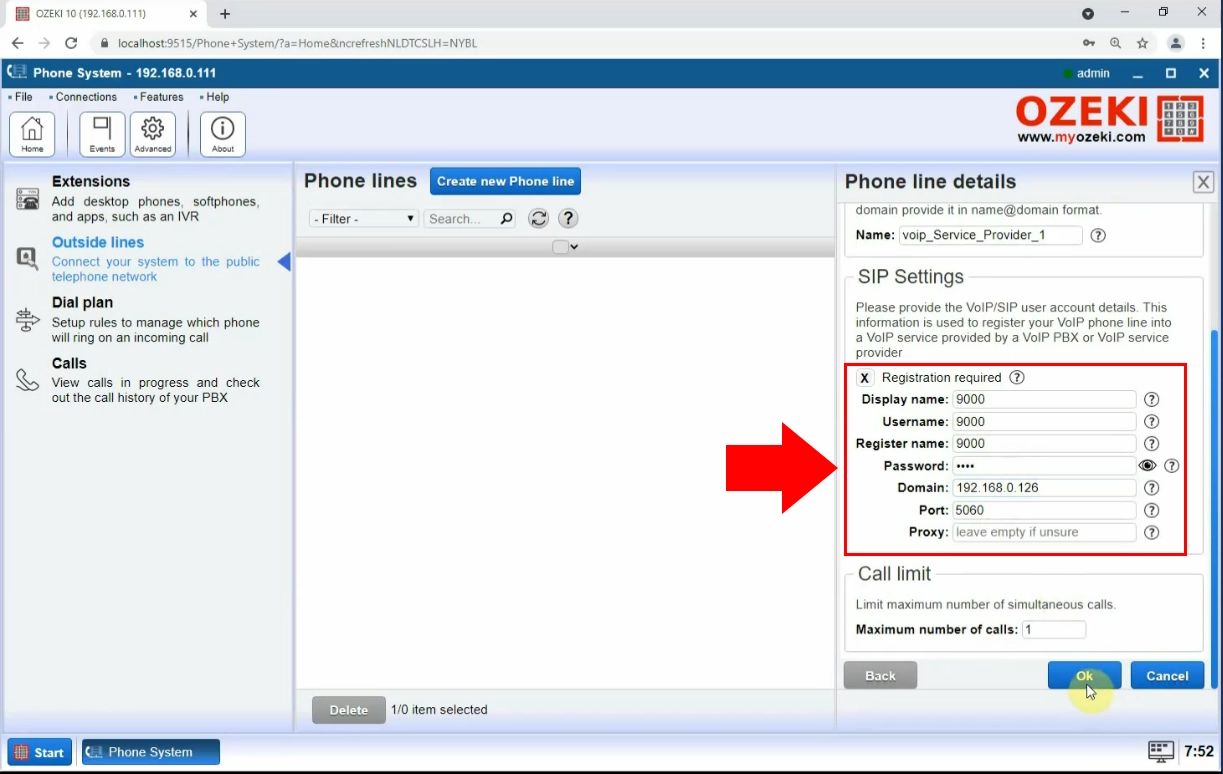
After providing the information click on the OK button at the bottom of the screen.
Step 3: Setting up Dial plans
To create a new dial plan for outgoing calls, click on Create new Route at the Dial plan section, then set the "Any PBX Extension" for the FROM connection and choose the VOIP Service provider connection for TO connection (Figure 5).

To specify which extension belon to the Voip Service provider specify the recipient address in the To Address section in the Mach tab. (Figure 6)

For incoming call create an another dial plan where for the FROM connection set the VOIP Service provider and for the TO connection specify an extension from the Ozeki Phone System's extensions.

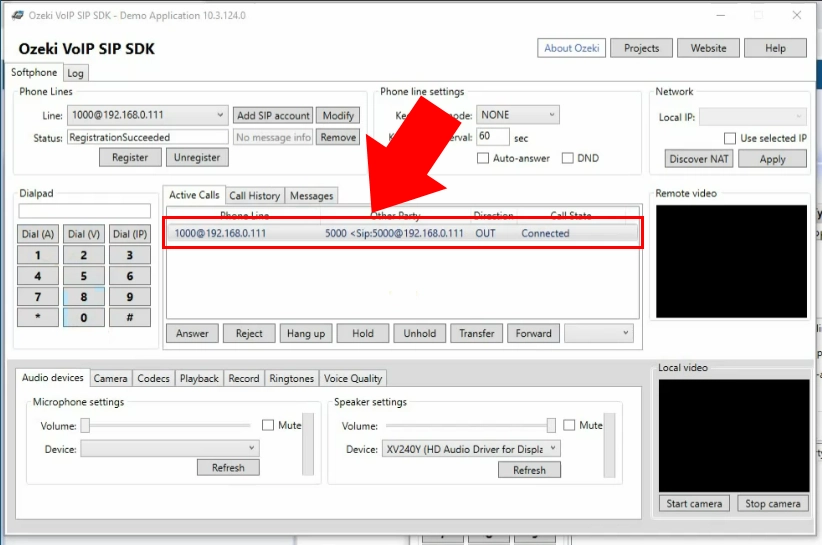
Step 4. Make a test call
You have created a softphone extension(number 1000) in the Ozeki Phone System, and you are calling another softphone extension(number 5000) from it, which is connected to the VoIP Provider extension.
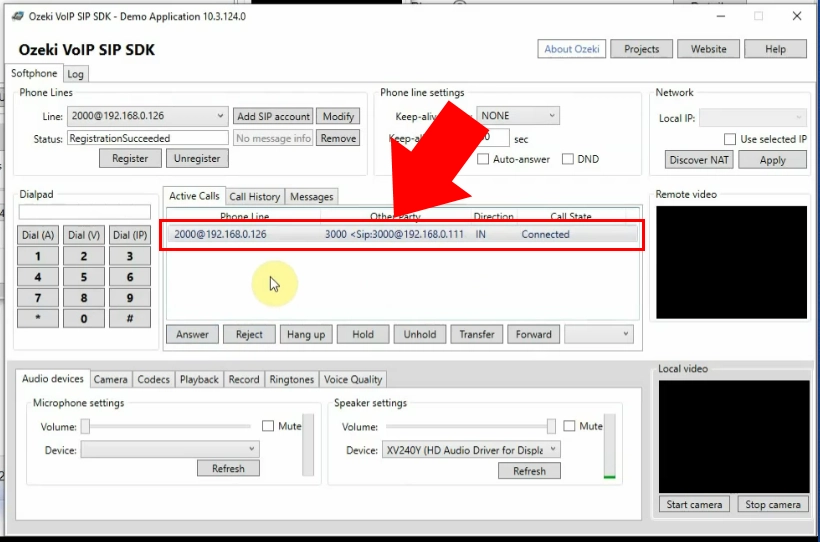
As per Figure 9, you are going to do the exact reverse of what you have done on Figure 8. You are going to call the number 2000 extension from the number 3000 extension, so you will call an extension connected to the Ozeki Phone System from an extension connected to the VoIP Service Provider:
Conclusion
Due to the Ozeki Phone System you can make VoIP calls from any communication devices achieved by a VoIP service provider. A VoIP PBX allows you to make connections regardless of place and time, by integrating communication devices. Following this guide, you will be able to connect a VoIP Service Provider easily to the Ozeki Phone System in a couple minutes.
For more information or assistance, please contact us at info@ozekiphone.com
Related pages:
More information
- How to connect VoIP telephone networks to Ozeki Phone System
- How to connect your ISDN phone line to the Ozeki
- How to connect Telephone Networks to Ozeki Phone System
- How to connect Analog Phone lines to the Ozeki Phone System
- How to connect your PBX to mobile telephone networks