How to send SMS from Ozeki Phone System by using Android SMPP SMS Gateway
The Ozeki Android SMPP SMS Gateway mobile application enables powerful SMS messaging through your Ozeki Phone System without using any GSM modems. For this purpose you need to establish an SMPP connection in the Ozeki Phone System and you will have to install the SMPP SMS Gateway application on your Android Mobile. If you follow the instructions below, you will be able to build an advanced SMS messaging solution into your communication system.
Video tutorial:
![]() How to send SMS from the Ozeki Phone System using Android SMPP SMS Gateway
How to send SMS from the Ozeki Phone System using Android SMPP SMS Gateway
What should you do to create a connection?
Step 1: Install the SMPP SMS GatewayStep 2: Create an SMPP connection in Ozeki XE
Step 3: Setting up Dial plans
Step 4: Send a test message

What is the Ozeki Android SMPP SMS Gateway?
The Ozeki SMPP SMS Gateway is a business application for Android Mobiles. It provides a powerful and effective solution to connect your IP system to the GSM network. (If you need more information please visit the the official website of this product where you can learn about technical specifications, setup guides and business features as well.)
Step 1: Install the Ozeki Android SMPP SMS Gateway
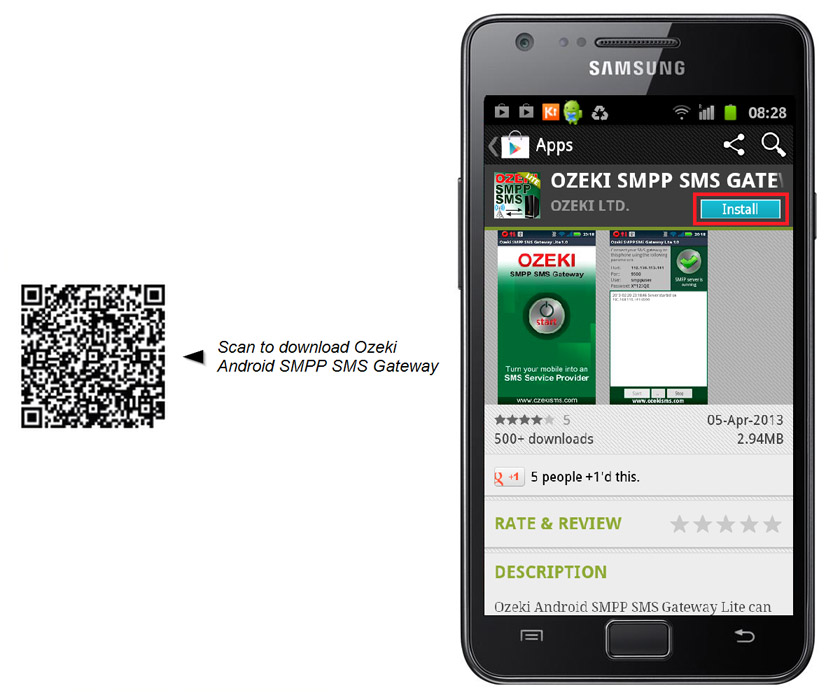
First of all, you need to download the Ozeki Android SMPP SMS Gateway on your Android smartphone from Google Play. After you have downloaded the application, your Android OS will install it automatically.
Choose from the following options to download Ozeki Android SMPP SMS Gateway:
- Option 1: Visit SMPP SMS website: Download SMPP SMS gateway
- Option 2: Scan the following QR code:
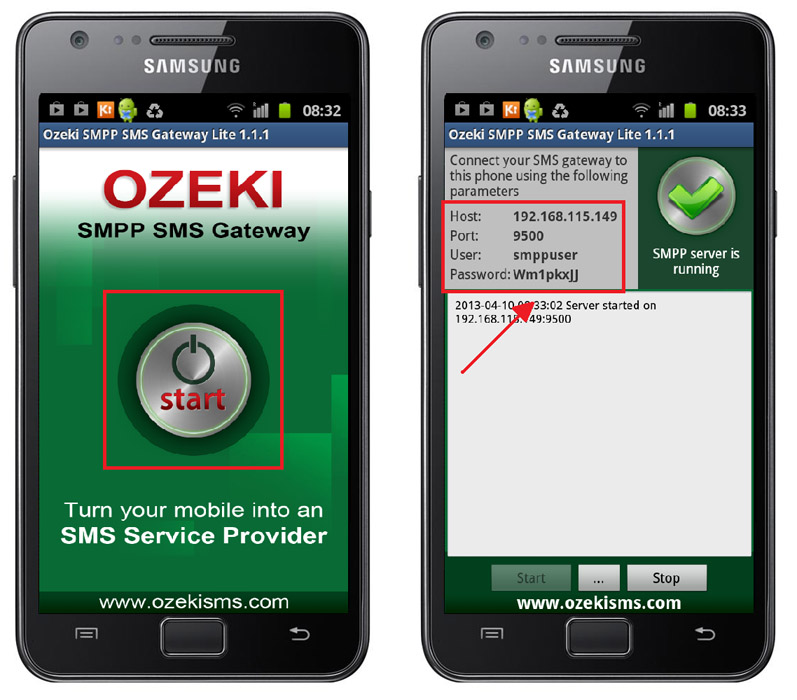
When you have finished the installation, launch the application by clicking on its icon. The home screen of the application will appear, where you need to click on the "Start" button. After that, the following can be seen at the top left-hand side of the screen: Host address, Port number, User name and Password (Figure 2). You have to use these parameters later, when configuring the SMPP connection in the Ozeki Phone System.
Step 2: Create an SMPP connection in Ozeki XE
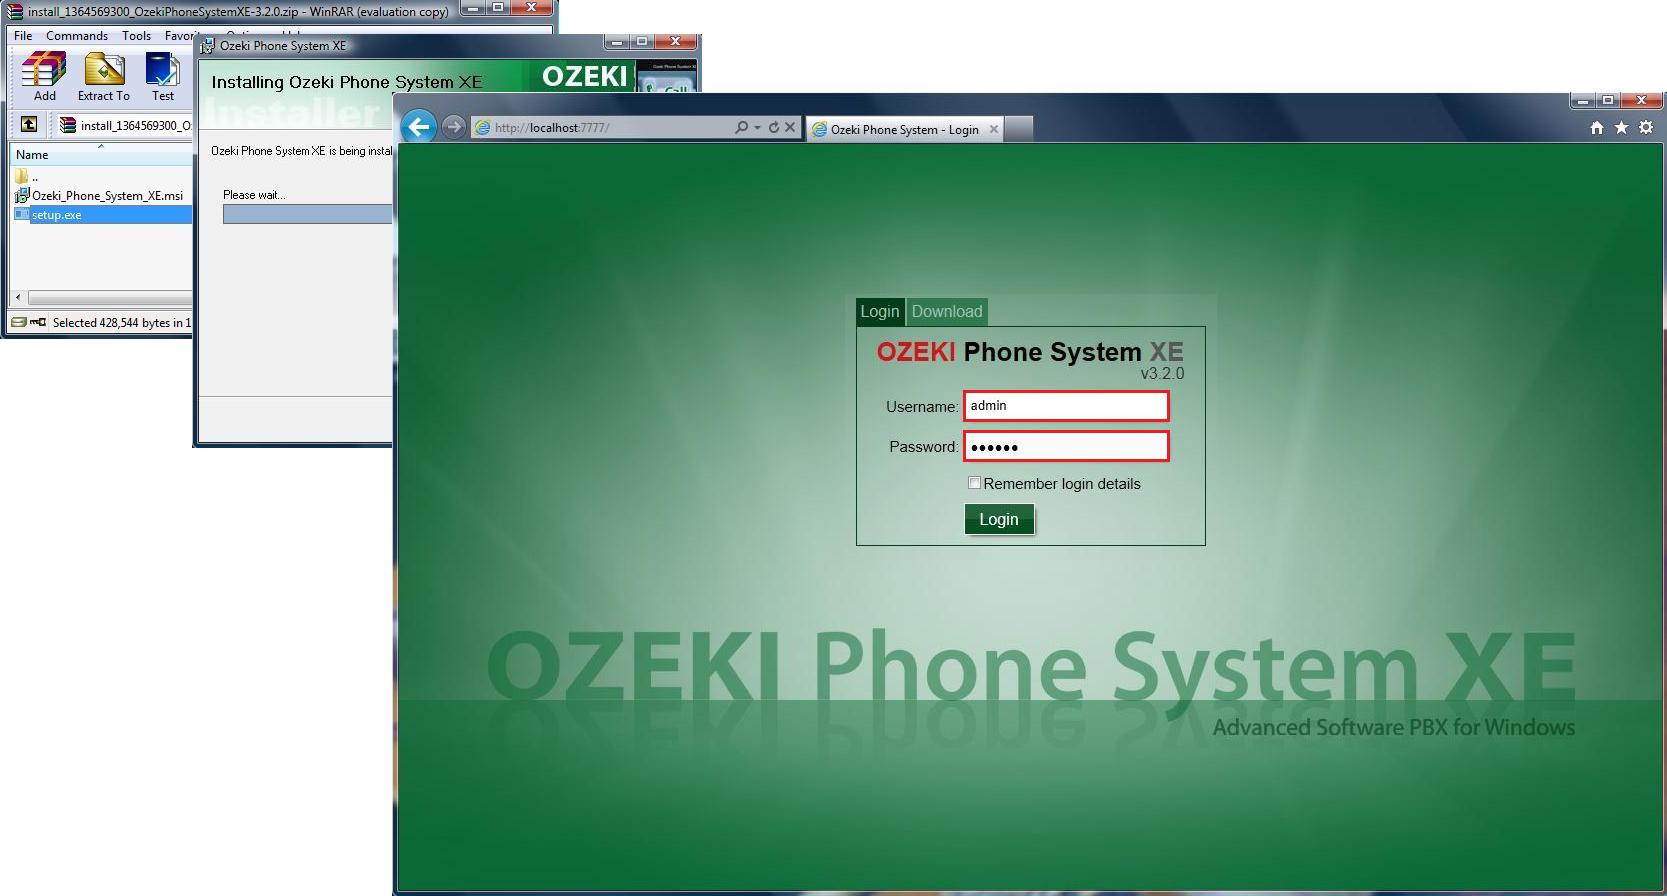
Firstly, you need to install the Ozeki Phone System. After you have downloaded the software, it is recommended to read the Quick Start Guide for detailed instructions and useful screenshots.
After launching the software, the login window can be seen on the WebGUI. Provide your Username and Password to login and to access your personal configuration (Figure 3). Click on "Login" button to continue.
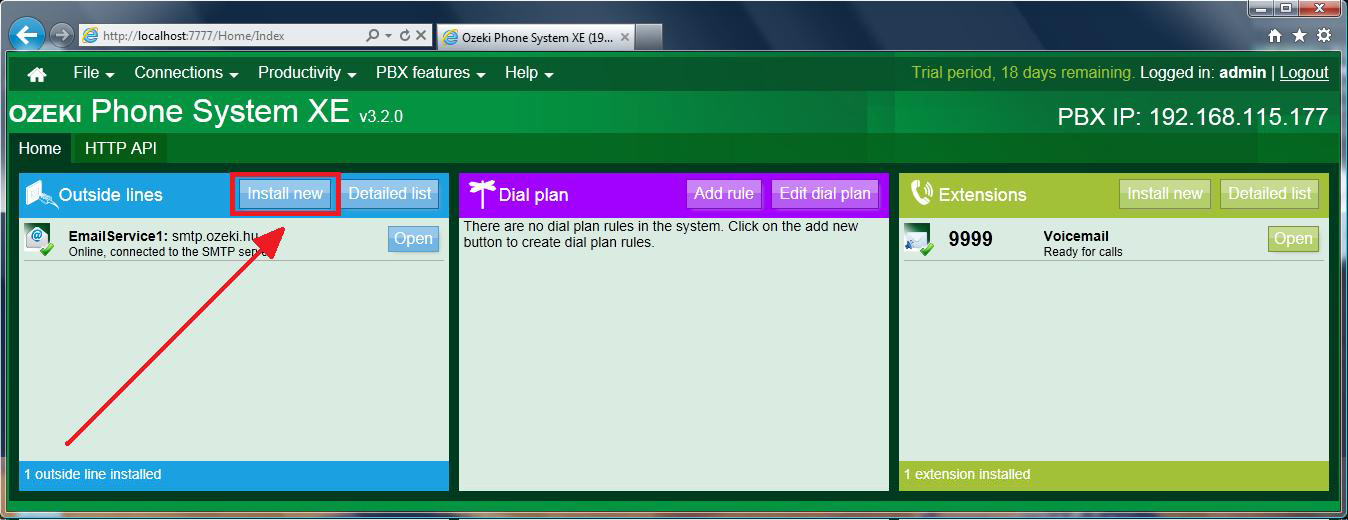
If you have specified your user details, you should focus on the blue "Outsides lines" panel on the left side of the screen. You need to click on the Install new button in the top right-hand corner of the Outside lines panel (Figure 4).
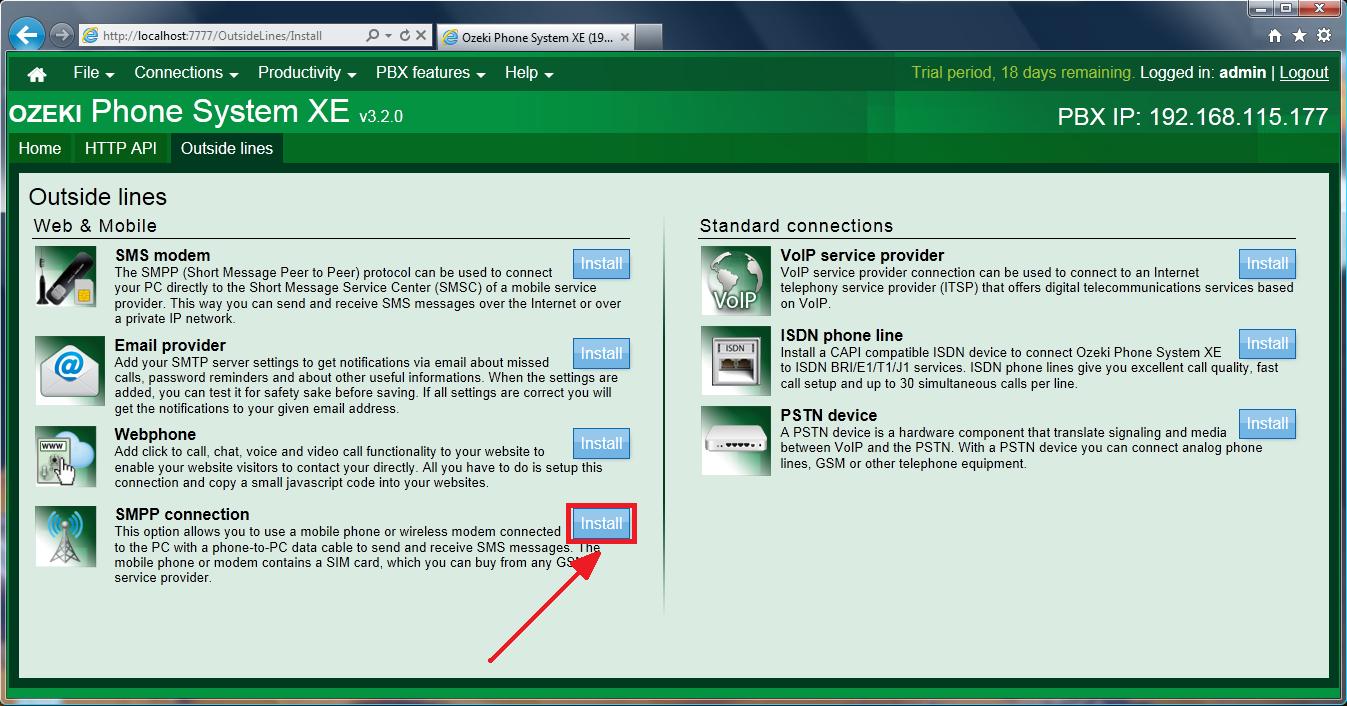
You will see the "Outside lines" window. Look for the "SMPP connection" item in the "Web & Mobile" column then click on the "Install" button (Figure 5).
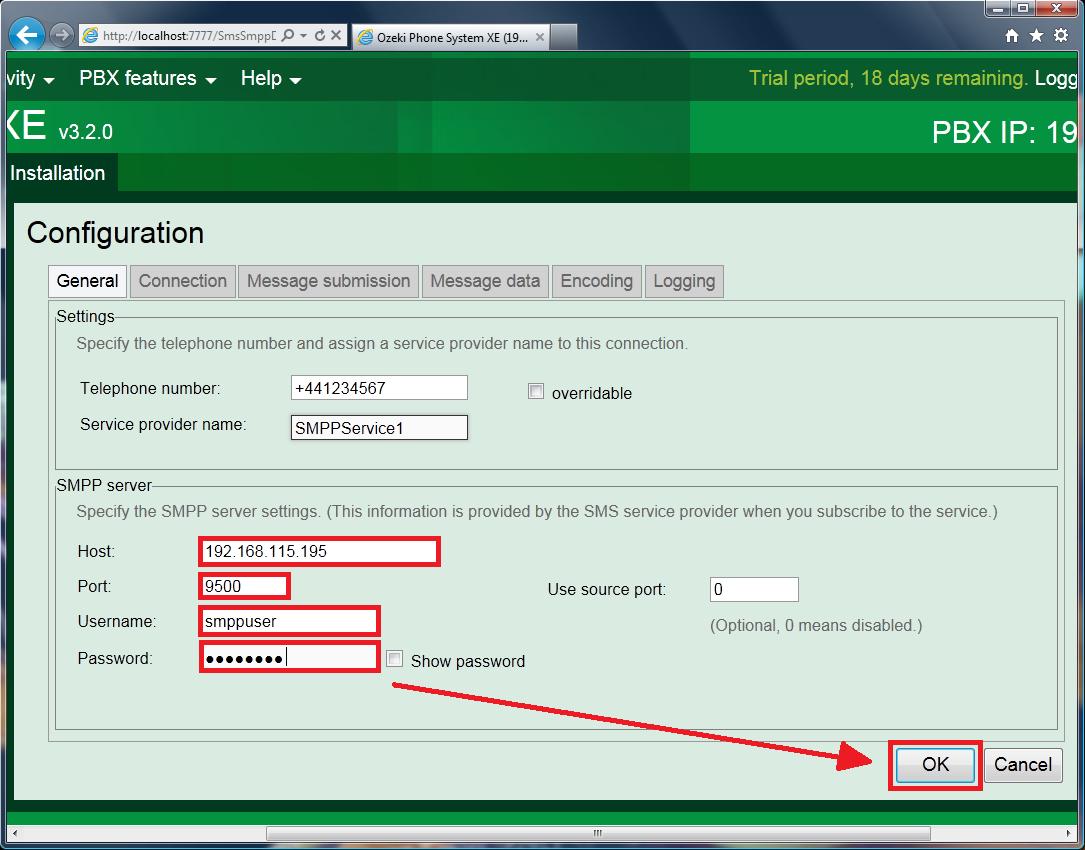
Now, a Configuration form can be seen, which contains 6 tabs. On the first "General" tab you need to enter the following parameters: Host number, Port number, Username, Password. You can find this information in your Ozeki Android SMPP SMS Gateway (see Figure 4).
In this tab you can also define the telephone number, that was used for this connection and the service provider name as well. If you select the "overridable" checkbox, you can replace the default telephone number with a different one to be displayed as the sender of an outgoing message. You can also replace the number with text (up to 11 characters - such as: "Sample Ltd."). As a result, before you send your message, you can enter any different phone number or a name as the sender ID of the message.
In the other tabs leave all configuration values on default settings. When you have finished these steps, click on "OK" button (Figure 6).
After you have provided the proper parameters and clicked on "OK", the Log panel will appear. The following messages show that the SMPP connection has been installed successfully: "Communication channel has successfully opened from [your PBX IP] to [your SMPP server IP]. In addition, your Android SMPP SMS Gateway application also displays a message, which refers to the successfull configuration: "Client successfully login with 'smppuser' username." (Figure 7).
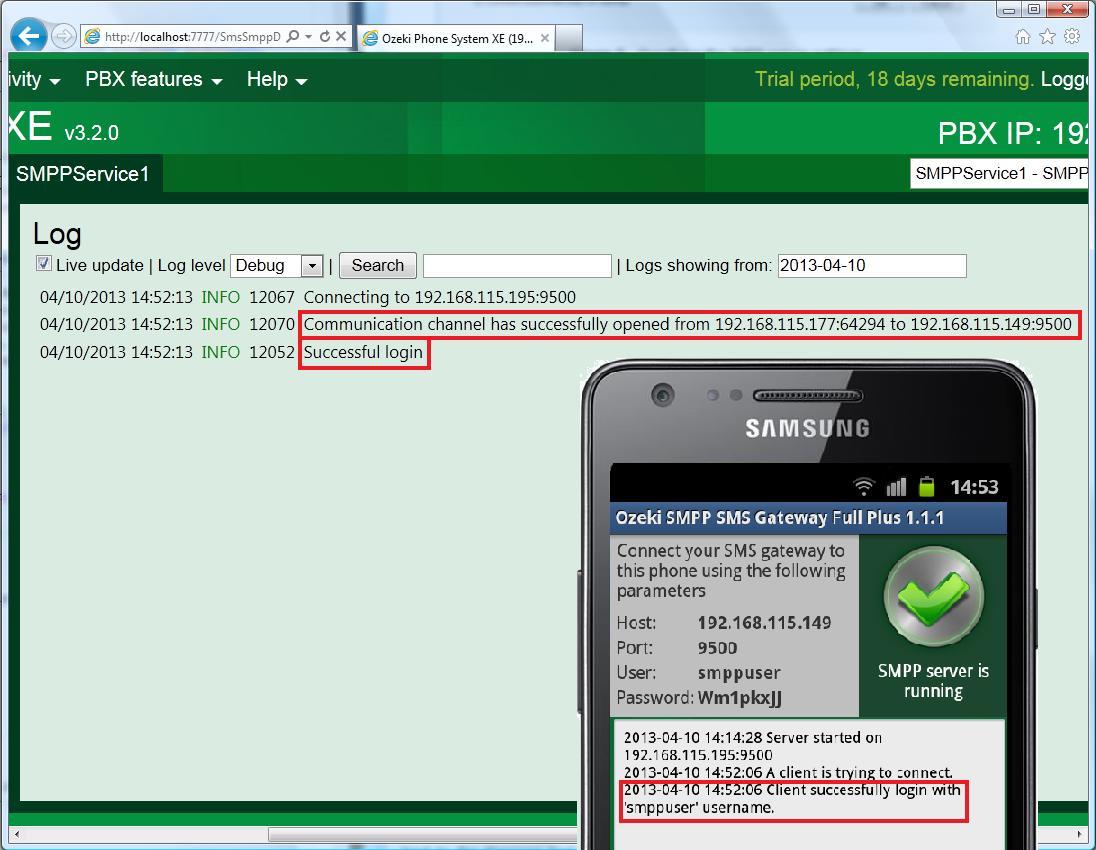
When you get a message about successfully creating an SMPP connection, your mobile is ready to work as an SMPP SMS gateway and you are able to compose and send messages from the Ozeki Phone System.
Step 3: Setting up Dial plans
Step 4: Send a test message
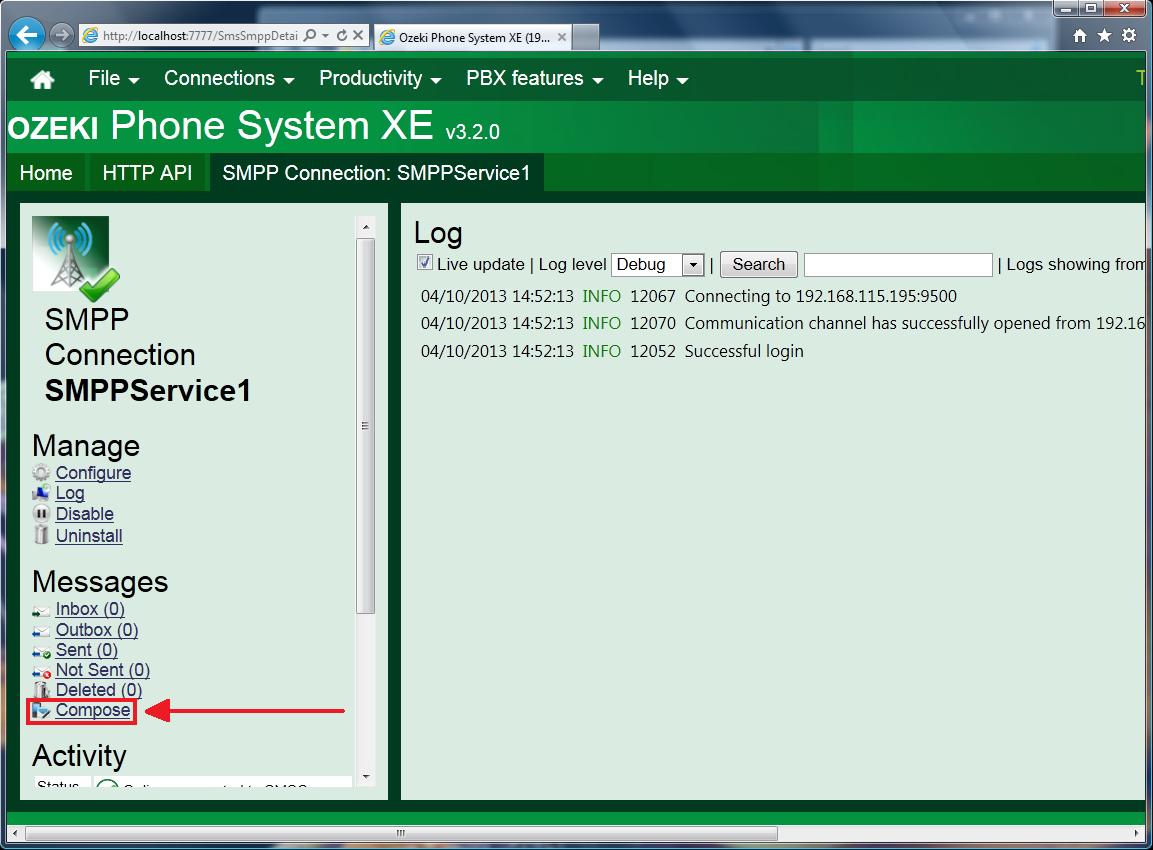
On the left side of the screen the "SMPP Connection" panel can be seen. Here you can find all options related to managing the SMPP connection and sending messages. To compose and send an SMS message, click on the "Compose" text link within the "Messages" toolbox (Figure 8).
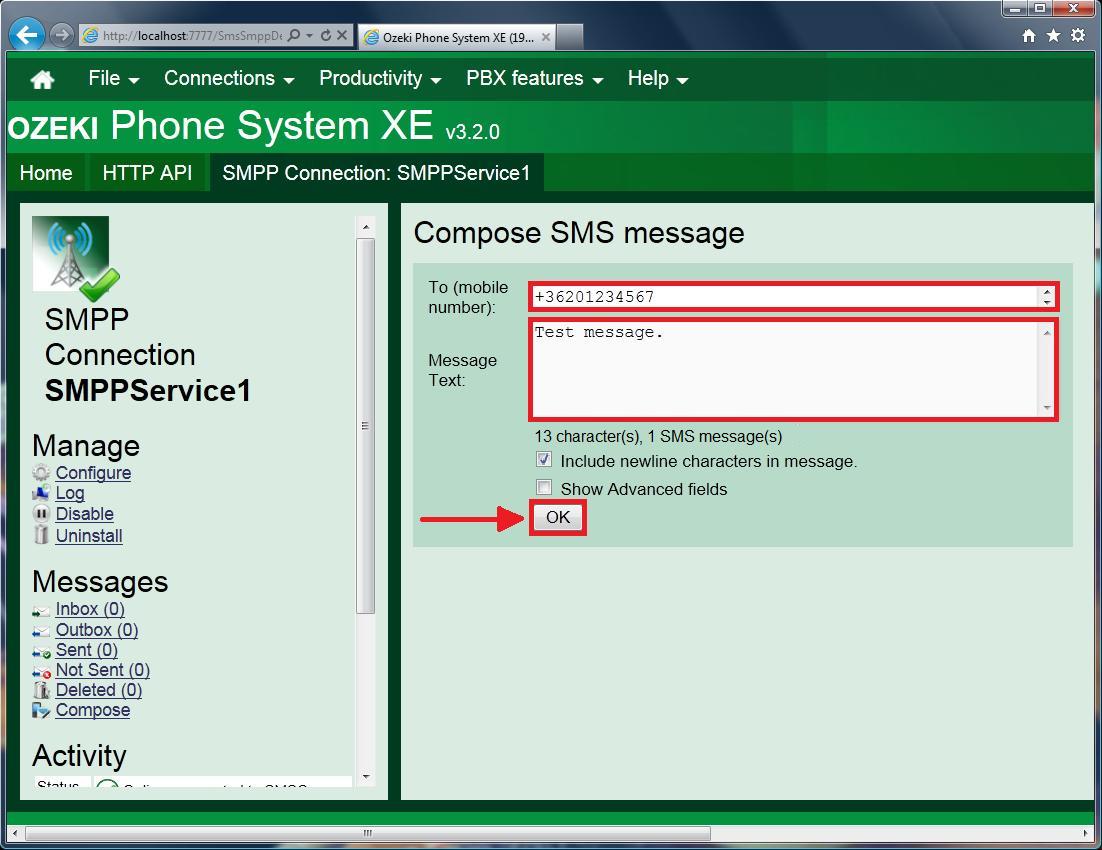
If you clicked on "Compose", the "Compose SMS message" panel will appear. Firstly, you need to enter the recipient phone number in international format (starting with "+") in the "To (mobile number)" edit box. After that, compose your message in the "Message Text" edit box (Figure 9).
Under the Message text box there is a character counter, which shows that your SMS message will be sent as one or more messages.
Here you can find two checkboxes as well. Select the first checkbox ("Include newline characters in message."), if you want to enter new lines in "Message text box" in order to display them as new lines in the sent SMS as well. Check the "Show Advanced fields" if you need special settings. In this case two new fields will appear in the top of the compose form: "Message Type" (where you can select the appropriate message type) and "Sender ID" (where you can specify a unique telephone number or a name to display as a sender ID). When you are finished, click on the "OK" button (Figure 9).
Conclusion
After studying the guide, you will be able to install and configure an SMPP connection with the Ozeki Phone System to send SMS messages from your PBX to any mobile phone. By using the Ozeki Android SMPP SMS Gateway there is no need for any GSM modems. Installation is easy and only takes a few minutes, and the application guarantees powerful SMS messaging and reliable operation.
If you have any questions or need assistance, please contact us at info@ozekiphone.com
People who read this also read...
- How to connect your Android Mobile to Ozeki Phone System
- How to connect your Apple Mobile to Ozeki Phone System
- How to create mobile extensions in Ozeki Phone System
- How to create advanced VoIP telephone network
- Everything about Webphone Technology - Live chat, voice calls, video calls, click to call
