IVR Studio
For developer
Introduction
The Ozeki IVR Studio sample program package is a system combined by 2 applications developed for Ozeki Phone System. It consists of an IVR Studio Designer where the user can easily construct the appropriate IVR system on the GUI (Graphical User Interface) and save it to a project file. According to this, it can be said that the role of the designer is to design and create the desired IVR system. The second application is the IVR Studio, which will use the previously mentioned, designed and saved project with the help of a designer application. In a way that according to the designed IVR menu structure it will provide the answer based on the appropriate menu for the DTMF signals of the incoming calls.
IVR briefly
The Interactive Voice Response (IVR) systems are programs that simply play audio streams into the call after answering it and navigate the caller customer in a so-called IVR tree structure until the customer gets to the answer they seek or the tree gets to a dead end. The customer can navigate in the IVR tree using different methods but the simplest way is using the numeric keypad and sending DTMF signals.
DTMF is a signaling system that is used in telephoning for sending simple information from one end to another. Every keypad button on a telephone has a special frequency signal that is transferred into the call when the person presses the button. The signal of the given buttons is standard, so it can be perfectly used for getting information from the other end.
The document will introduce the usage of the IVR Studio in 2 main parts (Designer and Studio) alongside with the programmer elements, which were used in the implementation.
Software requirements
- Operating System: Microsoft Windows XP or newer
- .NET Framework 4.0
- Microsoft Visual Studio 2010, 2012
- Ozeki Phone System
Installation and Configuration of Ozeki Phone System
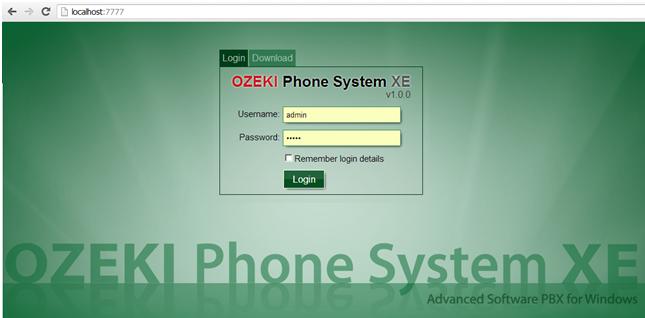
In order to connect to the server, Ozeki Phone System has to be installed. A Setup Guide can be found here: How to install and configurate your Ozeki Phone System, the installation package can be downloaded from the following page: Download. After the installation, the main page of the PBX can be accessed on the http://localhost:7777/Home address.

For the first login attempt, use the username and password, which was provided during the installation process.
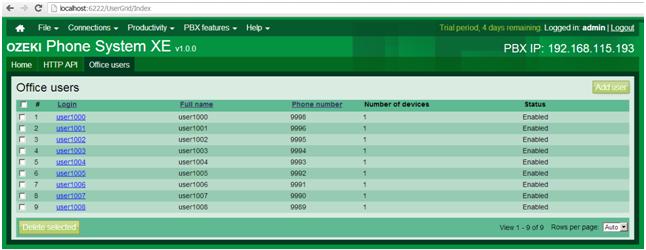
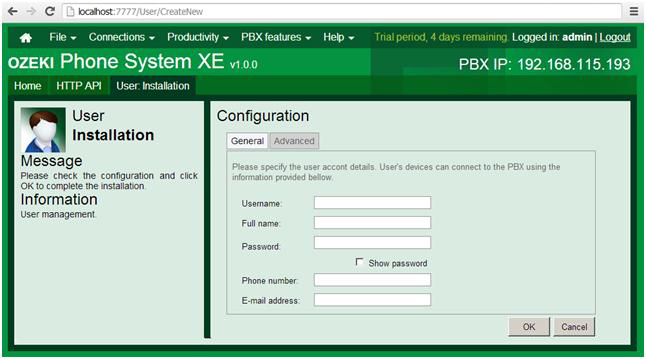
New user can be added to the system with the Add user button. It can be found under the Office users menu item in the Connections menu.

The username and password specified here can be used to connect to the system, in the OPSClient LoginAsync method.

Project development
- Let us create a new WPF Application project with the help of File/New/Project menu item.
- Let us add the OPSSDK.dll file to the project references in the Solution Explorer by clicking on Add Reference… menu item. This will ensure the connection interface to Ozeki Phone System.
Ozeki IVR Studio Designer
GUI and usage
The application devides into well separated sections. On the left side the menu toolbox can be seen from where we use Drag&Drop – Standing on a menu item with the mouse, click and hold the left mouse button and drag it to the desired place and then release the left mouse button – to assemble our IVR menu structure on the section, which is placed on the right side of the toolbox. Here the opportunity is given to select the given menu and then on the lower part of the picture, we can set the features, which are assigned to the menu. The assembled IVR project can be saved to a .ozivr projectfile, which will be used by the IVR Studio to operate the IVR system.
Supported menu item types
- Info reader menu
- Voice message recorder menu
- Call transfer menu
ViewModels
-
VmMain
public RelayCommand<object> CommandNewProject { get; private set; }
private void Init() { CurrentProject = new VmIVRProject(); CurrentProject.IVRMenuRoot = new VmIVRMenuElementInfoReader(); CommandDeleteMenu = new RelayCommand<TreeViewItem>(DeleteIvrMenu); CommandTreeViewItemChanged = new RelayCommand
