How to setup Ozeki Webphone Gateway with Wordpress
By connecting a webphone to the Ozeki Phone System XE you can make it possible for your customers to reach your support staff easily. Any web browser is capable of handling microphones and web cameras, making voice and video chat become available. This leads to numerous new possibilities: fast, effective and easy-to-use availability (results in higher income) for companies, great quality communication and also fast, effective and easy-to-use accessibility for the customer.
This guide helps you to build your own CMS system with a Webphone Gateway. It creates more possibilities to reach your customers or your friend over the webphone connection. You can easily create this webphone if you follow the steps and configure the tools which are important for the connection. Ozeki Wephone Gateway provides you a new facility in world wide web. You can use it for your own business and aims. In order to build your own Webphone Gateway and start calling your contacts, you need to connect Ozeki Phone System XE to your CMS System.
System architecture
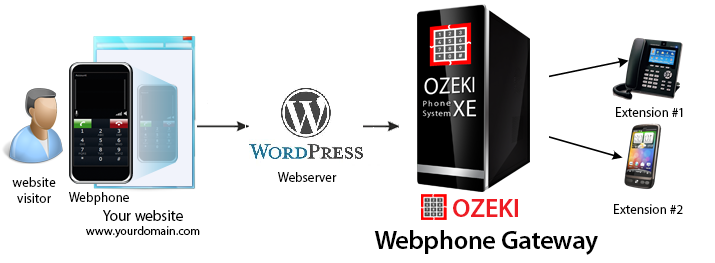 Figure 1 - Connect with Wordpress
If you follow the steps of the configuration guide below, you will have own CMS system which is connected to Ozeki Webphone Gateway. The system will work as follows:
- Create your own Wordpress website
- Add Ozeki Webphone Gateway to your own site.
- Connect the Webphone with Ozeki Phone system XE
- You can start call your contacts via Ozeki Phone System XE Webphone Gateway
In this few step you get information about how can you configure and build your own CMS system with Ozeki Webphone Gateway. Before you start to configure this solution it is assumed that you have already installed your Ozeki Phone System XE, downloaded from this page. You will also need a configured webserver like XAMPP or Wamp.
Step 1.) Install Wordpress
First, download the newest version of Wordpress from the official web page. Unpack the files to the directory of your webserver. Open your browser and type the following text: http://localhost in the search bar. It will navigate to the Wordpress directory from the main page. Now you can start to install your CMS system. If the wp-config.php does not exist in the file system, you can create it from the installer. After it in the next page, press 'Let's Go!'. You should create a new table in your database and enter the connection details, like name, username, password, host and table prefix. Press 'Submit' to proceed. (Figure 2)
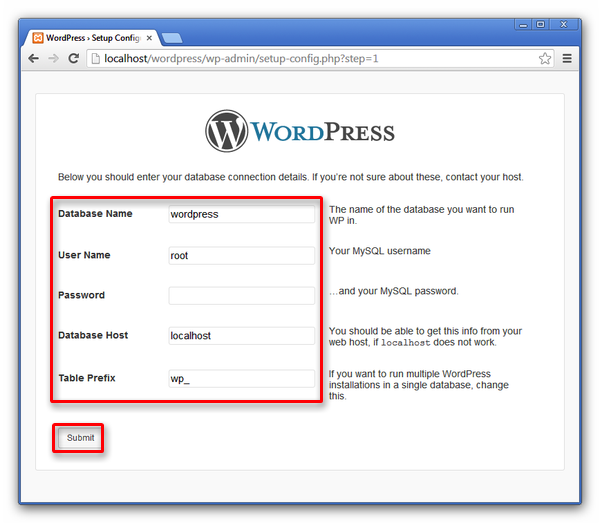 Figure 2 - Database connection
In the site information page, enter the title, username, your password twice and
your e-mail. Finally click 'Install Wordpress'. ('Figure 3')
Then
run the installation and after it finished, log in wih your username and password.
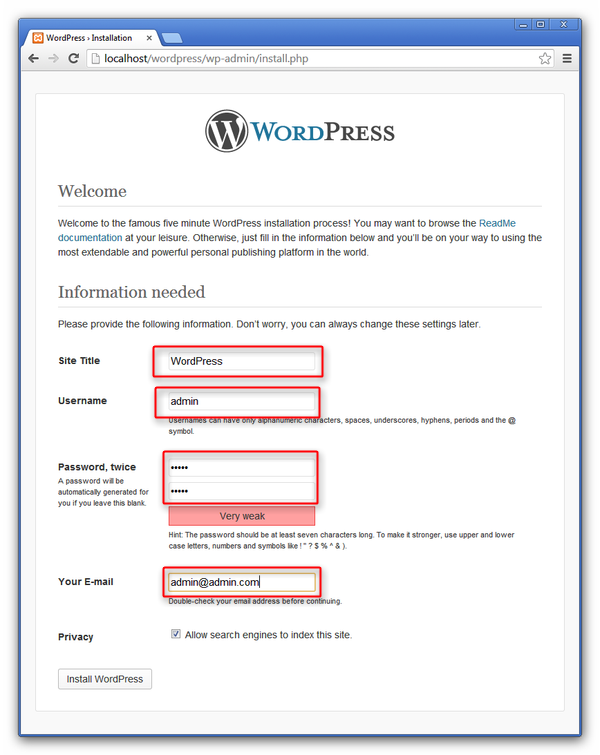 Figure 3 - Site information
Step 3.) Connect Wordpress with Ozeki Webphone Gateway
When you set up everything, mentioned before, go to your webpage. Log in as administrator, then go 'Howdy, admin' - > 'Edit My Profile' to modify your site. ('Figure 4')
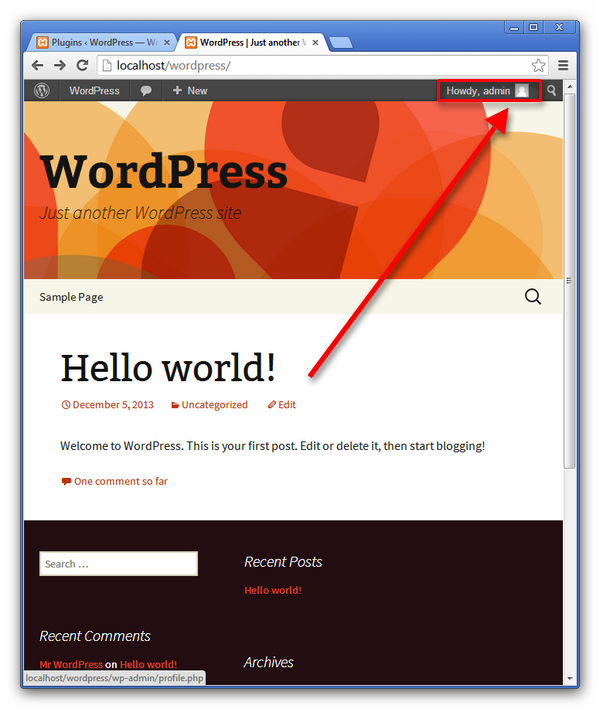 Figure 4 - Enter admin mode
To use JavaScript in Wordpress, you have to install a plugin, made for this purpose. In this example, we used HTML JavaScript Adder. Go to 'Plugins' - > 'Installed Plugins', select 'HTML JavaScript Adder', then select 'Activate' and click 'Apply'.('Figure 5')
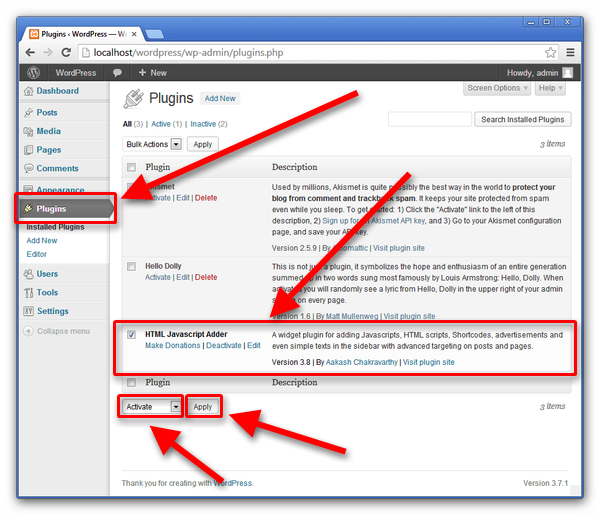 Figure 5 - Active HTML JavaScript adder plugin
Once your plugin is added, go to 'Appearance' - > 'Widgets', then drag and drop the JavaScript Adder to the Main Widget Area.('Figure 6')
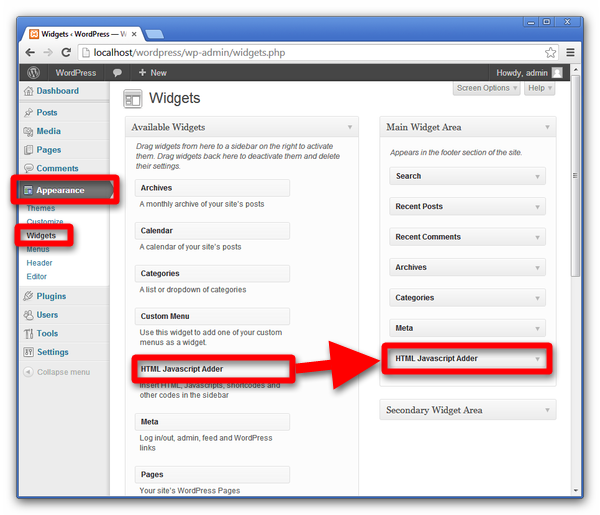 Figure 6 - Add new widget to your page
Paste the generated code into the content of the JavaScript Adder. Note that, if the PBX and the webserver are hosted in different computers, you have to replace the generated IP address with the address of the PBX. Also change the port number to 80. To save the changes click 'Save'. (Figure 7)
 Figure 7 - Insert webphone code
Step 4.) Make a test call
Now click on your webphone. A popup window will appear, where you will be able to make calls. (Figure 8)
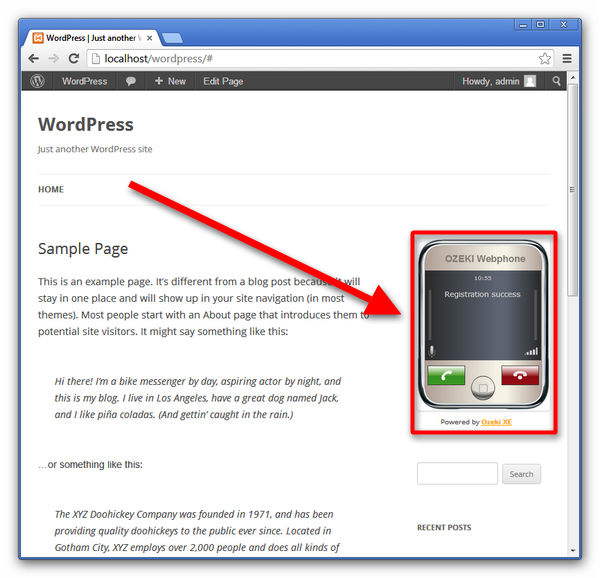 Figure 8 - Make a test call
You can dial your own SIP devices if you click on the calling button. You should set a dial plan, don't forget to set it, because it will transmit the call to your customer (Figure 9).
 Figure 9 - Check calling on Call History
If you have followed these steps, then you have installed the Ozeki Gateway and the WordPress CMS system and you have made phonecalls over the Webphone Gateway in your web browser. In these steps you could learn new possibilities of the CMS system of your business. You can add your Webphone Gateway into your website or your CMS system. If you have followed these steps and you have finished the configuration, then you can make phonecalls over the Webphone and you can dial your own phones and other devices which support the SIP protocoll.
If you have any questions or need assistance, please contact us at info@ozekiphone.com
Dig deeper!
People who read this also read...