LinkSys SPA 3102 setup
This guide will walk you through the process of connecting your LinkSys SPA3102 VoIP Analog Telephone Adapter (ATA) to the Ozeki AI Phone System. By following the steps outlined here, you'll learn how to reset the device, configure it to accept calls, register it to your PBX, and integrate it with AI-powered phone lines. Whether you're setting up a basic VoIP connection or enabling advanced AI-driven call handling, this tutorial ensures a smooth integration between your LinkSys SPA3102 and the Ozeki AI Phone System for seamless communication.
Register LinkSys SPA 3102 to the PBX (Quick Steps)
- Access the LinkSys SPA 3102 web interface and open the Voice settings.
- Switch to Admin Login for advanced configuration options.
- Enter SIP authentication details under Line 1 settings.
- Set the outbound phone number or extension.
- Save changes and verify that the device is registered to the PBX.
Add new AI Phone lin in Ozeki AI Chat server (Quick Steps)
- Install the AI Phone Agent in Ozeki AI Chat Server.
- Configure SIP settings to connect to your PBX.
- Assign Speech-to-Text and Text-to-Speech AI models.
- Turn on the AI Phone Agent and verify PBX registration.
- Create a new route for handling calls.
Configure asterisk dial plan (Quick Steps)
- Open the ozeki_ext.conf file on your Asterisk server.
- Add the public dial plan to route calls to SIP endpoints.
- Save the configuration and open the Asterisk console.
- Run the reload command to apply the new dial plan settings.
Product manual
ATA_AG_v3_200809_AdminGuide.pdf
How to reset the device
Connect an analog phone to the FXS port with a telephone cable. Dial **** to access the IVR, then dial 73738# to reset the unit.
Register LinkSys SPA 3102 to the PBX (Video tutorial)
In this video, you will learn how to configure your LinkSys SPA 3102 VoIP adapter to successfully register with your PBX system. The tutorial will guide you through accessing the device’s web interface, switching to admin mode, and setting up the necessary SIP authentication details on Line 1. You'll also see how to define the phone number for outgoing calls and verify that the device is properly registered to the PBX. By the end of this video, your LinkSys SPA 3102 will be ready to handle VoIP calls through your PBX network.
Step 1 - Open Voice settings
Access the LinkSys SPA 3102 web interface through your browser and navigate to the "Voice" tab where all VoIP configuration settings are located. This is where you'll begin setting up the device for PBX registration (Figure 2).

Step 2 - Change to admin login
Switch to advanced configuration mode by selecting the "Admin Login" option. This will unlock additional settings required for SIP and network configuration (Figure 3).

Step 3 - Set auth info for Line1
In Line 1 settings, enter SIP account details such as Proxy and Registration details, and Subscriber details. This information allows the device to authenticate itself to your PBX (Figure 4).

Step 4 - Set phone number to call
Specify the phone number or extension that the device will use for outbound calls. This ensures that the SPA 3102 can properly route calls through the PBX system, then Submit All Changes (Figure 5).

Step 5 - Registered to PBX
Once all settings are applied, check the registration status. A successful registration indicates that the LinkSys SPA 3102 is now connected to the PBX and ready to handle VoIP communications (Figure 6).

Add new AI Phone lin in Ozeki AI Chat server (Video tutorial)
In this video, you will learn how to set up an AI phone line within the Ozeki AI Chat Server to enable intelligent call handling. The tutorial will guide you through installing the AI Phone Agent, configuring SIP settings to connect your PBX, and assigning Speech-to-Text, Text-to-Speech models for AI-driven conversations. You’ll also see how to register the AI phone line to the PBX and create routing rules for managing calls.
Step 6 - Install AI phone agent
Start by installing the AI Phone Agent in Ozeki AI Chat Server. This component will handle VoIP communication and AI integration for phone calls (Figure 7).

Step 7 - Configure SIP settings
Enter your SIP account details, including display name, username, register name, password, domain, port, proxy parameters to connect the AI phone line to your PBX system (Figure 8).

Step 8 - Set AI speech models
Assign the Speech-to-Text, Text-to-Speech models to the AI phone agent. These models will enable real-time voice recognition, AI responses, and voice synthesis during calls (Figure 9).

Step 9 - AI phone registered to PBX
Once configured, verify that the AI phone line has successfully registered with your PBX. Turn the status indicator on (Figure 10).

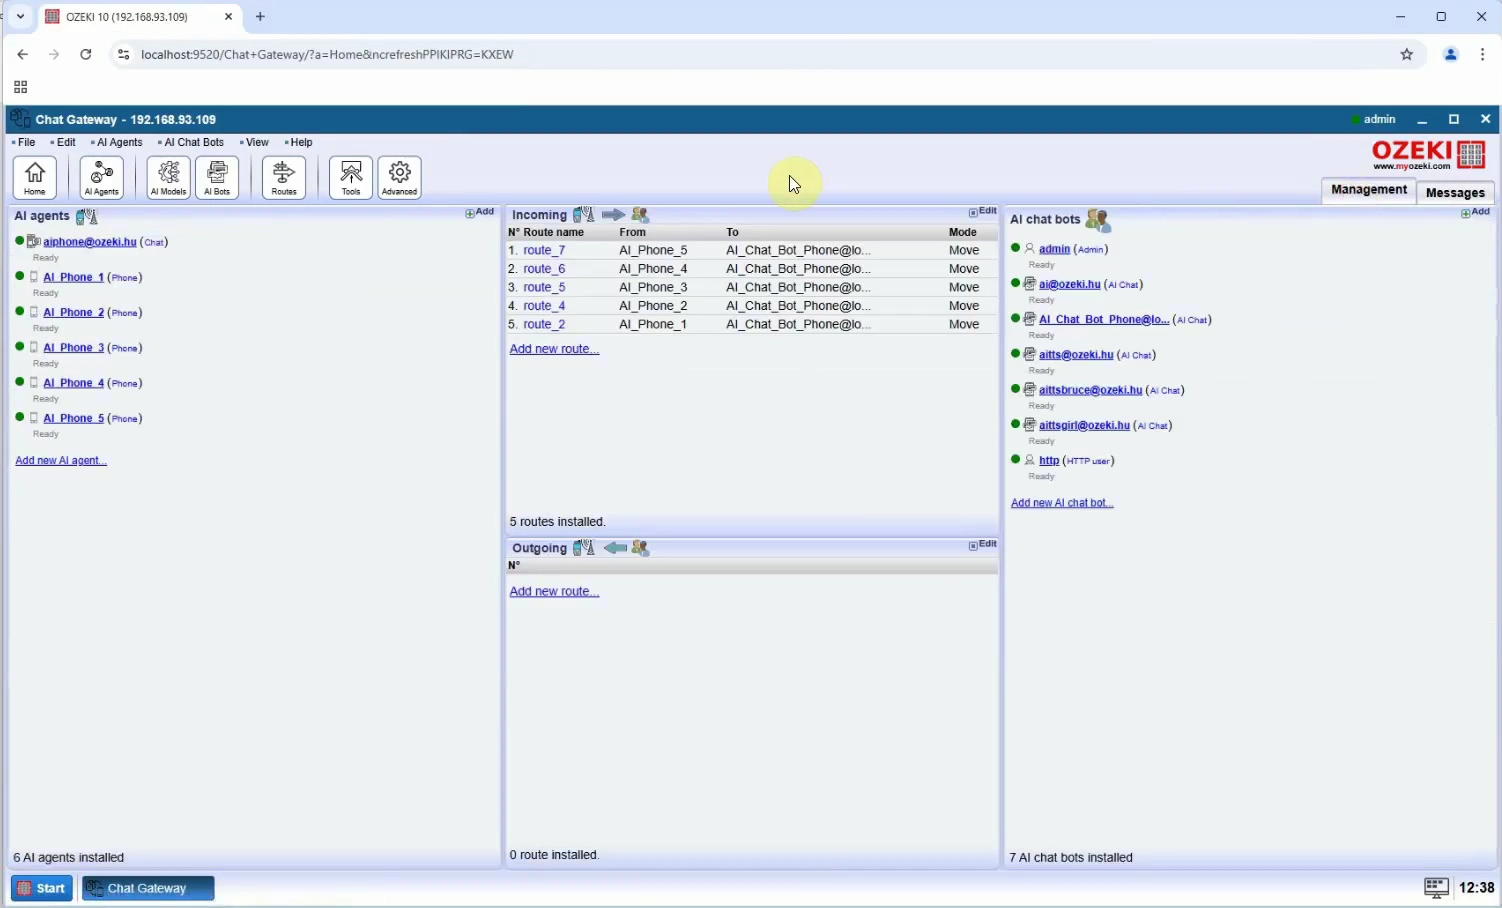
Step 10 - Create new route
To set up a new route, click the "Routes" button located at the top of the screen. Then, select "Create new Route" and configure the sender and receiver routes on the right side (Figure 11).

Step 11 - AI phone connection created
After completing the setup, your AI phone connection is fully operational. The AI system is now ready to handle and respond to phone calls intelligently (Figure 12).
Configure asterisk dial plan (Video tutorial)
In this video, you will learn how to configure the Asterisk dial plan to properly route calls through your PBX system. The tutorial will guide you through accessing the Asterisk configuration files, editing the extension settings to define how calls are handled, and applying the changes by reloading the Asterisk service. By the end of this video, your PBX will be set up to forward calls to the correct SIP endpoints, ensuring smooth communication between your LinkSys SPA 3102, Ozeki AI Phone System, and Asterisk server.
Step 12 - Open asterisk extension config file
Access your Asterisk server and open the ozeki_ext.conf configuration file using a text editor like nano. This is where you will define how calls are routed within your PBX system (Figure 13).
nano /etc/asterisk/ozeki_ext.conf

Step 13 - Configure public dial plan
In the config file, add the public dial plan rules. Use the provided syntax to ensure that calls matching the pattern (_ZXXX) are forwarded correctly to SIP endpoints. Save the changes once done (Figure 14).
[public]
exten => _ZXXX,1,Dial(SIP/${EXTEN},,r)

Step 14 - Reload asterisk config
After updating the configuration, open the Asterisk console by typing asterisk -rvvvvvvv. Run the reload command to apply the new dial plan without restarting the server, ensuring your changes take effect immediately (Figure 15).
asterisk -rvvvvvvv
reload
