How to connect HT813 Grandtream ATA to Ozeki AI
The Grandstream HT813 is a reliable 2-port Hybrid ATA, enabling users to integrate their analogue phones with VoIP services. This page guides you through configuring the HT813 for use with your Ozeki AI Phone system, detailing setup for its FXO and FSX ports, SIP account registration), and codec selection (including G.729 and T.38 for fax). All settings are manageable via its user-friendly web interface or through a provisioning server.
What is Ozeki AI?
Ozeki AI Server is a powerful self-hosted software platform designed to run and manage AI models locally or on private networks. It enables businesses and developers to build advanced AI-based solutions by integrating language models, chatbots, voice assistants, and other intelligent tools into their systems without relying on third-party cloud services.
What is HT813 Grandtream ATA?
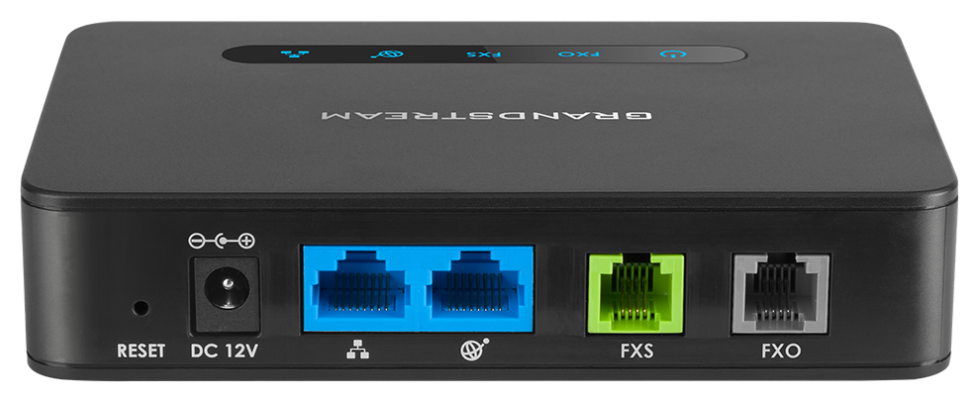
The Grandstream HT813 is a hybrid VoIP Analog Telephone Adapter (ATA) equipped with one FXS port for connecting analog phones and one FXO port for connecting to a telephone line. It supports up to three SIP accounts and provides features such as T.38 fax support and various codecs like G.729 and G.711. The device allows users to bridge traditional telephony with modern VoIP systems, and it can be configured easily through a web interface or a provisioning server.
About the device
The device is officially called: Grandstream Hybrid ATA with 2 Ports HT813 VoIP Analogue Telephone Adaptor

- The device has 1 FXS and 1 FXO port
- The device supports 3 SIP accounts
- The device supports T.38 fax
- The device supports G.729 codec
- The device supports a variety of other codecs (G.711, iLBC, etc.)
- The device can be configured via web interface or using a provisioning server
Register ATA to PBX (Quick Steps)
- Login to ATA
- Provide SIP data
- Basic settings, configure SIP number to dial
- Verify ATA registration
Add new AI phone connection in Chat Server (Quick Steps)
- Install AI Phone Agent
- Configure SIP settings
- Configure AI speech models
- Connect AI Phone to PBX
- Create a new routing rule
- AI Phone operational
Register ATA to PBX (Video tutorial)
In this video, you will learn how to register the Grandstream HT813 ATA device to your PBX system. The tutorial walks you through logging into the ATA’s web interface, entering the necessary SIP account credentials, adjusting basic VoIP settings, and configuring the dial-out number. By the end of the video, you will have a successfully registered HT813, ready to route calls between your analog devices and your VoIP network.
Step 3 - Login to ATA
Access the Grandstream HT813 web interface by entering its IP address in your browser. Log in using the administrator credentials to start configuring the device (Figure 3).

Step 4 - Provide SIP data
Navigate to the SIP Settings section and fill in the fields, enter the IP address of the PBX server, the Proxy and the SIP username and password assigned to the ATA device, as shown in the screenshot (Figure 4).

Step 5 - Open Basic settings
Go to the Basic Settings menu to change the general network and call behaviour settings and scroll down to the bottom of the page (Figure 5).

Step 6 - Configure SIP number to dial and apply chnages
Set the outbound dial settings by entering the SIP number or extension, the Sip Server and the Sip Destination Port, the ATA should use when initiating calls. Apply and save the configuration changes (Figure 6).

Step 7 - ATA registered to PBX
After saving all changes, check the registration status. The HT813 should now display a successful connection to your PBX server (Figure 7).

Add new AI phone connection in Chat Server (Video tutorial)
In this video, you will learn how to add and configure a new AI phone connection in the Ozeki AI Chat Server. The tutorial covers installing the AI Phone Agent, setting up SIP credentials to register with your PBX, and linking AI speech models for voice interaction. You’ll also see how to verify the phone line’s registration, create routing rules, and ensure that incoming and outgoing calls are handled intelligently by the AI system. By the end of the video, your AI phone connection will be fully operational and ready to provide real-time AI-driven voice communication.
Step 8 - Install AI phone connection
Start by installing the AI Phone Agent in Ozeki AI Chat Server. This component will handle VoIP communication and AI integration for phone calls (Figure 8).

Step 9 - Configure SIP settings
Enter your SIP account details, including display name, username, register name, password, domain, port, proxy parameters to connect the AI phone line to your PBX system (Figure 9).

Step 10 - Configure AI speech
Assign the Speech-to-Text, Text-to-Speech models to the AI phone agent. These models will enable real-time voice recognition, AI responses, and voice synthesis during calls (Figure 10).

Step 11 - AI Phone connected to PBX
Once configured, verify that the AI phone line has successfully registered with your PBX. Turn the status indicator on (Figure 11).

Step 12 - Add new routing rule
To set up a new route, click the "Routes" button located at the top of the screen. Then, select "Create new Route" and configure the sender and receiver routes on the right side (Figure 12).

Step 13 - AI Phone connection created
After completing the setup, your AI phone connection is fully operational. The AI system is now ready to handle and respond to phone calls intelligently (Figure 13).
