Ozeki voip sip client
With Ozeki VoIP SIP SDK, you have the opportunity to make your own VoIP products, for instance a softphone or even your own PBX. Only NuGet is essential, to start developing your very own applications. This guide helps you how to start and how to continue your project.
Download example from nuget.org: http://www.nuget.org/packages/ozeki.voip.sip.client/
Prerequisites
- Visual Studio 2010 or newer
- PBX installed on your PC (e.g.: Ozeki Phone System) (Download now)
- A connected softphone
Install nuget package manager
With Installing the NuGet Package Manager, you can download and easily update the project (VoIP SIP SDK and the corresponding sample program). The NuGet is available for Visual Studio 2010, 2012.
Install into Visual Studio 2010:
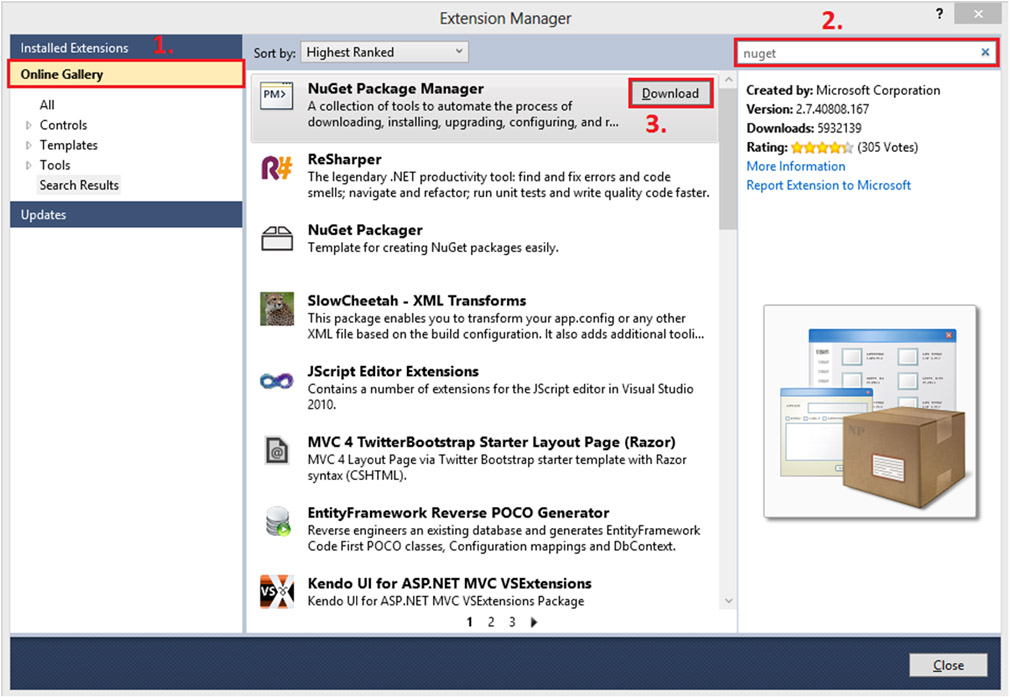
An extension can be installed to the Professional, Premium, and Ultimate editions. First of all select the ’Tools’ menu and ’Extension Manager…’. In Extension Manager select Online Gallery, and click to the ’Search Online Gallery’ field in the upper right corner. Then type in the NuGet word. After finding the ‘NuGet Package Manager’ extension, click to the ’Download’ button next to it, and follow the installation steps (Figure 1).

Install into Visual Studio 2012:
The NuGet is included in every edition (except Team Foundation Server) by default. Updates of NuGet can be found through the Extension Manager.
You can check whether your copy of Visual Studio already has the NuGet extension, look for Library Package Manager in the Tools menu of Visual Studio.
If your copy of Visual Studio does not have the Library Package Manager (NuGet) extension yet, you can install it by using the Extension Manager.Download project
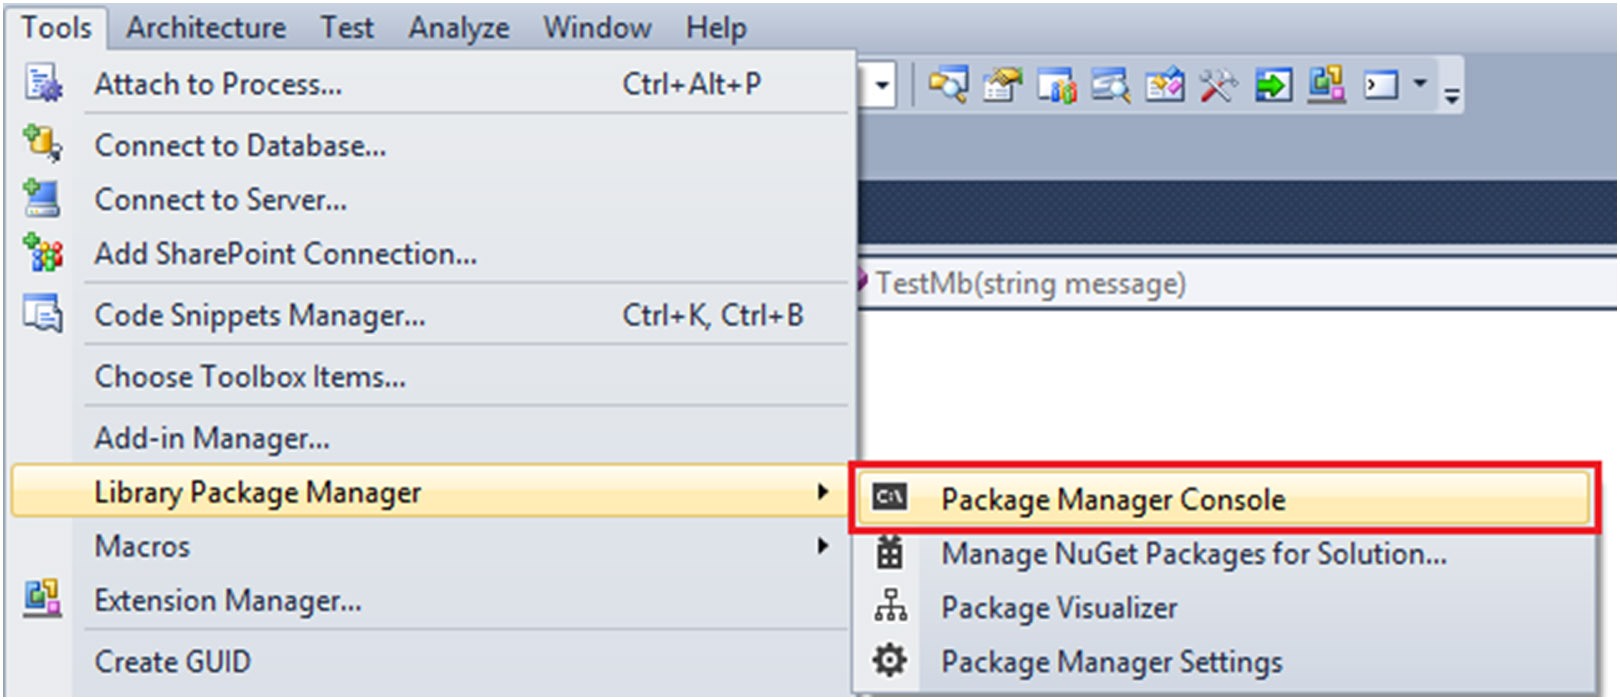
After you have installed the NuGet Package Manager, you can download the project by Package Manager Console. Select the ’Tools’ menu -> ’Library Package Manager’ -> ’Package Manager Console’ (Figure 2).

In the Package Manager Console execute the following command:
|
Install-Package ozeki.voip.sip.client |
In the Solution Explorer, you can see the added new VoIP SIP SDK Reference, and the two added class file (CallHandlerSample.cs, TestCall.cs).
Write the example
You have downloaded, and installed the project. For manage making and receiving calls, you can open the CallHandlerSample.cs file. In the constructor of the class, you will see the initialisation of microphone, speaker, connector, mediaSender, mediaReceiver. These objects are used for transporting the voice between the two sides of the phone lines. Also you can see Soft Phone initialization:
private void InitializeSoftPhone(string registerName, string domainHost)
{
	softPhone = SoftPhoneFactory.CreateSoftPhone( SoftPhoneFactory.GetLocalIP(), 5700, 5750, 5700);
	softPhone.IncomingCall += softPhone_IncomingCall;
	phoneLine = softPhone.CreatePhoneLine(new SIPAccount(true, registerName, registerName, registerName, registerName, domainHost, 5060), new NatConfiguration(NatTraversalMethod.None));
	phoneLine.PhoneLineStateChanged += phoneLine_PhoneLineInformation;

	softPhone.RegisterPhoneLine(phoneLine);
}
After the instantiation of Soft Phone (by SoftPhoneFactory) you have to subscribe the event of IncomingCalls. Then the Phone Line instantiation will follow, you can add the register name of the new soft phone, and the address of the PBX. If the added register name will be called by another phone, your Soft Phone will ring. Of course the address of the running PBX (domainHost) have to be valid. After that subscribe the PhoneLineChanged event, and call the RegisterPhoneLine method. A request will send to the PBX for registering the Soft Phone, and if it is success then will be triggered the RegistrationSucceded event. You can only start your calls after this point.
Execute the following lines for calling the other party (device with the 1001 phone number):
|
static void Main(string[] args)
{
	...
	_callHandlerSample = new CallHandlerSample("888", "192.168.113.13");
	_callHandlerSample.RegistrationSucceded += callHandlerSample_RegistrationSucceded;
	...
}

...

private static void callHandlerSample_RegistrationSucceded(object sender, EventArgs e)
{
	_callHandlerSample.Call("1001");
}
|
The Call function will check the state of registration, and if it is RegistrationSucceeded or NoRegNeeded then it creates a call object, subscribes the necessary events and starts the call.
|
call = softPhone.CreateCallObject(phoneLine, dialedNumber); WireUpCallEvents(); call.Start(); |
After you have started the call, the CallStateChanged event will be triggered. If the actual state is InCall, then the call is picked up on the other side. After connecting the microphone and the speaker to the call you can communicate with the other party. The actual state is Completed, means the call is ended, so unsubscribe the call events, disconnect the attached devices and set null value to the call object (for possibility to receive or make another calls later). For more information about CallStates please visit the following page.
|
private void call_CallStateChanged(object sender, VoIPEventArgs |
The CallErrorOccured event is the other event for the call. This can be triggered, when the call cannot be created (e.g. dialled number is not available, or the phone line is busy etc.) or an exception is occurred during the call. When somebody calls your registered Soft Phone the IncomingCall of Phone Line event will be triggered. This event is mentioned before, so check the code below:
|
private void softPhone_IncomingCall(object sender, VoIPEventArgs |
When this event is triggered set the call object (e.Item) to this call Class field, subscribe the call events and forward the call object to the IncomingCallReceived Class event. With these steps, you can subscribe that event like this:
static void Main(string[] args)
{
	...
	_callHandlerSample = new CallHandlerSample("888", "192.168.113.13");
	_callHandlerSample.IncomingCallReceived += callHandlerSample_IncomingCallReceived;
	...
}

...

static void callHandlerSample_IncomingCallReceived(object sender, VoIPEventArgs<IPhoneCall> incomingCall)
{
	incomingCall.Item.Accept();
}
All of the incoming calls are accepted as you can see in the code example above. Decide whether you would like to reject the call, or transfer it. Of course you can use the full VoIP SIP SDK as you wish. The calling with Soft Phone is just a simple example from that.
Test the example
For testing your application, start and login into your PBX (for example Ozeki Phone System). After that, register a Soft Phone for testing purpose. If the registered Soft Phone is ready, open your Visual Studio, and install the project if you have not done that before. Open the TestCall.cs source file. Change the parameters of the methods to yours and the called number too:
|
	_callHandlerSample = new CallHandlerSample("888", "192.168.113.13");
	_callHandlerSample.Call("1001");
|
You can read some information about parameters in the constructor of the CallHandlerSample class. Set called number parameter of Call method to that number what your registered in your PBX before. After you done with actualising of parameters, you can run the project. Press F5 to do that. If your settings were correct, your Soft Phone (what you have registered into the PBX by manually) will be called.
You can test the other way, by calling the 888 (that Soft Phone is registered by your application) with the test Soft Phone.
If you have any questions or need assistance, please contact us at info@ozekiphone.com
Dig deeper!
People who read this also read...
