How to create a simple voting IVR using SQL
In this article you will find a detailed tutorial on how to create a simple voting IVR using SQL. The process requires MySQl Workbench, Ozeki Phone System and Ozeki VoIP SIP SDK to complete. This solution enables the users to make and recieve voting calls using databases. We hope you will find this article informativ and helpful in implementing the solution. Now let's get started!
What is a voting IVR?
IVR polling technology integrates automatic phone systems and software that call individuals and conduct telephone polls. These solutions allow called individuals to answer questions without human intervention. Callers respond to questions by either pressing phone keys or by responding with voice answers that are recorded for later analysis.
What is MySql?
MySQL is an open-source relational database management system (RDBMS). MySQL has stand-alone clients that allow users to interact directly with a MySQL database using SQL, but more often, MySQL is used with other programs to implement applications that need relational database capability.
What is Ozeki Phone System
Ozeki Phone System is software for Windows that transforms a computer into a communication server. Ozeki Phone System lets you build applications like PBX, VoIP gateway, IVR and ACD. It can be used for voice calls, video calls, SMS messaging and new-, revolutionary channels like real time communication through webbrowsers and mobile phones.
How to create a simple voting IVR using SQL (video tutorial)
This tutorial will show you how to create a voting IVR using SQL. In this video we are going to create database tables, then add a MySQL call extension in Ozeki Phone System. We can use this connection to make and recieve voting calls using Ozeki VoIP SIP SDK and MySQl Workbench.
Create the database tables
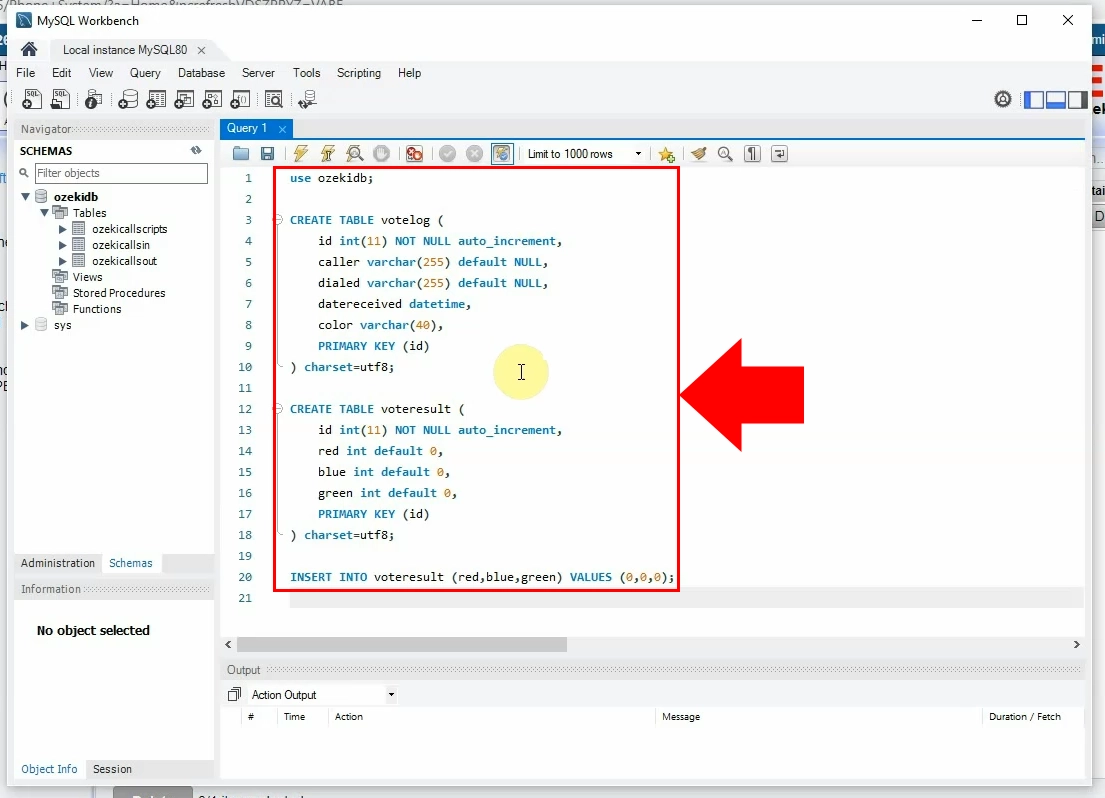
The first step is to create the database tables. Open MySql Workbench (Figure 1). Copy and paste the code below into the text editor. This piece of code creates the votelog and voteresult tables. Run the code by clicking on the lightning icon in the top toolbar.
CREATE TABLE votelog (
    id int(11) NOT NULL auto_increment,
    caller varchar(255) default NULL,
    dialed varchar(255) default NULL,
    datereceived datetime,
    color varchar(40),
    PRIMARY KEY (id)
) charset=utf8;

CREATE TABLE voteresult (
    id int(11) NOT NULL auto_increment,
    red int default 0,
    blue int default 0,
    green int default 0,
    PRIMARY KEY (id)
) charset=utf8;

INSERT INTO voteresult (red,blue,green) VALUES (0,0,0);
Save the OzML script on drive C
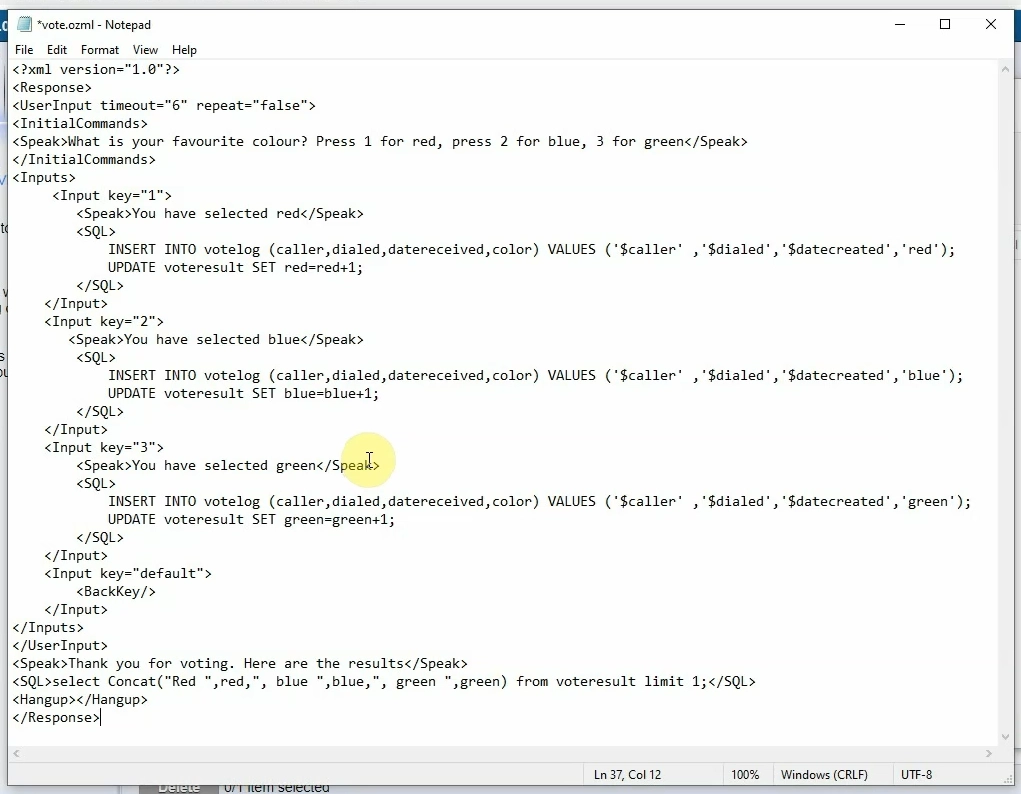
Now you need to create the OzML script. Create a new txt file and paste the code found below into the file (Figure 2). Save this file to C:\ozml\vote.ozml Make sure it is saved in .ozml format.
<?xml version="1.0"?>
<Response>
<UserInput  timeout="6" repeat="false">
<InitialCommands>
<Speak>What is your favourite colour? Press 1 for red, press 2 for blue, 3 for green</Speak>
</InitialCommands>
<Inputs>
     <Input key="1">
	<Speak>You have selected red</Speak>
	<SQL>
	    INSERT INTO votelog (caller,dialed,datereceived,color) VALUES ('$caller' ,'$dialed','$datecreated','red');
	    UPDATE voteresult SET red=red+1;
	</SQL>
    </Input>
    <Input key="2">
       <Speak>You have selected blue</Speak>
	<SQL>
	    INSERT INTO votelog (caller,dialed,datereceived,color) VALUES ('$caller' ,'$dialed','$datecreated','blue');
	    UPDATE voteresult SET blue=blue+1;
	</SQL>
    </Input>
    <Input key="3">
	<Speak>You have selected green</Speak>
	<SQL>
	    INSERT INTO votelog (caller,dialed,datereceived,color) VALUES ('$caller' ,'$dialed','$datecreated','green');
	    UPDATE voteresult SET green=green+1;
	</SQL>
    </Input>
    <Input key="default">
	<BackKey/>
    </Input>
</Inputs>
</UserInput>
<Speak>Thank you for voting. Here are the results</Speak>
<SQL>select Concat("Red ",red,", blue ",blue,", green ",green) from voteresult limit 1;</SQL>
<Hangup></Hangup>
</Response>
Insert a reference to the script
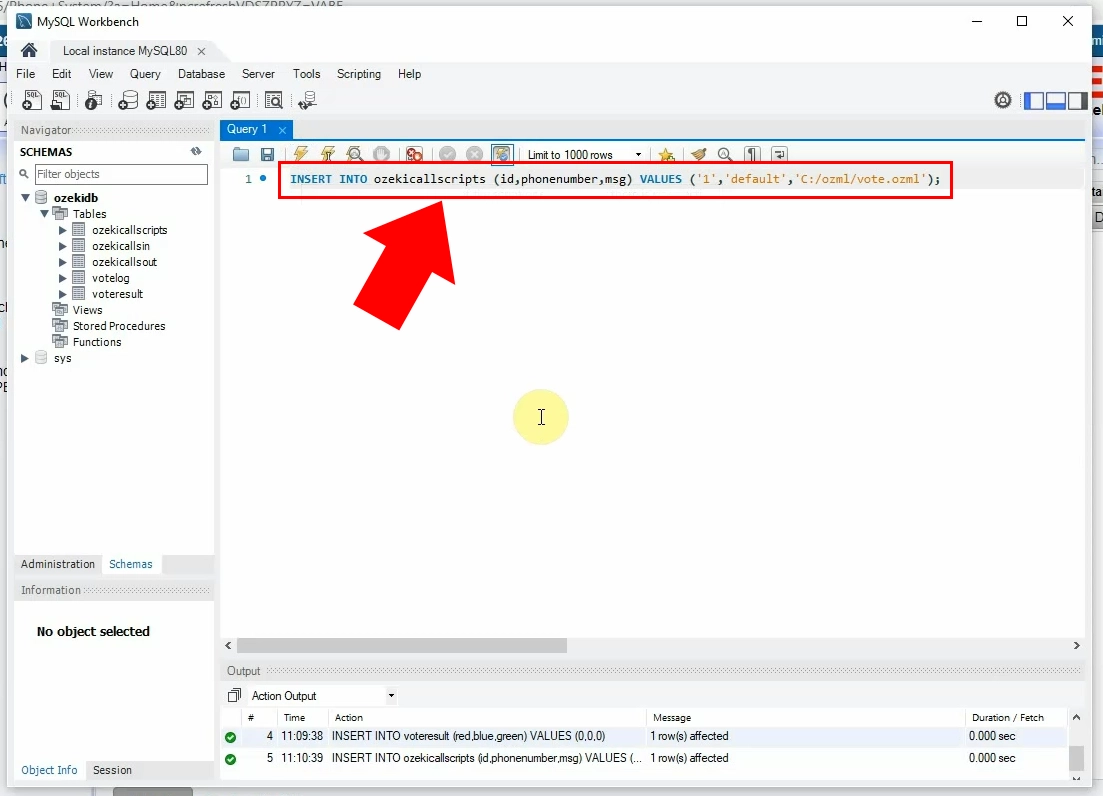
Next you need to insert a reference to the script. Open a blank page in MySql Workbench again (Figure 3). Copy and paste the code found below into the text editor. Click on the lightning icon in the top toolbar to run the code. This will insert the script into the ozekicallscripts table.
INSERT INTO ozekicallscripts (id,phonenumber,msg) VALUES ('1','default','C:/ozml/vote.ozml');
SETUP an SQL Calls extension
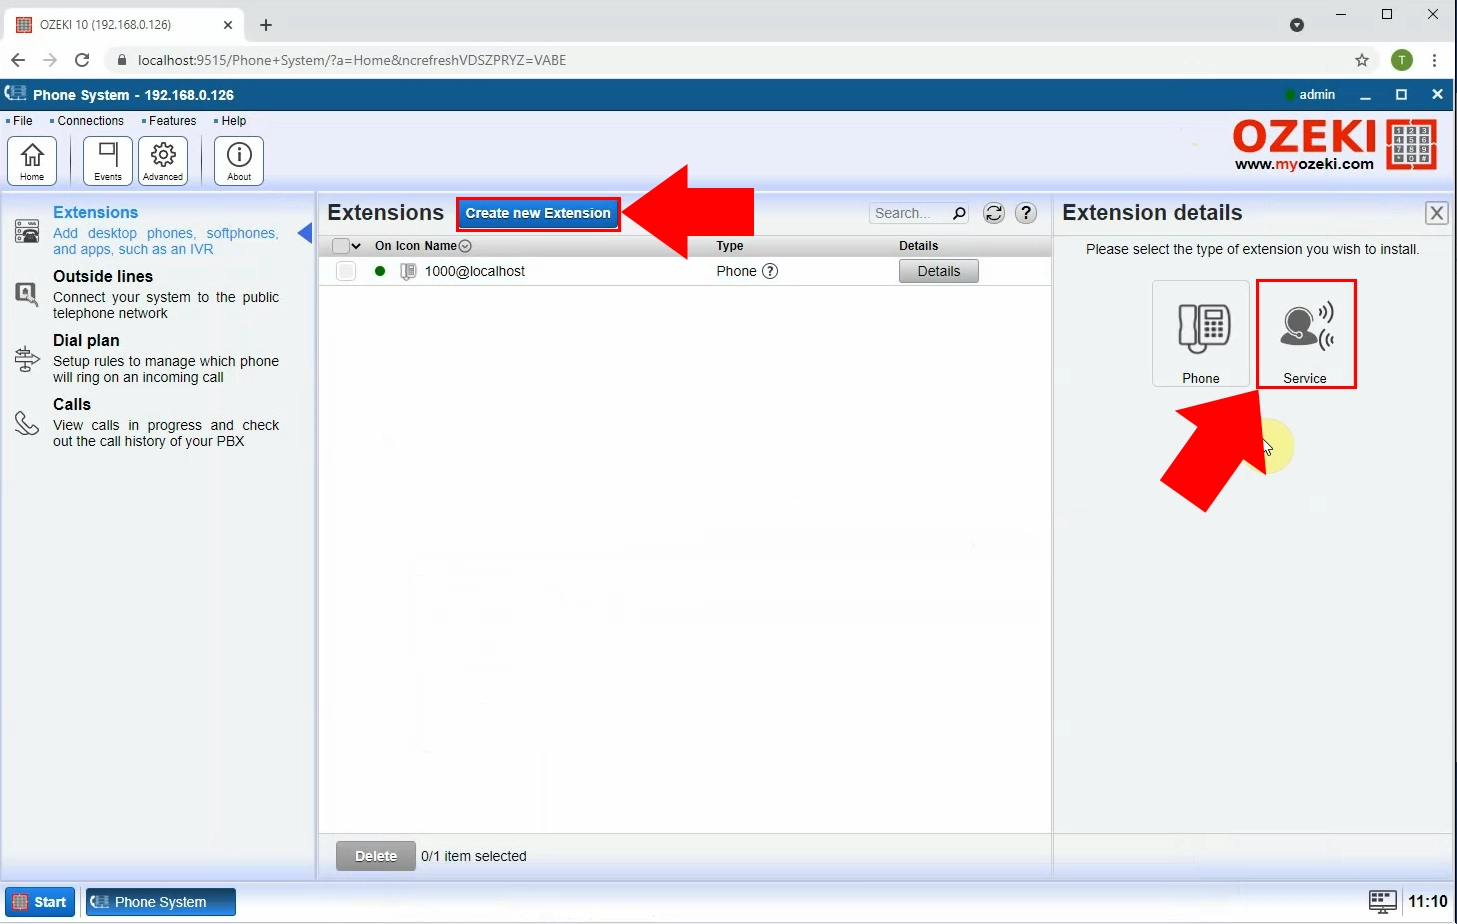
After creating the script, you can move on to setting up an SQL call extension in Ozeki Phone System. Start by opening Ozeki Phone System (Figure 4). Find Extensions inside the menu on the left, and click on it. Click the blue Create new Extension button to add a new extension. Find the Icon that resembles a person talking on a headset in the menu on the right. Click on the Service option under Extension details.
Create SQL call extension
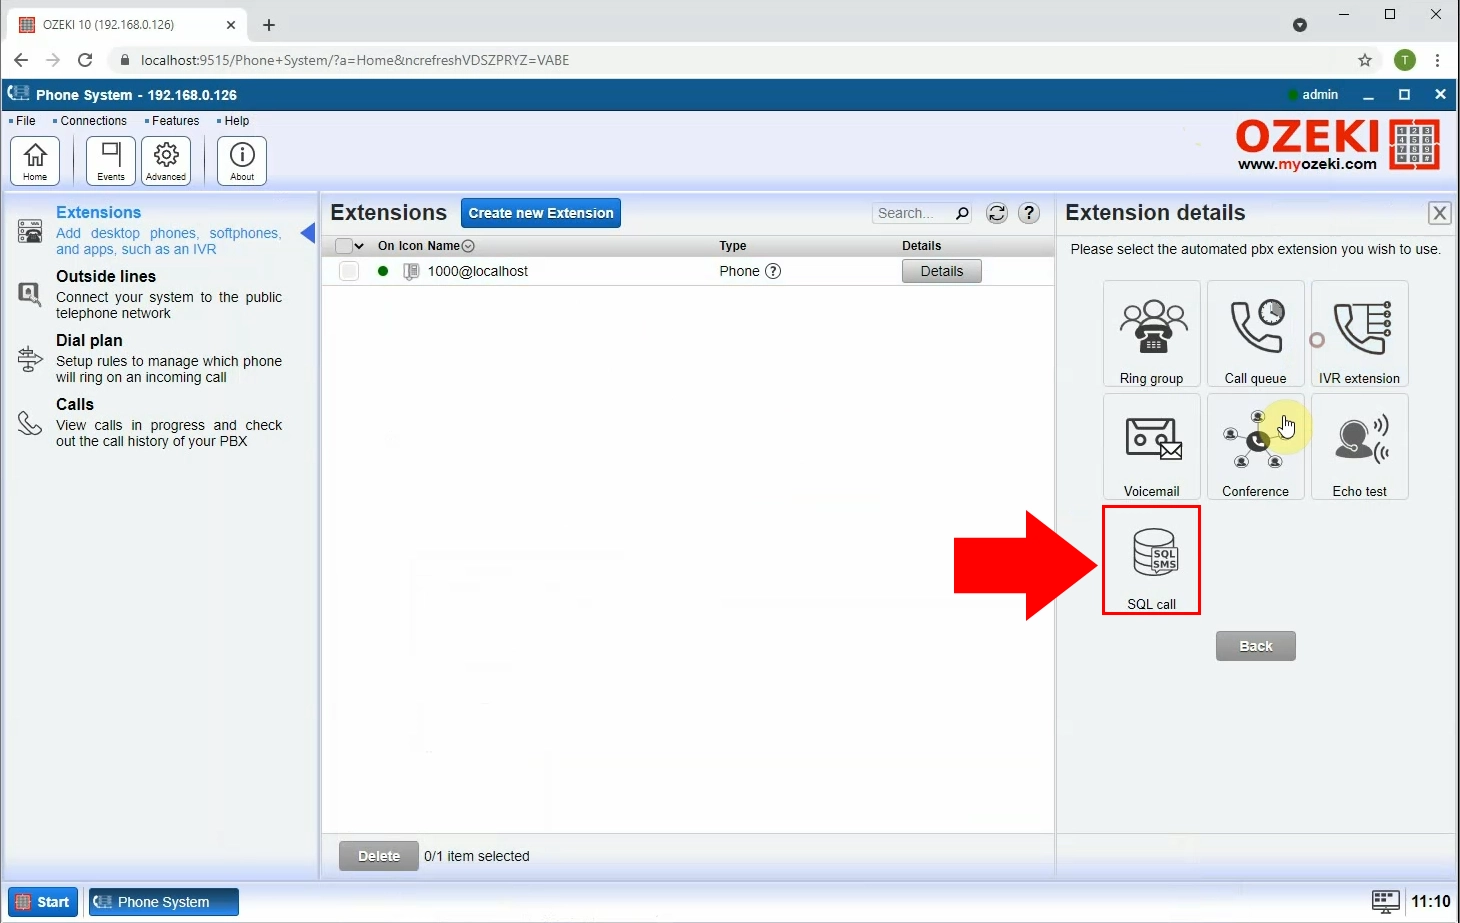
Choose which type of call extension you want to create. Click on SQL call extension in the menu on the right (Figure 4).
Select MySQL calls
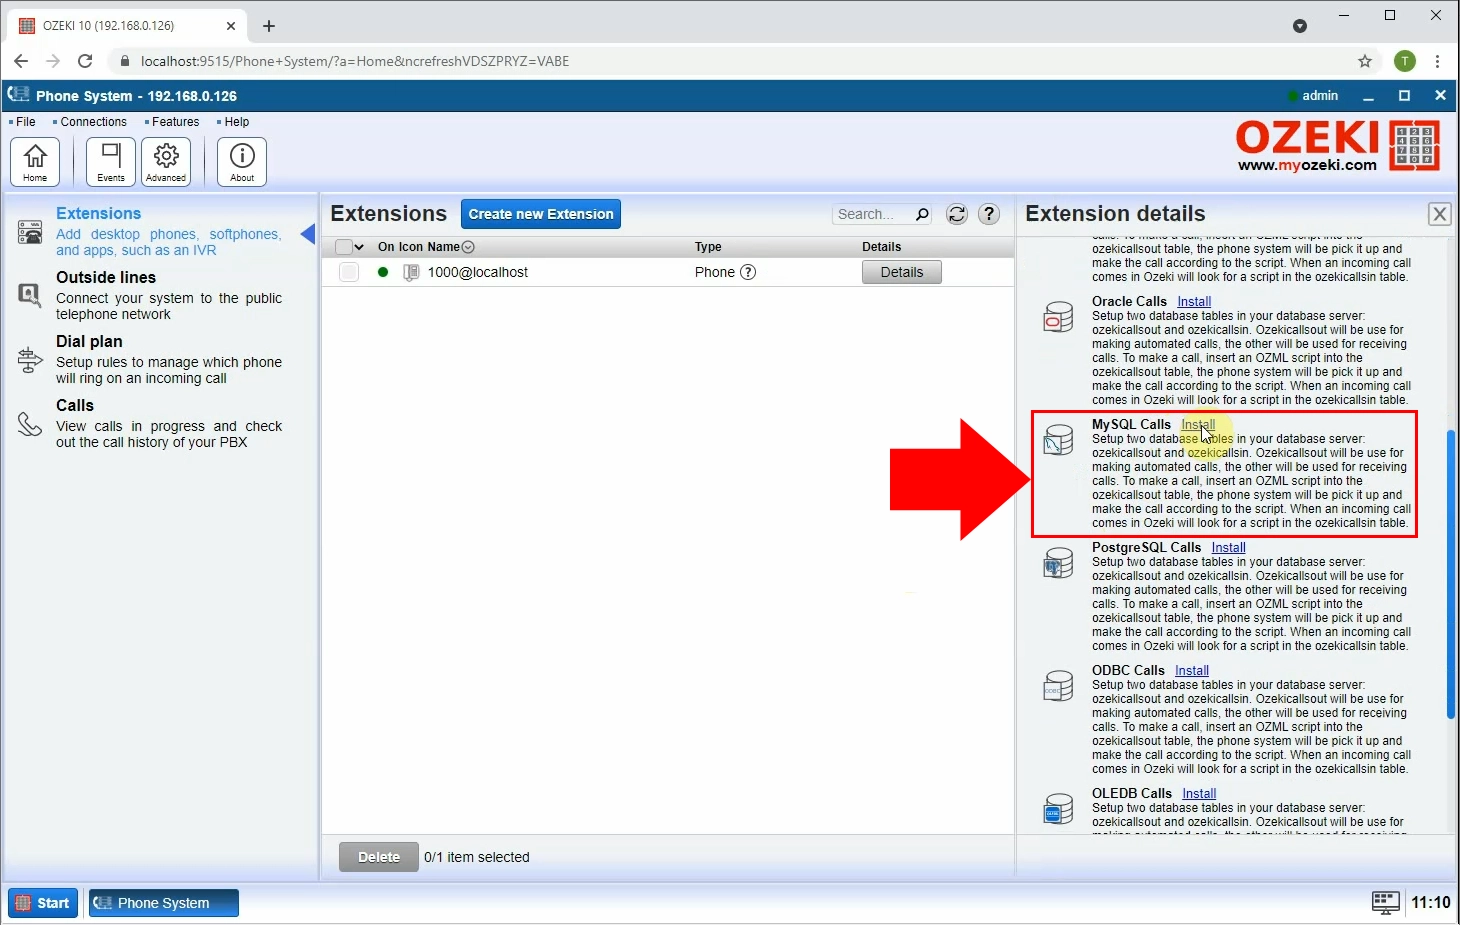
Scroll down and find MySql calls (Figure 6). Click on Install highlighted in blue next to it.
Configure connection details
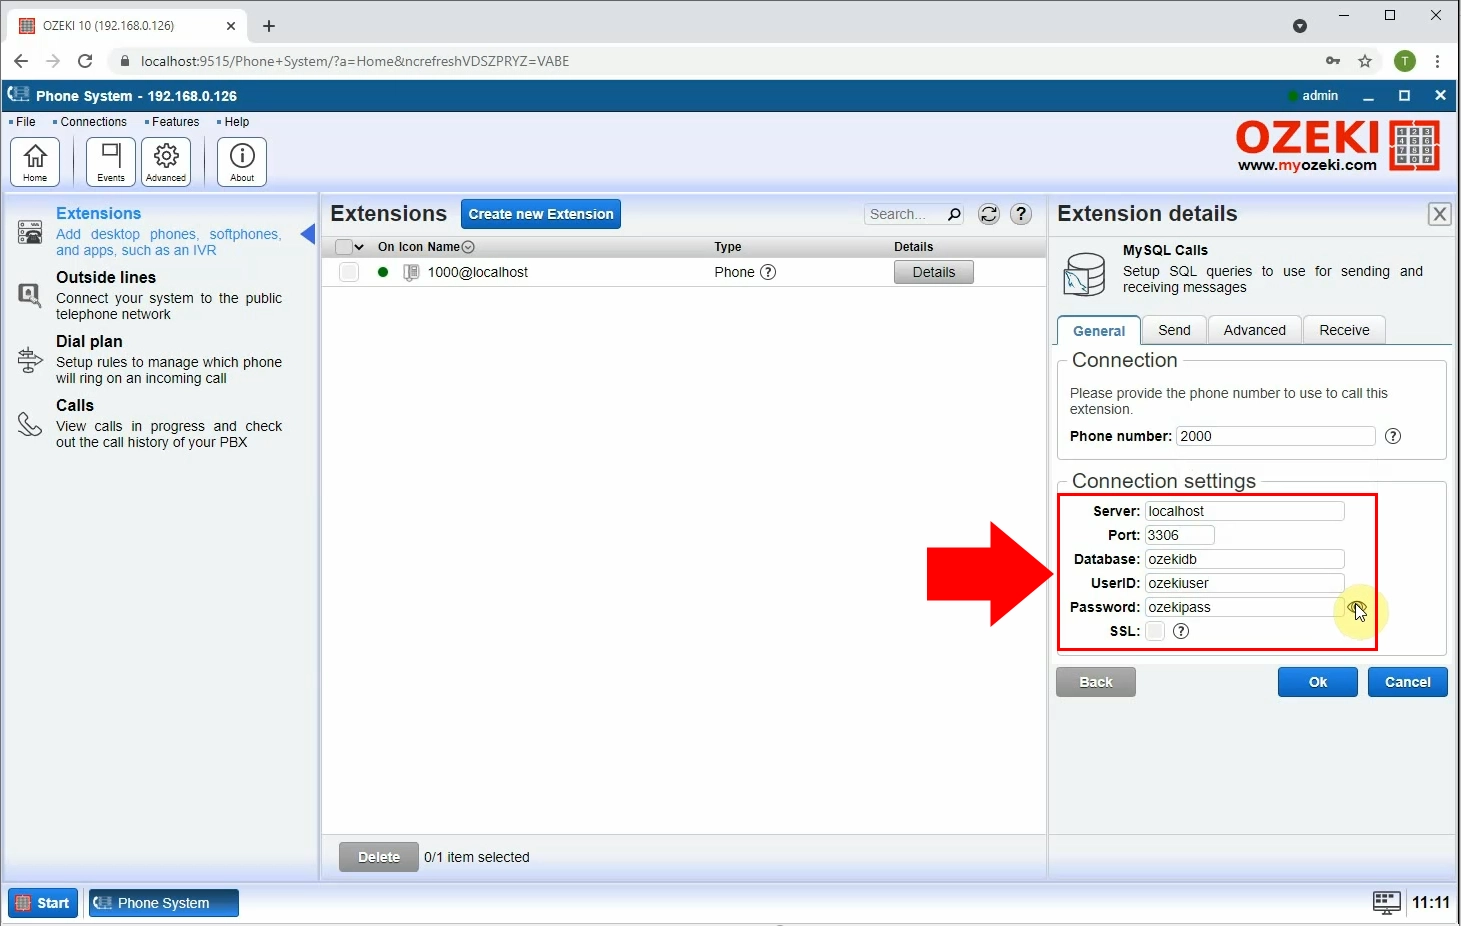
Before creating the datbase connection, you must configure the connection detials (Figure 7). Under Connection settings, first enter the phone number you wish to use to call this extension. Then, enter your server's address next to Server along with the Port. Next, enter the name of your Database. Finally, enter your User ID and Password for the database. Click on OK to finish configuration and create the connection.
Database connection established
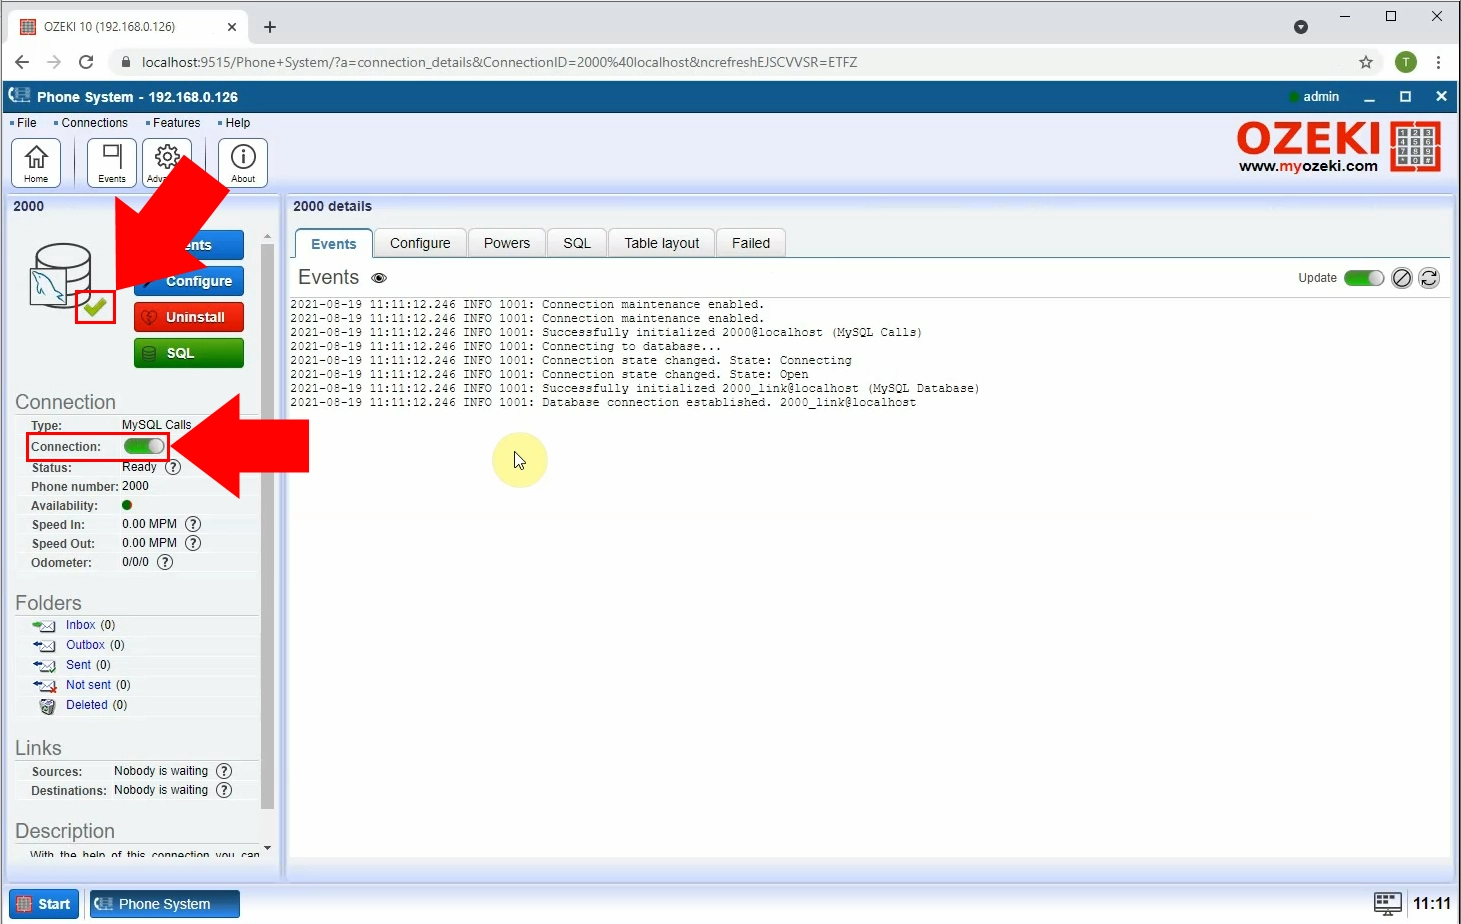
After creating the database connection, you must enable it before use. Click the switch button next to Connection in the left side menu (Figure 8). The switch button will turn green to indicate the connection has been established. A green check mark will also appear next to the icon of the database connection.
Call Voting SQL extension
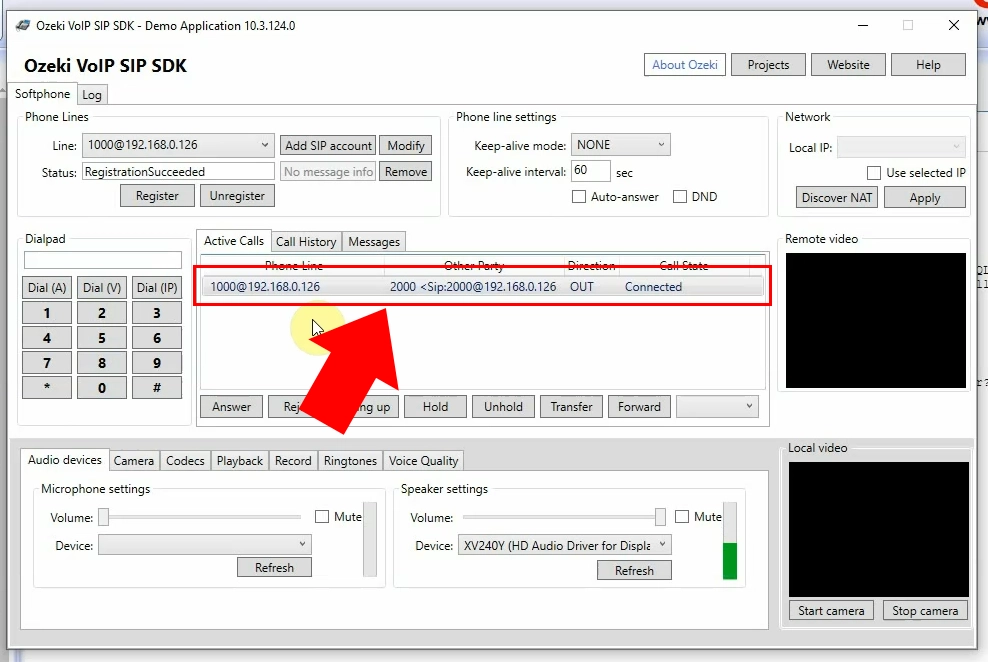
After establishing connection, you need to open Ozeki VoIP SIP SDK (Figure 9). Here you are able to call the voting SQL extension. Enter the phone number using the dialpad and click Dial to call it.
Simulate an outbound call
You are also able to simulate an outbound call using this system. Open MySQL Workbench once again (Figure 10). Copy and Paste the code found below into the text editor. Click on the lightning icon in the top toolbar to run the code. This code will send the call into the database.
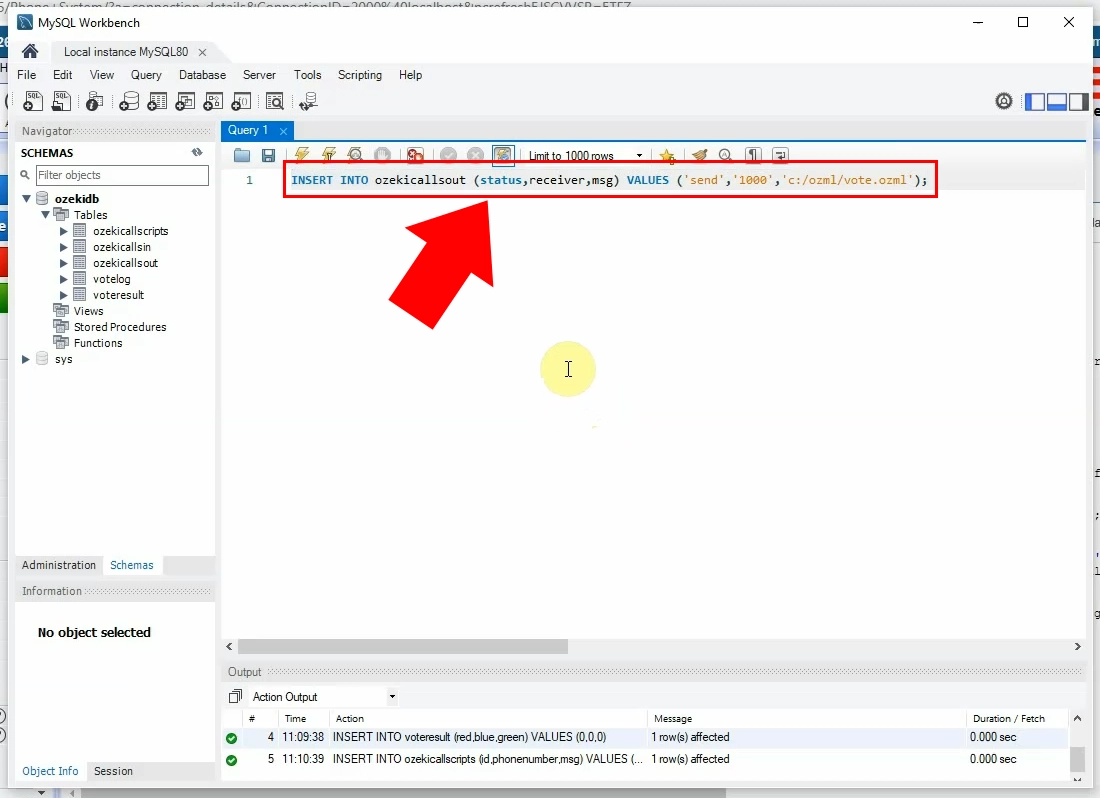
INSERT INTO ozekicallsout (status,receiver,msg) VALUES ('send','06201234567','c:/ozml/vote.ozml');
Call received from Voting SQL extension
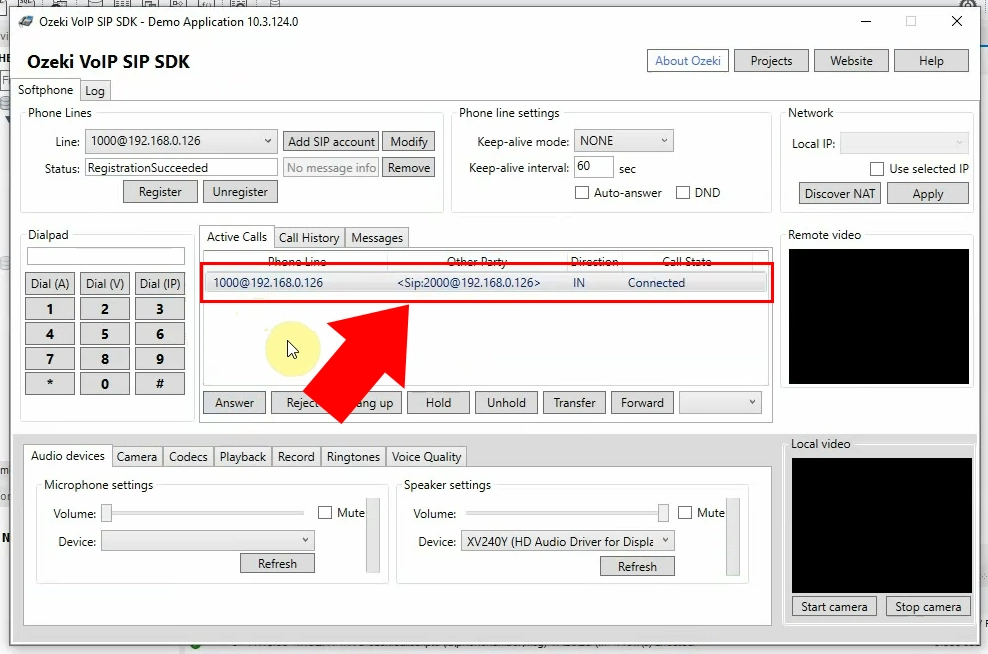
Here you can see that the call has been received from the Voting SQL extension (Figure 11).
Summary
Everything is now in working order for you to be able to send and recieve voting calls using SQL For more information on Ozeki Phone System and Ozeki VoIP SIP SDK, make sure to check out our other guides. Thank you for following along this tutorial and choosing our solution.
