How to make scripted calls from SQL
Scripted calls are a way to make your organization more efficient with human resources. Supplemented with an SQL database storage that you can modify anytime you wish, will make a system that needs no human resources. In this tutorial, we are going to talk about the four main steps you need to take to have a working system. Creating an extension, creating the tables for storage, setting up a phone line, and finally set up the routing of this system. This process is easy to do and the article is supplemented with a detailed video tutorial. You will have no problem with following it and it only takes about 20 minutes to perform. Start now!
What is a scripted call?
Scripted calls are phone calls that are suited with a pre-written text. This text will be read aloud to the recipient by a text-to-speak system. Call scripts guarantee consistency across the call center and allow agents to act more naturally and listen to customers as they know they don’t have to worry about remembering what to say next. Call scripts can be easily integrated with telephony and IVR systems in order to provide the agent useful information about the customer and tailor each interaction accordingly.
What is VoIP?
Voice over Internet Protocol (VoIP) is a proven technology that lets anyone place phone calls over an internet connection. With the rise of broadband, VoIP has become the definitive choice for phone service for consumers and businesses alike. Esentially, VoIP converts your voice into a digital signal, allowing you to make a call directly from a computer, a VoIP phone, or other data-driven devices. Simply put, it's phone service delivered over the internet.
What is SQL?
SQL stands for Structured Query Language. It is basically a language used by databases. This language allows to handle the information using tables and shows a language to query these tables and other objects related (views, functions, procedures, etc.)
What is Ozeki Phone System
Ozeki Phone System is software for Windows that transforms a computer into a communication server. Ozeki Phone System lets you build applications like PBX, VoIP gateway, IVR and ACD. It can be used for voice calls, video calls, SMS messaging and new-, revolutionary channels like real time communication through webbrowsers and mobile phones.
How to make scripted calls from SQL (video tutorial)
This short video tutorial will show you how to make scripted calls from SQL. This solution is implemented with the use of Ozeki Phone System, and MySQL Workbench. We are going to set up a database, a database connection as well as a phone extension and a phone line throuh the use of these softwares. Follow along the steps provided in the video to implement and test this solution successfully.
// *******************************************
// Create the database
// *******************************************

create database ozekidb;
create user 'ozekiuser'@'localhost' identified by 'ozekipass';
grant all privileges on ozekidb.* to 'ozekiuser'@'localhost';
flush privileges;

use ozekidb;

// *******************************************
// Create the database table layout
// *******************************************

CREATE TABLE ozekicallsin (
    id int(11) NOT NULL auto_increment,
    caller varchar(255) default NULL,
    dialed varchar(255) default NULL,
    msg text default NULL,
    starttime varchar(40) default NULL,
    endtime varchar(40) default NULL,
    ringduration varchar(40) default NULL,
    talkduration varchar(40) default NULL,
    callid varchar(100) default NULL,
    status varchar(40) default NULL,
    errormsg varchar(1024) default NULL,
    operator varchar(100) default NULL,
    PRIMARY KEY (id)
) charset=utf8;
ALTER TABLE ozekicallsin ADD INDEX (id) ;

CREATE TABLE ozekicallsout (
    id int(11) NOT NULL auto_increment,
    sender varchar(255) default NULL,
    receiver varchar(255) default NULL,
    msg text default NULL,
    callid varchar(255) default NULL,
    startime varchar(40) default NULL,
    endtime varchar(40) default NULL,
    status varchar(40) default NULL,
    talkduration varchar(40) default NULL,
    ringduration varchar(40) default NULL,
    operator varchar(100) default NULL,
    errormsg varchar(1024) default NULL,
    PRIMARY KEY (id)
) charset=utf8;
ALTER TABLE ozekicallsout ADD INDEX (id);

CREATE TABLE ozekicallscripts (
    id int(11) NOT NULL auto_increment,
    msg text,
    phonenumber varchar(40) default NULL,
    PRIMARY KEY (id)
) charset=utf8;
ALTER TABLE ozekicallscripts ADD INDEX (id) ;

// *******************************************
// How to make a call: example 1
// The script is in the ozekicallsout table
// *******************************************

INSERT INTO ozekicallsout (status,receiver,msg)
VALUES ('send','101','
<?xml version="1.0"?>
<Response>
	<Request>
        <OnAnswered>
            <Speak Party="caller">You will get dtmf keys 123.</Speak>
            <SendDTMF Party="caller" Keys="123"></SendDTMF>
            <Hangup/>
        </OnAnswered>
    </Request>
</Response>
');

// *******************************************
// How to make a call: example 2
// The script is in a file on drive C
// *******************************************

INSERT INTO ozekicallsout (status,receiver,msg) VALUES ('send','101','C:\ozml\script.ozml');

// *******************************************
// How to make a call: example 3
// The script is in the ozekicallscripts table
// *******************************************

INSERT INTO ozekicallscripts (id,msg)
VALUES ('1','
<?xml version="1.0"?>
<Response>
	<Request>
        <OnAnswered>
            <Speak Party="caller">You are using call script 1. Thank you for calling. </Speak>
            <Hangup/>
        </OnAnswered>
    </Request>
</Response>
');

INSERT INTO ozekicallsout (status,receiver,msg) VALUES ('send','101','1');


// *******************************************
// How to serve an inbound call with a script
// The script is in the ozekicallscripts table
// *******************************************

INSERT INTO ozekicallscripts (id,phonenumber,msg)
VALUES ('1','default','
<?xml version="1.0"?>
<Response>
		<Speak Party="caller">You are using call script 1. Thank you for calling. </Speak>
		<Hangup/>
</Response>
');
Create new service extension
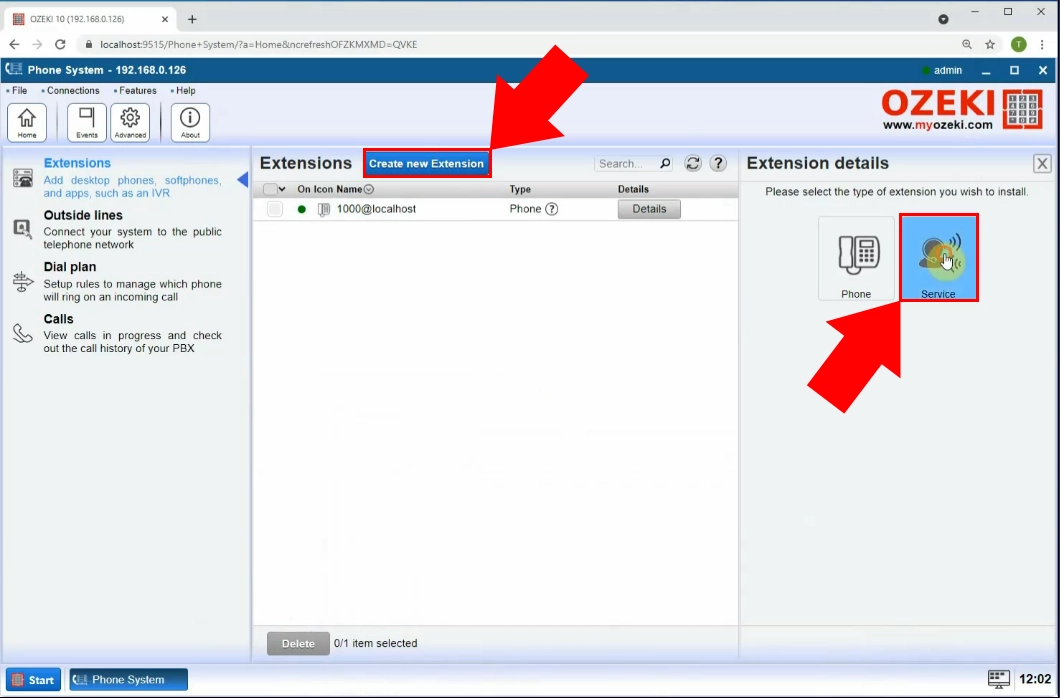
The first step in implementing this solution is to create a new service extension. Start by opening Ozeki Phone System (Figure 1). Find Extensions inside the menu on the left, and click on it. Click the blue Create new Extension button to add a new extension. Find the Icon that resembles a person talking on a headset in the menu on the right. Click on the Service option under Extension details.
Create SQL call extension
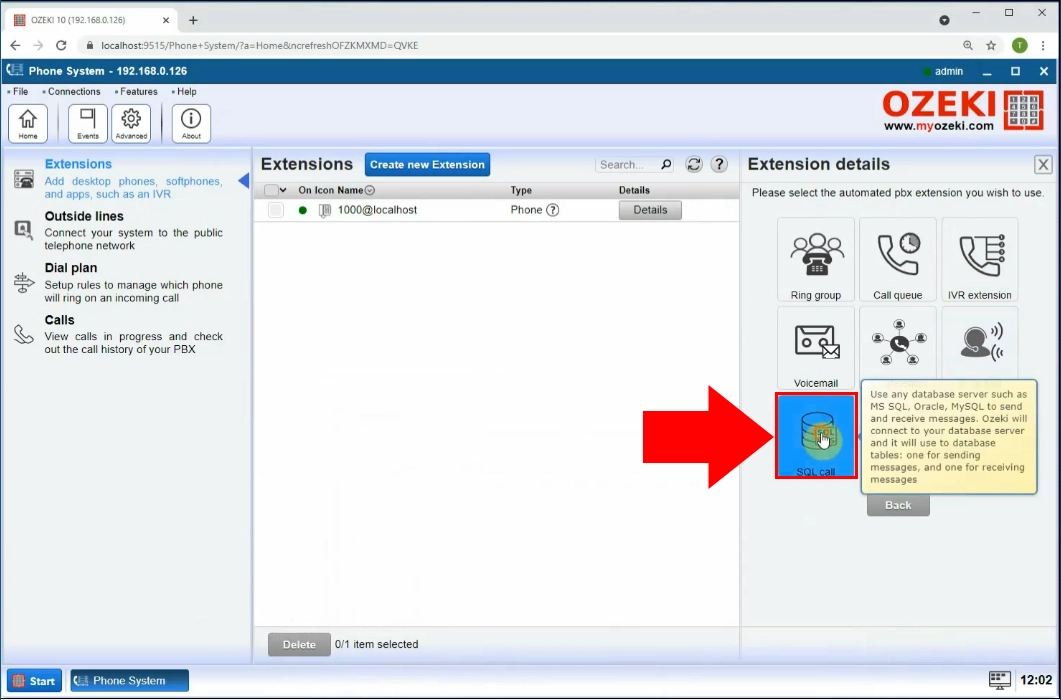
Now you can see an Extension details panel (Figure 2). It is on the right-side of the screen when the Ozeki Phone System is opened. You can choose what type of service you need an extension for. In this case, find the SQL call option. Click it to open the list of database servers that is compatible with the Ozeki Phone System. This list features most of the common database handling tools. You will find the one that you wish to use.
Select MySQL calls
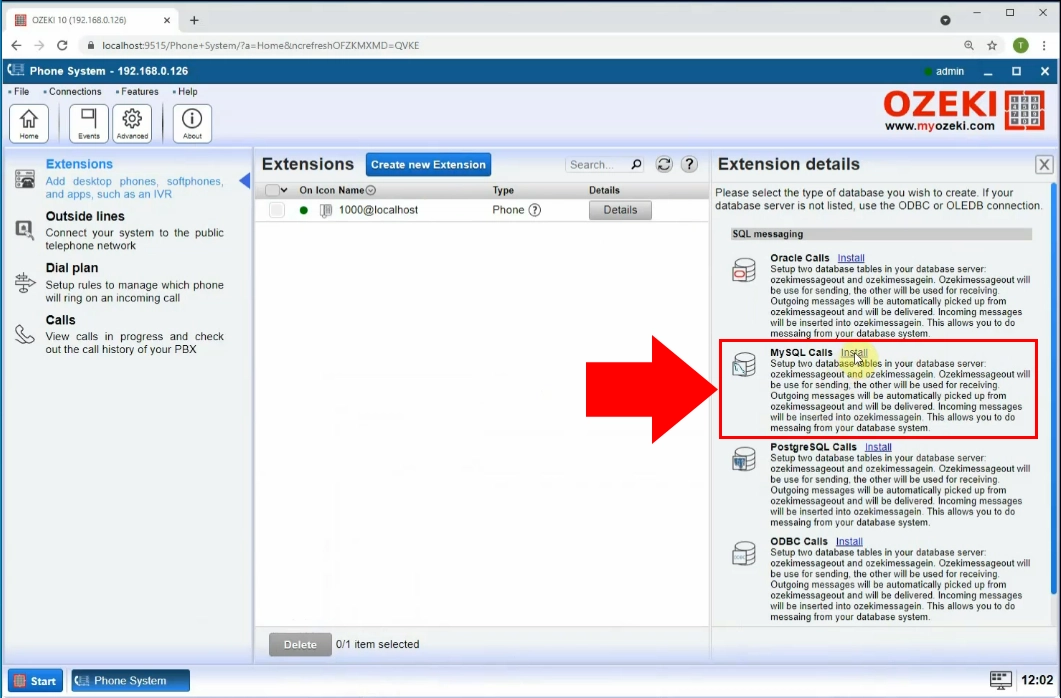
You can see the list of SQL database managers on the right-side of the screen, in the Extension details panel. You can see that the Ozeki Phone System is compatible with all the commonly used database tools. In this example system, we are going to use MySQL. Search for it in the list and click the blue Install button next to the ‘MySQL’ title (Figure 3).. This will open the MySQL connection configuration panel. Under the button and the title, you can find more information about the setup process and how the system works.
Configure connection details
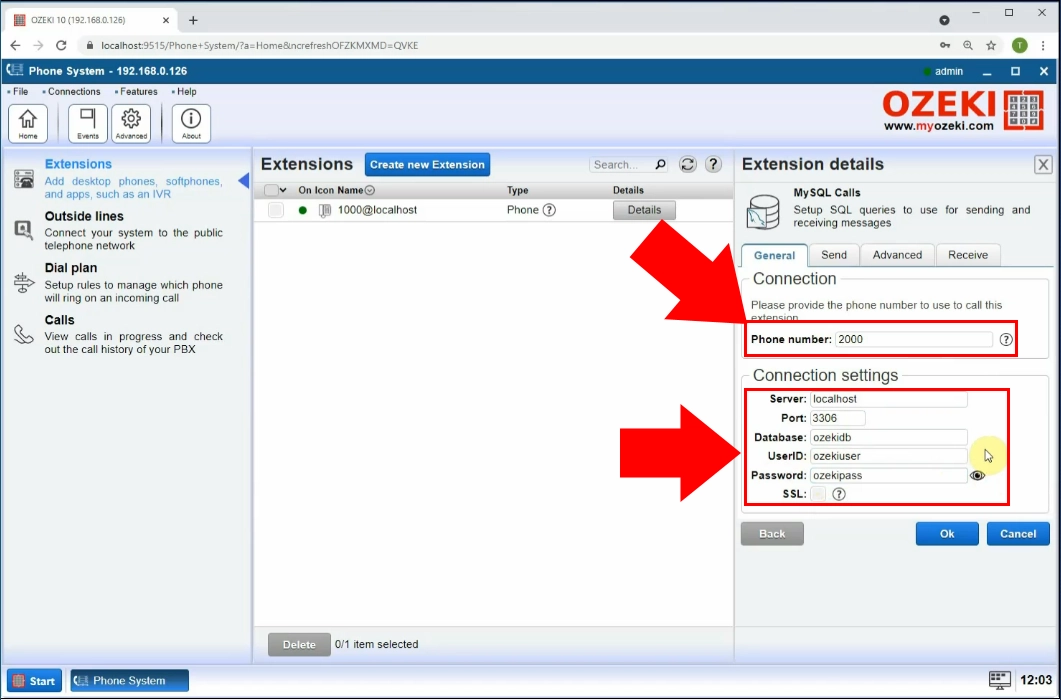
Before creating the datbase connection, you must configure the connection detials (Figure 4). Under Connection settings, first enter the phone number you wish to use to call this extension. Then, enter your server's address next to Server along with the Port. Next, enter the name of your Database. Finally, enter your User ID and Password for the database. Click on OK to finish configuration and create the connection.
Create SQL database and user
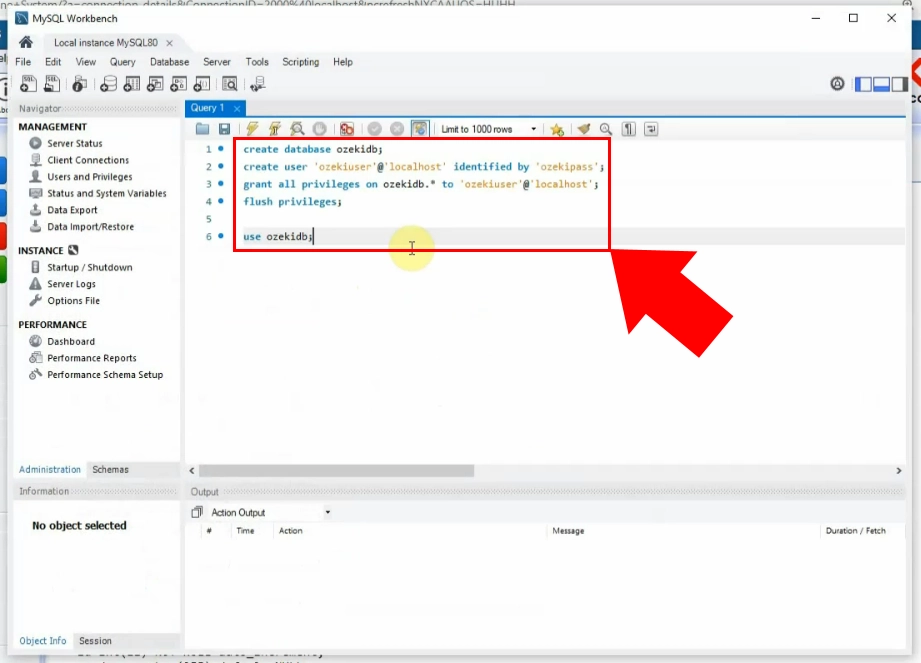
In this next step, we are going to create the database and the database user that we are going to use with the Ozeki Phone system. We provide you the code above. You will only need the Create the database part for this step. Open the SQL Workbench (Figure 5). Copy and paste the code part in the code editor section. Use the lightning icon in the toolbar of MySQL to run the code. This will create the database with the corresponding configurations and will create a user that will help Ozeki Phone System with reaching it.
Create table layout
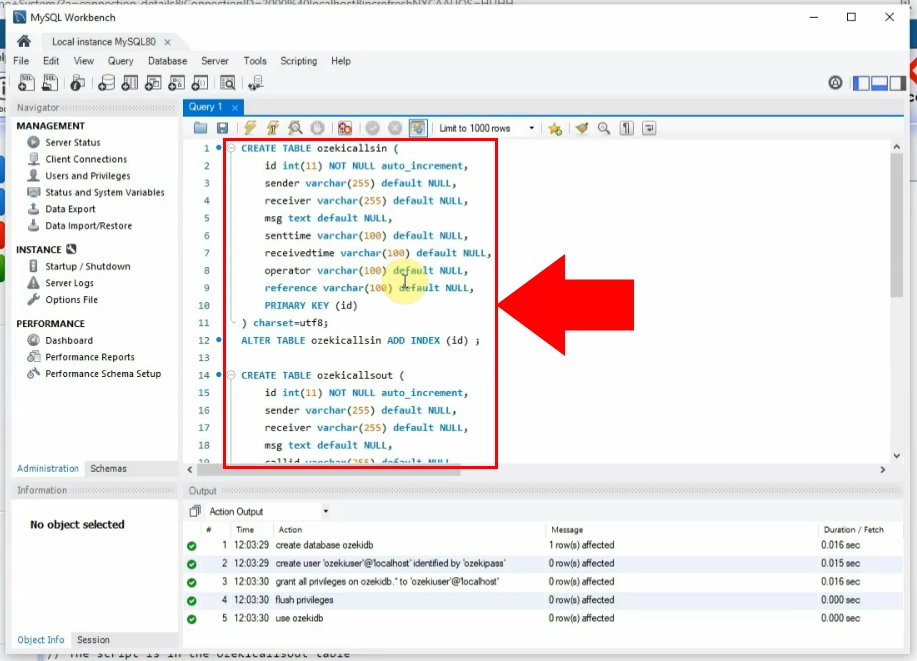
Now we need two tables in the database. One will be used to store the data for the incoming calls, the other will store the outgoing calls. You can the find the part of the code you need above. This time, you need the ‘Create the database table layout’ part of the code. Copy and paste the code part into the code editor panel in MySQL (Figure 6). Use the lightning icon in the toolbar of MySQL to run the table creating code. Below the code editor, you can find the ‘Output’ panel. There you can find more information about the table creating process upon running.
Database connection established
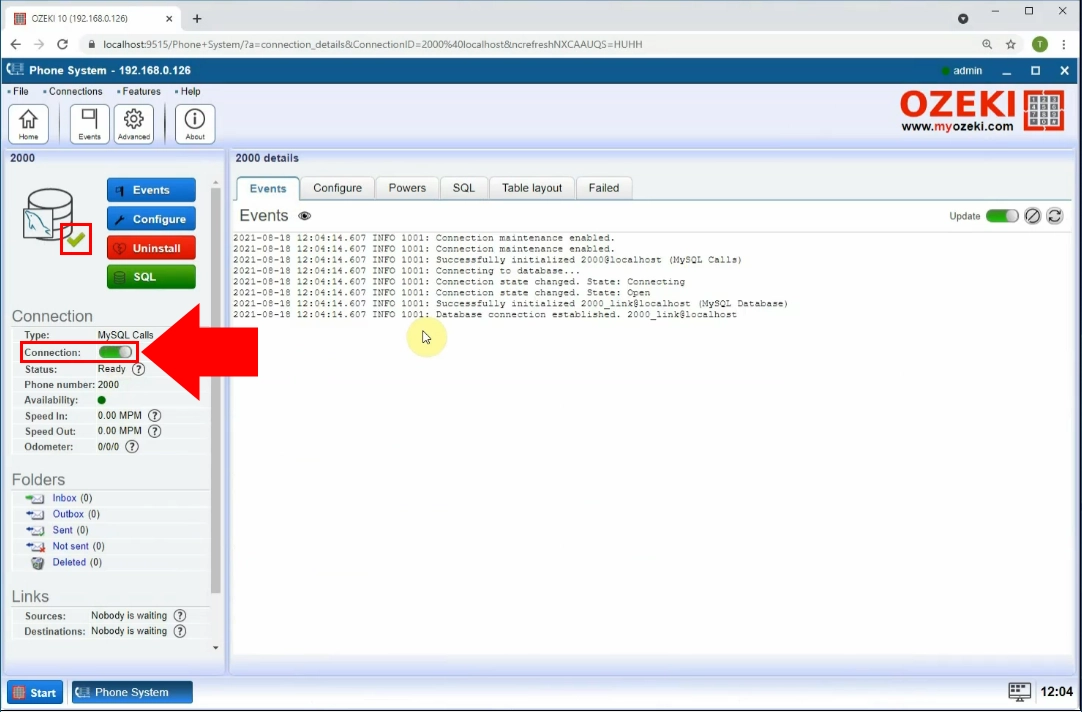
After creating the database connection, you must enable it before use. Click the switch button next to Connection in the left side menu (Figure 7). The switch button will turn green to indicate the connection has been established. A green check mark will also appear next to the icon of the database connection. In the middle of the screen, you can see an ‘Events’ tab. There, you will find more information about the connecting process. You can see error messages in real time if there is something wrong with the connection.
Create outside phone line
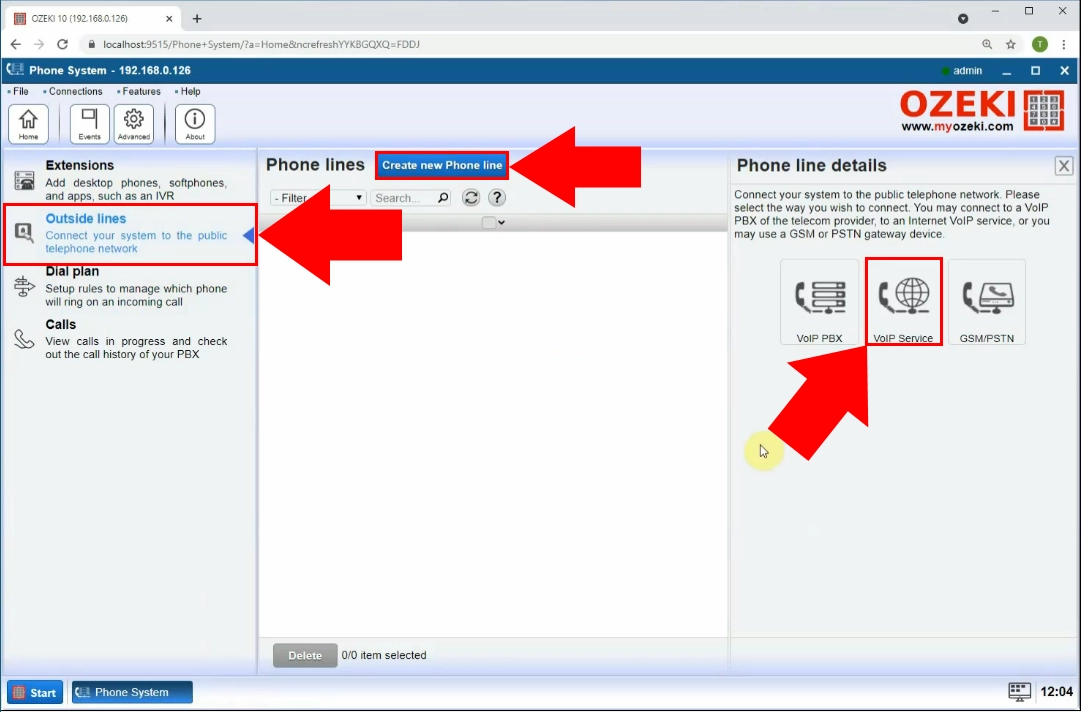
Now you have the database where the information for the incoming and outgoing calls will be stored, and the connection between the database and the Ozeki Phone System. In the next step, you are going to create a phone line that can be used to make automated phone calls. Locate the blue ‘Create new Phone line’ button and choose the ‘Outside line’ option form the left-side panel (Figure 8). An outside line will connect your system to the public telephone network. In the Phone line details panel, located on the right-side, you will find three ways of connection. In this case, you wish to connect to the public telephone network using the internet, so choose the VoIP Service option.
Provide account details
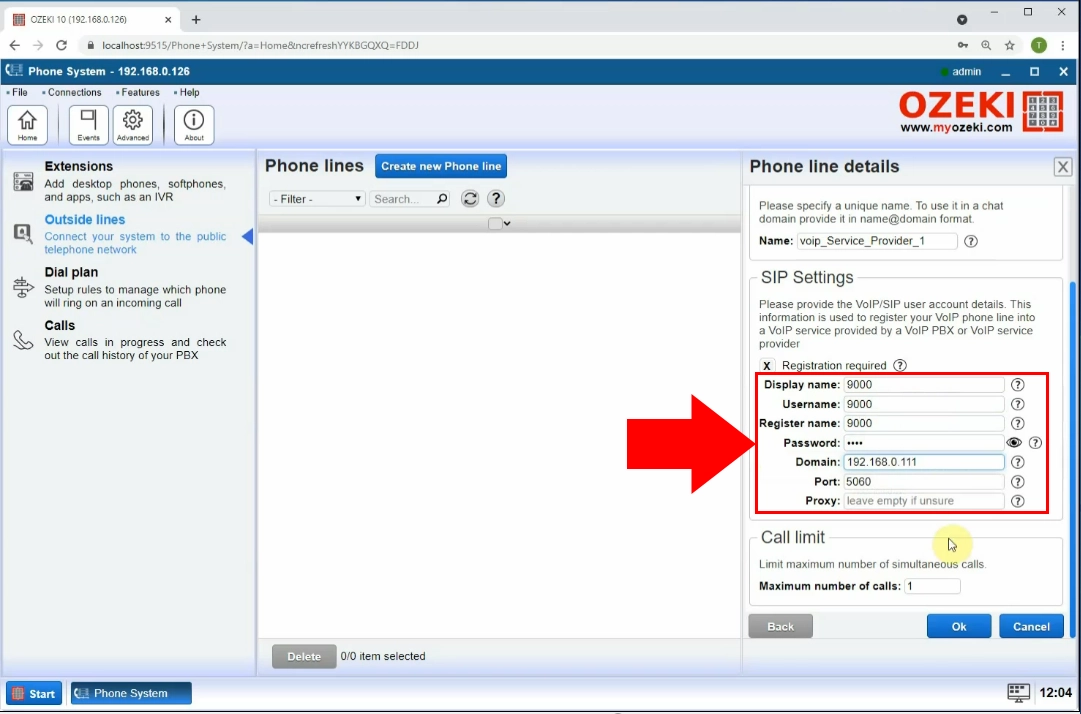
To have a connection between the Ozeki Phone System and the public telephone network, you need to provide details used for registering you into a VoIP service. The following details are required (Figure 9):
- Display name
- Username
- Register name
- Password
- Domain (IP address)
- Port
Create new dial plan
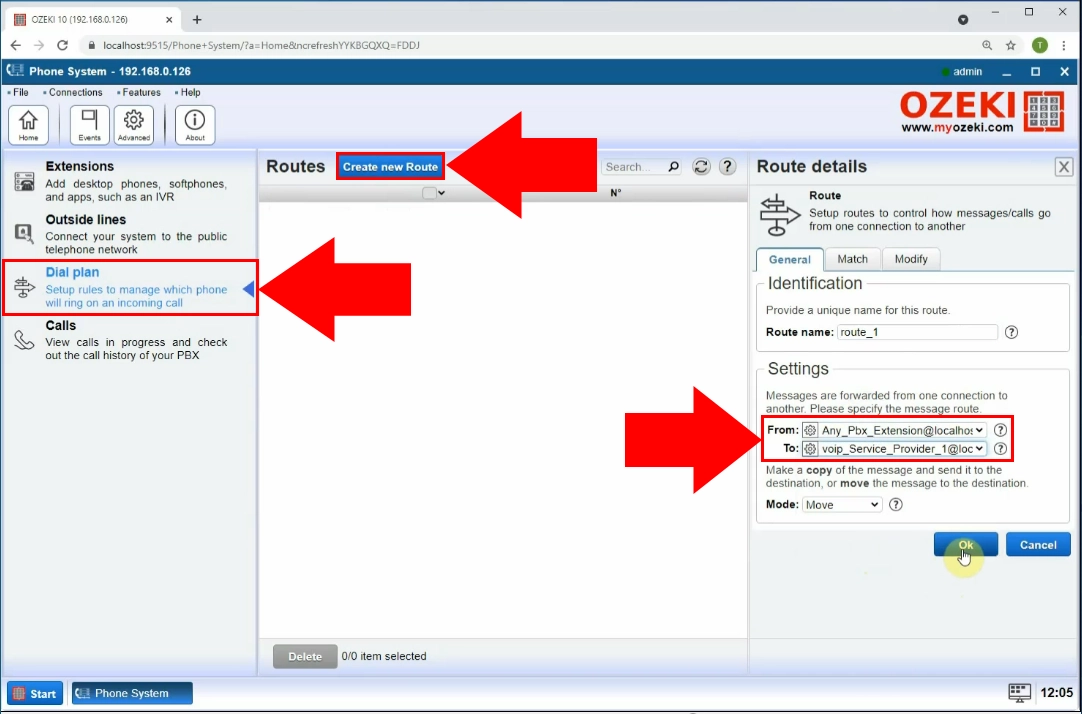
Next you need to create a new dial plan. Do this by selecting Dial plan in the menu on the left (Figure 10). Click on the blue Create new route button on the top. Now navigate to the Route details menu on the right. In the Settings section, you wil find two comboboxes, in which you can select options. Set From: to Any_Pbx_Extension. Set To: to voip_Service_Provider_1. Click OK to save these settings.
Insert script into database
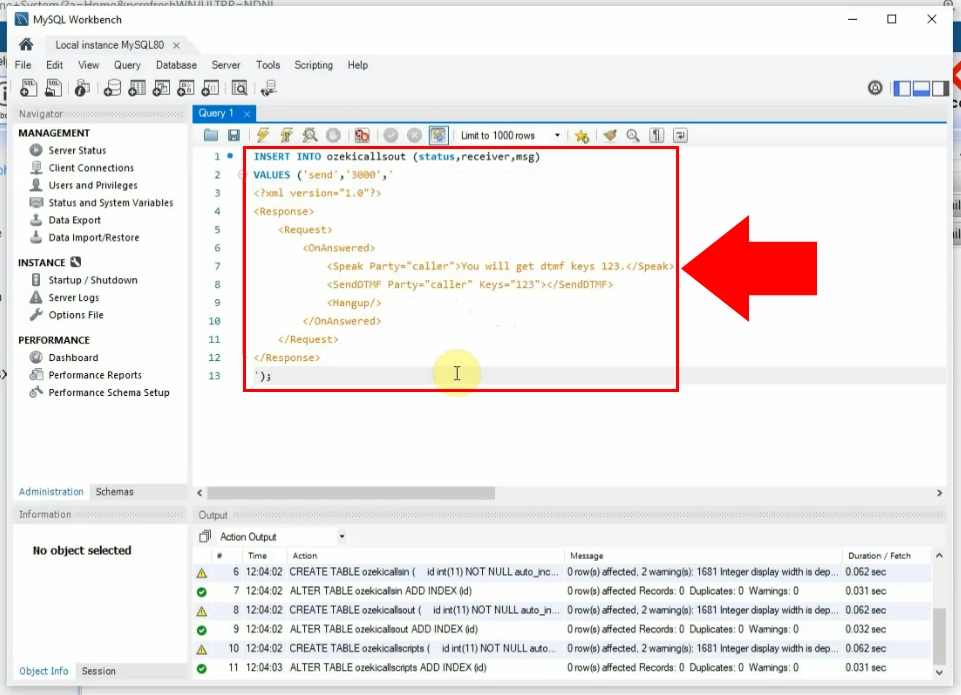
As the last thing to do, you need to test your system. We provide you with a code part that will insert data into the ‘ozekimessagein’ table. This way, the Ozeki Phone System will detect that record and will initiate a call according to the record. Copy and paste the ‘How to make a call: example 1’ code part into the MySQL code editor and edit it so that you test mobile number is provided (Figure 11). Click the lightning icon in the toolbar. This will automatically launch the phonecall.
Phone call created
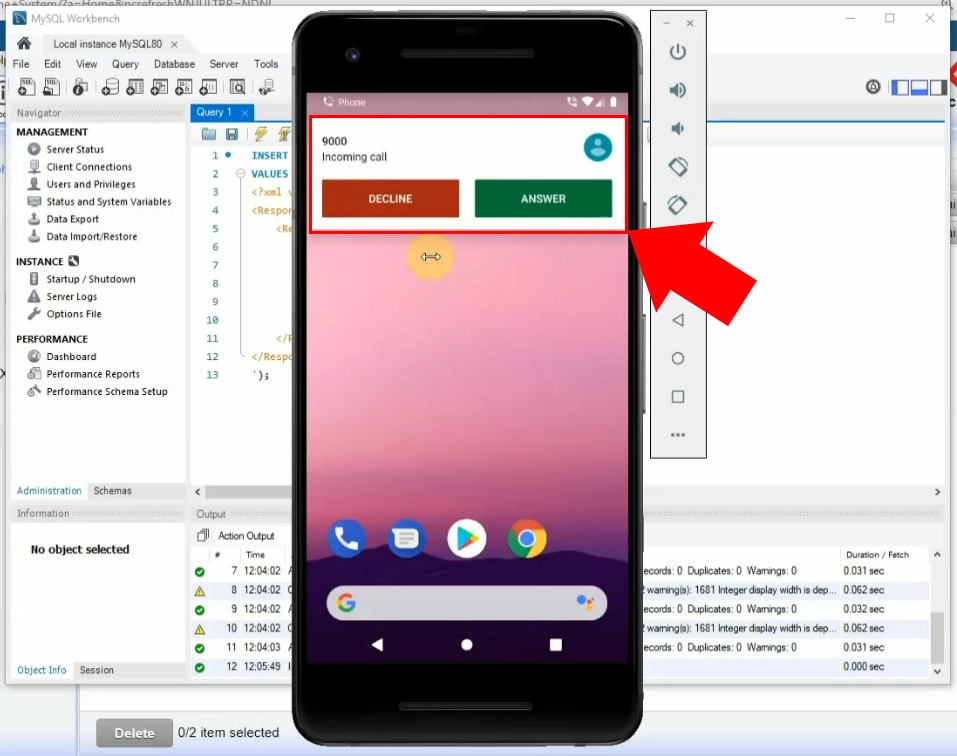
On Figure 12, you can see that our example mobile phone is now ringing. The displayed caller id is the number provided in the SIP configuration from. If you have successfully received your first test call, you can start using the system. You can now make automated calls and have scripts delivering the information for you fully automated.
Summary
By reading this article, you have learned how to setup a scripted call making setup in Ozeki Phone System. Creating such a system means that you can save on human resources and can speed up the information flow to your customers or co-workers. Having an SQL based automated calling systems also means that you can take advantage of the SQL language to manage you calling data. This way, searching for a specific call will take no effort.
If you would like to implement this system into your organization, feel free to discover the articles about using the Ozeki Phone System with other SQL database managing tools, such as MSSQL or Oracle.
To start working, all you need to do is download the Ozeki Phone System and start developing your scripted call solution.
