How to make scripted calls from MySQL
In this guide, we explain to you how you can setup a system that makes scripted calls. It requires basic knowledge of SQL. We are going to use MySQL as the foundation of the project. Using a MySQL database to store data for the scripted call system means that you can use SQL to manage all the data connected to the system. This process will take about 20 minutes to complete. You will find information about what software you need when developing the solution. You will find information about the installation process of MySQL and Python and all the necessary steps of creating the required tables to work with. At the end of the tutorial, you will also see how to start a test call. The Ozeki SMS Gateway is the other necessary component of the system besides MySQL. Using the Ozeki SMS Gateway means that you will acquire full-service provider independence and the speed of 1000 SMS per second. It means that your software will be able to satisfy any customer need regardless of location and system size. Now start to read the tutorial carefully and start the project.
What is a scripted call?
A scripted call is phone call which is done by a text-to-speech system instead of a human. The script can be written before the call and will be stored in the database.
What is MySQL?
MySQL is a database management system based on the Structured Query Language. It is widely used in web databases but it can store any data you wish.
How to make scripted calls from MySQL (Quick steps)
To make scripted calls from MySQL:
- Download the MySQL Installer
- Install python
- Install all product
- Create a password for the root account
- Create the required database and user
- Create a new service extension
- Turn on the connection
- Create a new VoIP PBX line
- Setup a new Route
- Insert a call into the database
- Test the system
How to make scripted calls from MySQL (video tutorial)
The following video explains to you how to create a system that makes scripted call using MySQL. The video starts with installing MySQL and takes you all the way to testing your system with your first call. The video is 7:27 long and it contains all the information you need to create the scripted call system. You will work with the Ozeki Phone System, which is an easy to use and easy to learn gateway software. You will have no problem with following the steps. You will see information about installing MySQL, installing python, and configuring the Ozeki Phone System.
// *******************************************
// Create the database
// *******************************************

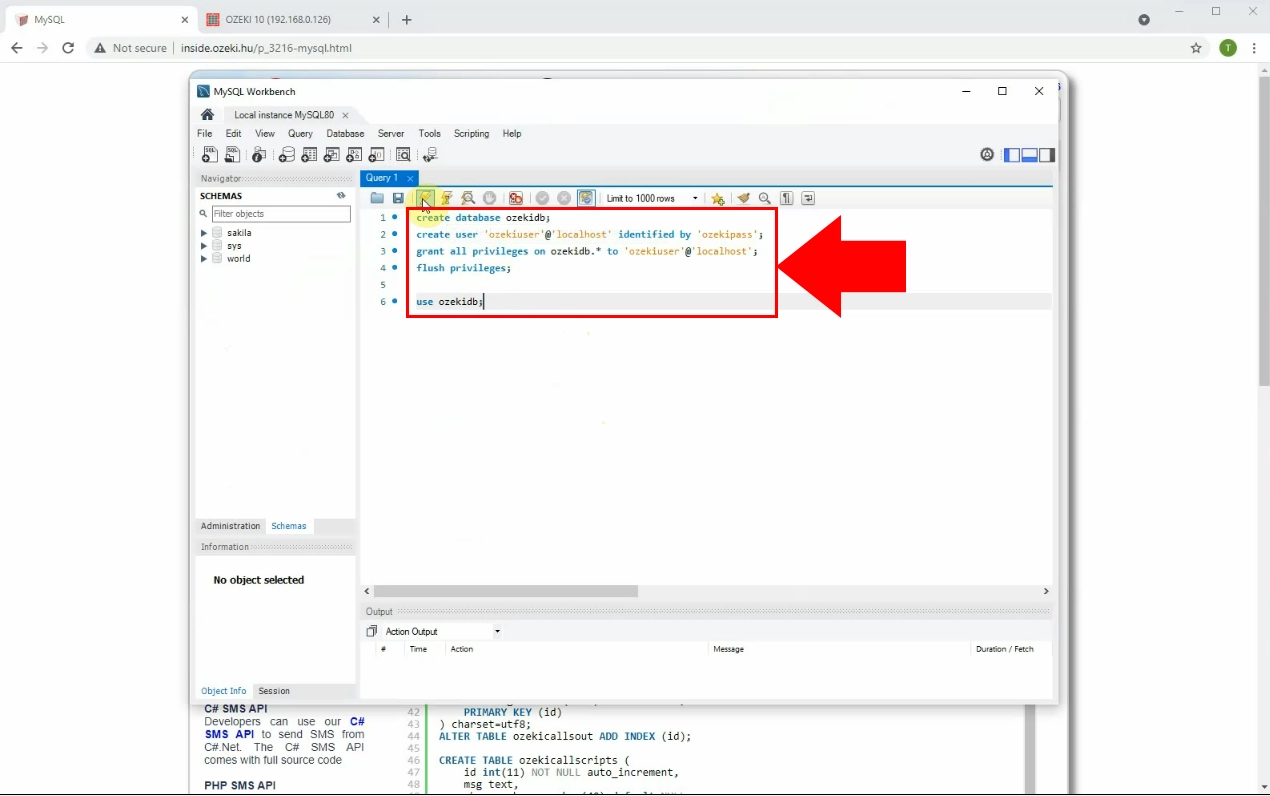
create database ozekidb;
create user 'ozekiuser'@'localhost' identified by 'ozekipass';
grant all privileges on ozekidb.* to 'ozekiuser'@'localhost';
flush privileges;

use ozekidb;

// *******************************************
// Create the database table layout
// *******************************************

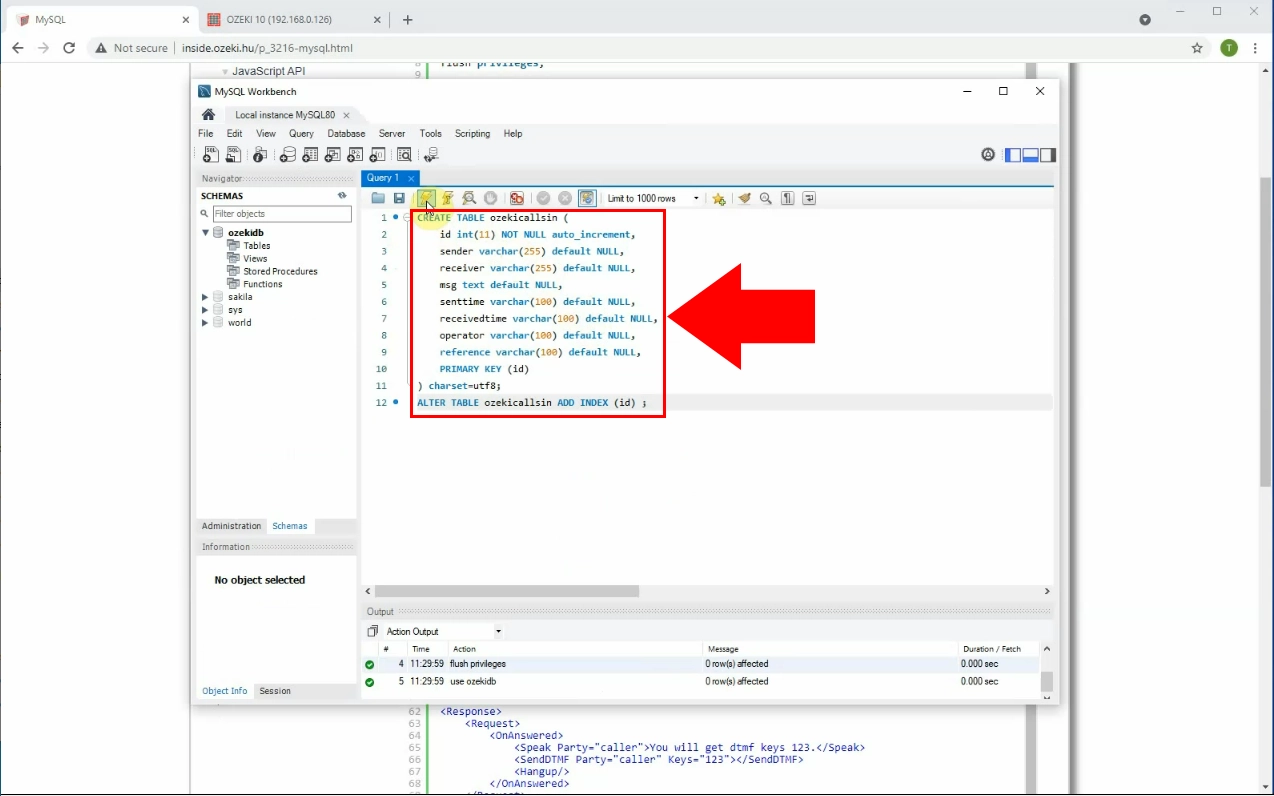
CREATE TABLE ozekicallsin (
    id int(11) NOT NULL auto_increment,
    sender varchar(255) default NULL,
    receiver varchar(255) default NULL,
    msg text default NULL,
    senttime varchar(100) default NULL,
    receivedtime varchar(100) default NULL,
    operator varchar(100) default NULL,
    reference varchar(100) default NULL,
    PRIMARY KEY (id)
) charset=utf8;
ALTER TABLE ozekicallsin ADD INDEX (id) ;

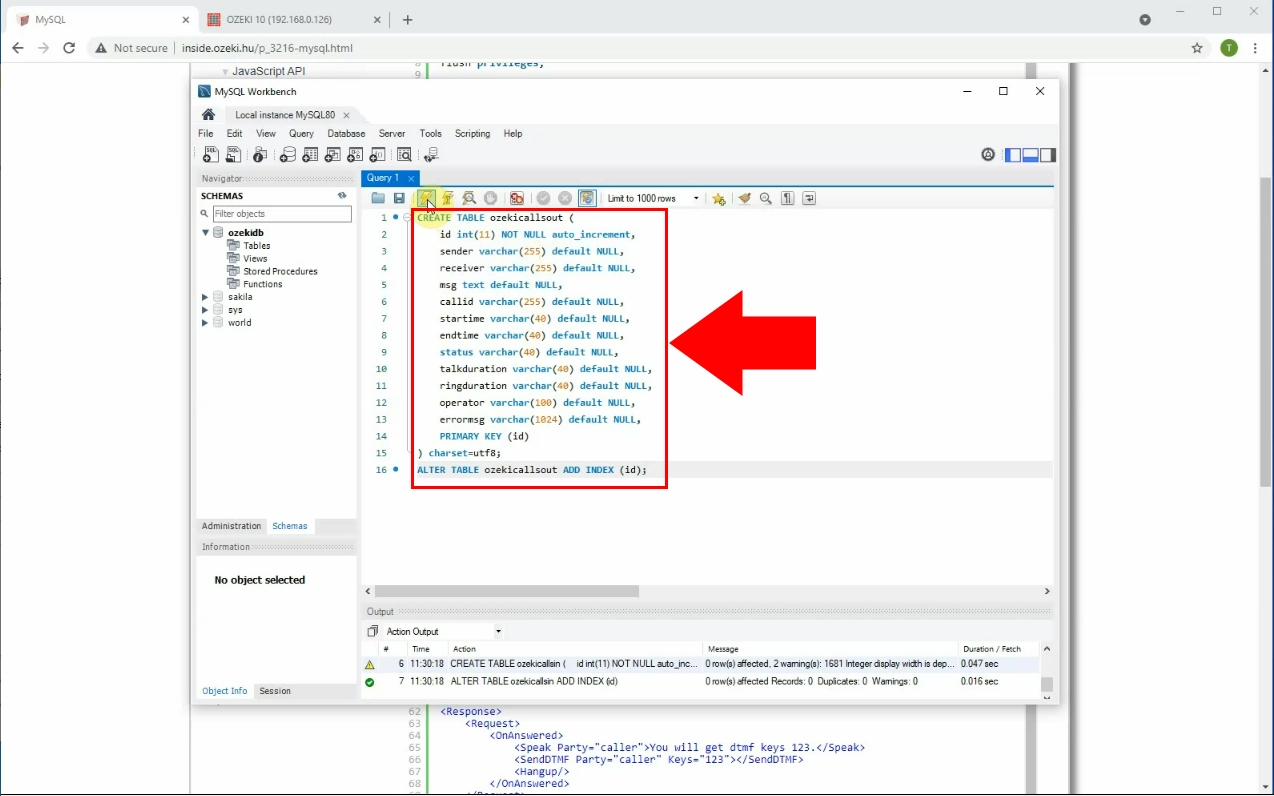
CREATE TABLE ozekicallsout (
    id int(11) NOT NULL auto_increment,
    sender varchar(255) default NULL,
    receiver varchar(255) default NULL,
    msg text default NULL,
    callid varchar(255) default NULL,
    startime varchar(40) default NULL,
    endtime varchar(40) default NULL,
    status varchar(40) default NULL,
    talkduration varchar(40) default NULL,
    ringduration varchar(40) default NULL,
    operator varchar(100) default NULL,
    errormsg varchar(1024) default NULL,
    PRIMARY KEY (id)
) charset=utf8;
ALTER TABLE ozekicallsout ADD INDEX (id);

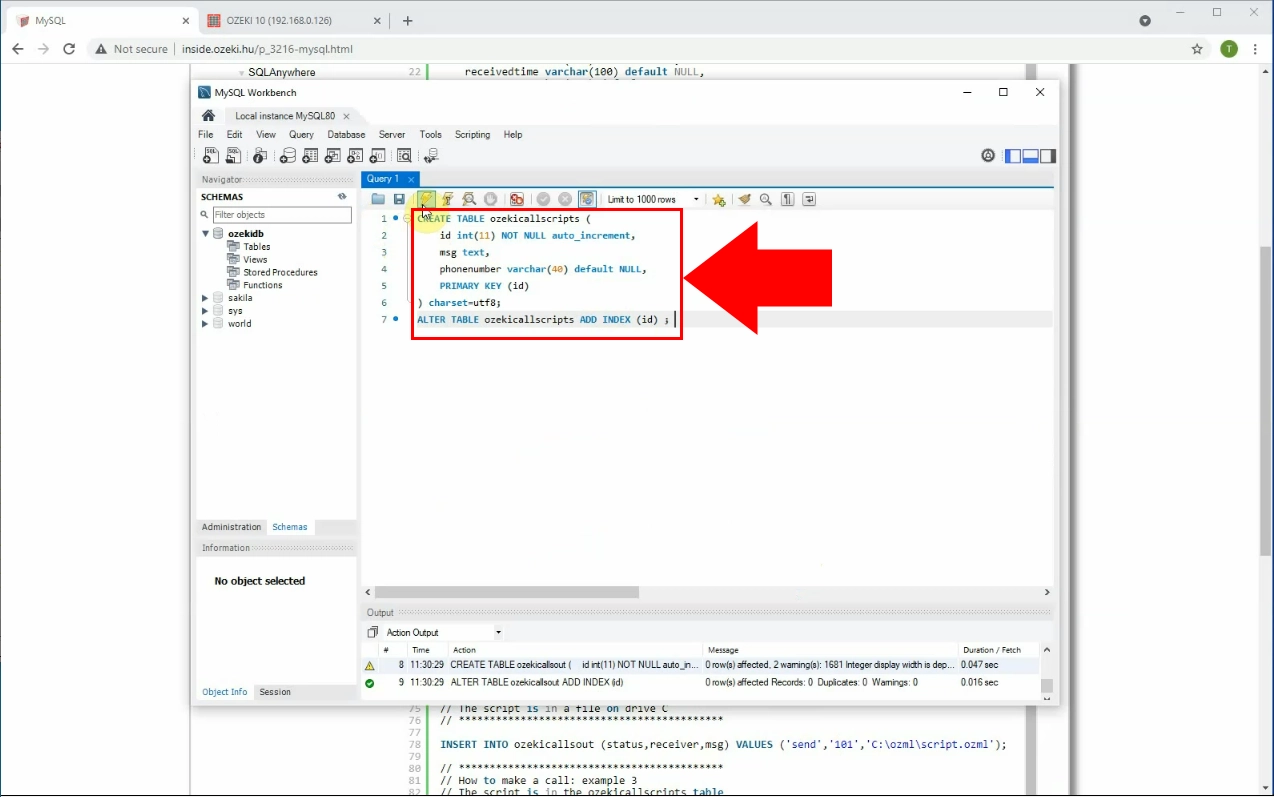
CREATE TABLE ozekicallscripts (
    id int(11) NOT NULL auto_increment,
    msg text,
    phonenumber varchar(40) default NULL,
    PRIMARY KEY (id)
) charset=utf8;
ALTER TABLE ozekicallscripts ADD INDEX (id) ;

// *******************************************
// How to make a call: example 1
// The script is in the ozekicallsout table
// *******************************************

INSERT INTO ozekicallsout (status,receiver,msg)
VALUES ('send','101','
<?xml version="1.0"?>
<Response>
	<Request>
        <OnAnswered>
            <Speak Party="caller">You will get dtmf keys 123.</Speak>
            <SendDTMF Party="caller" Keys="123"></SendDTMF>
            <Hangup/>
        </OnAnswered>
    </Request>
</Response>
');

// *******************************************
// How to make a call: example 2
// The script is in a file on drive C
// *******************************************

INSERT INTO ozekicallsout (status,receiver,msg) VALUES ('send','101','C:\ozml\script.ozml');

// *******************************************
// How to make a call: example 3
// The script is in the ozekicallscripts table
// *******************************************

INSERT INTO ozekicallscripts (id,msg)
VALUES ('1','
<?xml version="1.0"?>
<Response>
	<Request>
        <OnAnswered>
            <Speak Party="caller">You are using call script 1. Thank you for calling. </Speak>
            <Hangup/>
        </OnAnswered>
    </Request>
</Response>
');

INSERT INTO ozekicallsout (status,receiver,msg) VALUES ('send','101','1');
Download the MySQL Installer
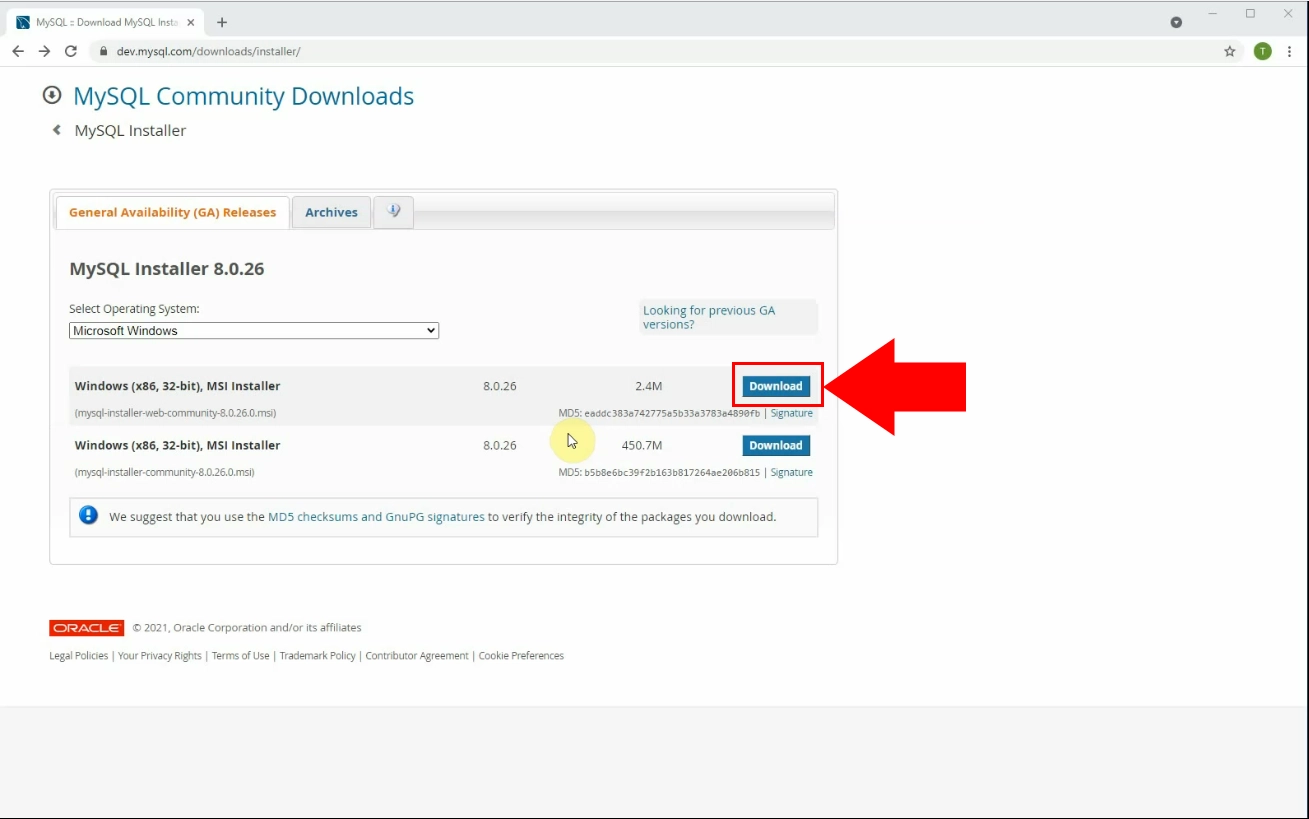
Find the Download button in the Windows version bar (Figure 1). Click the Download button next to the latest version number. This will start the downloading of the latest MySQL software in your browser. There you will be able to select the type of MySQL you wish to install. Downloading MySQL is the first step of creating a scripted calling setup.
Choose the Developer Default option
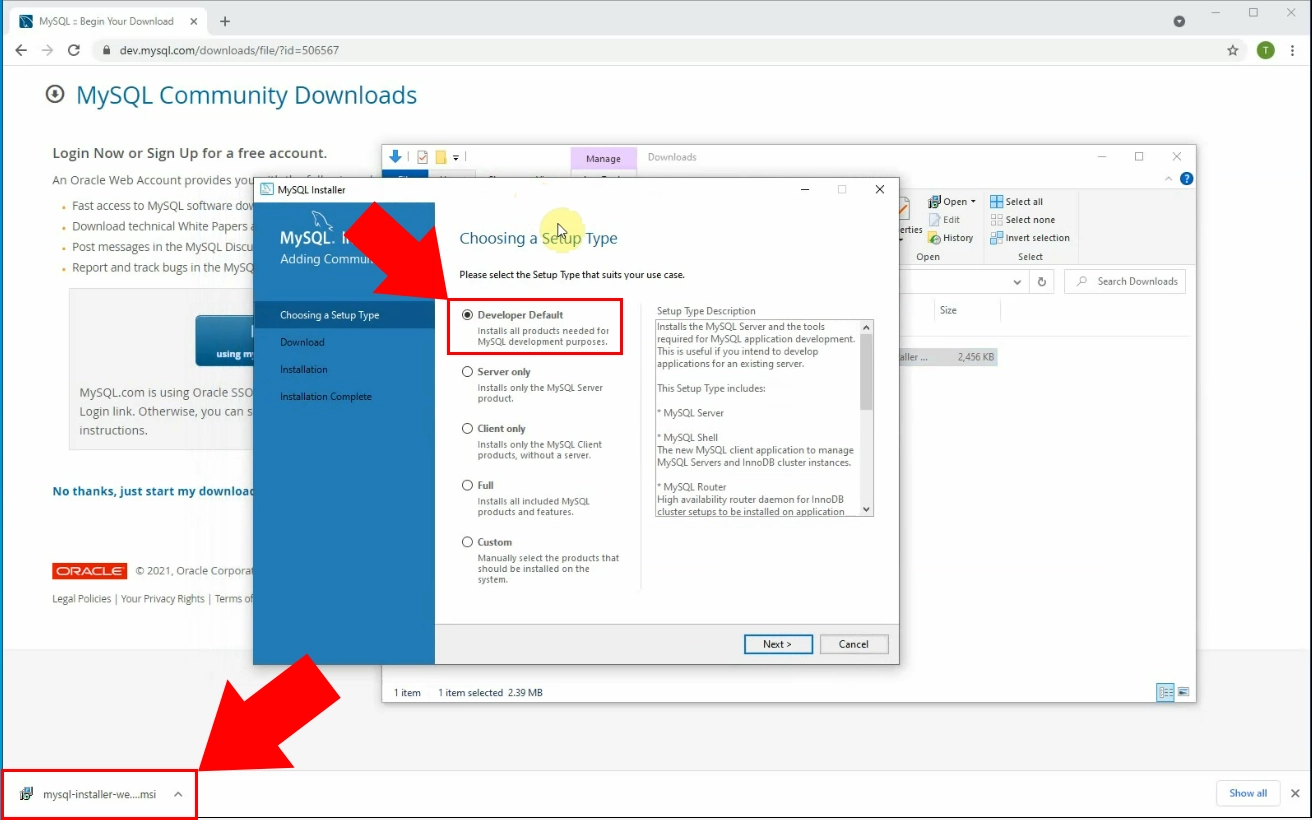
After the download process, open the MySQL Installer by double-clicking the downloaded file in your browser. It will open a dialog window where you can select the Setup Type of the new software. Choose the Developer Default setting (Figure 2). It will make sure that you can use MySQL for development purposes. Click the Next button to proceed with the process.
Check the installation requirements
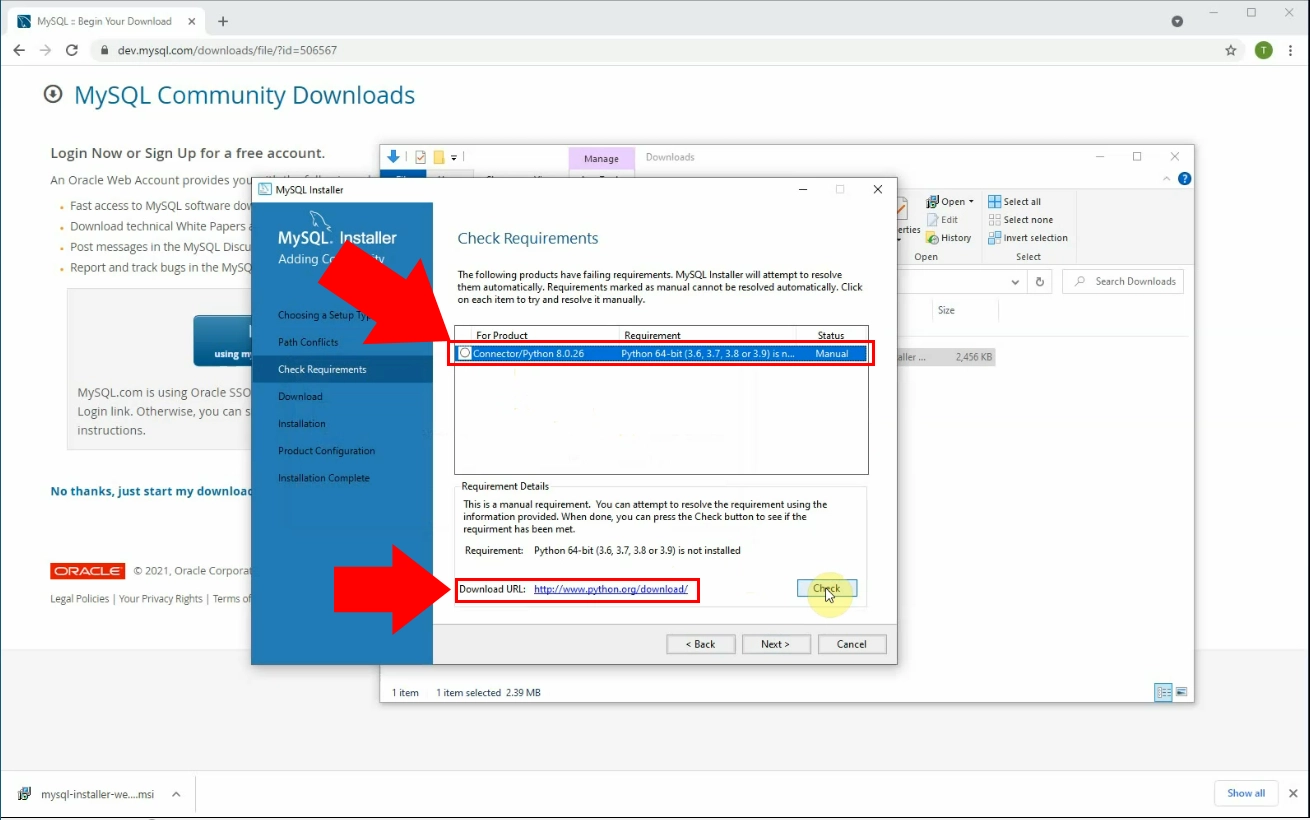
The MySQL Installer will check your system to decide if all the product is installable. As you can see on Figure 3, the MySQL Installer find out that the Python is not installed on the computer. To recognize the problem and start fixing it, check the Requirement Details Panel under the list of errors. You will find key information about all the errors here.
To fix the issue of missing Python, click the Download URL link. It will take you to the official download page of Python. You can get the latest version of the programming language there. If you have fixed the error, click the Check button. The MySQL installer will check if the error is fixed or not.
Download the latest version of Python
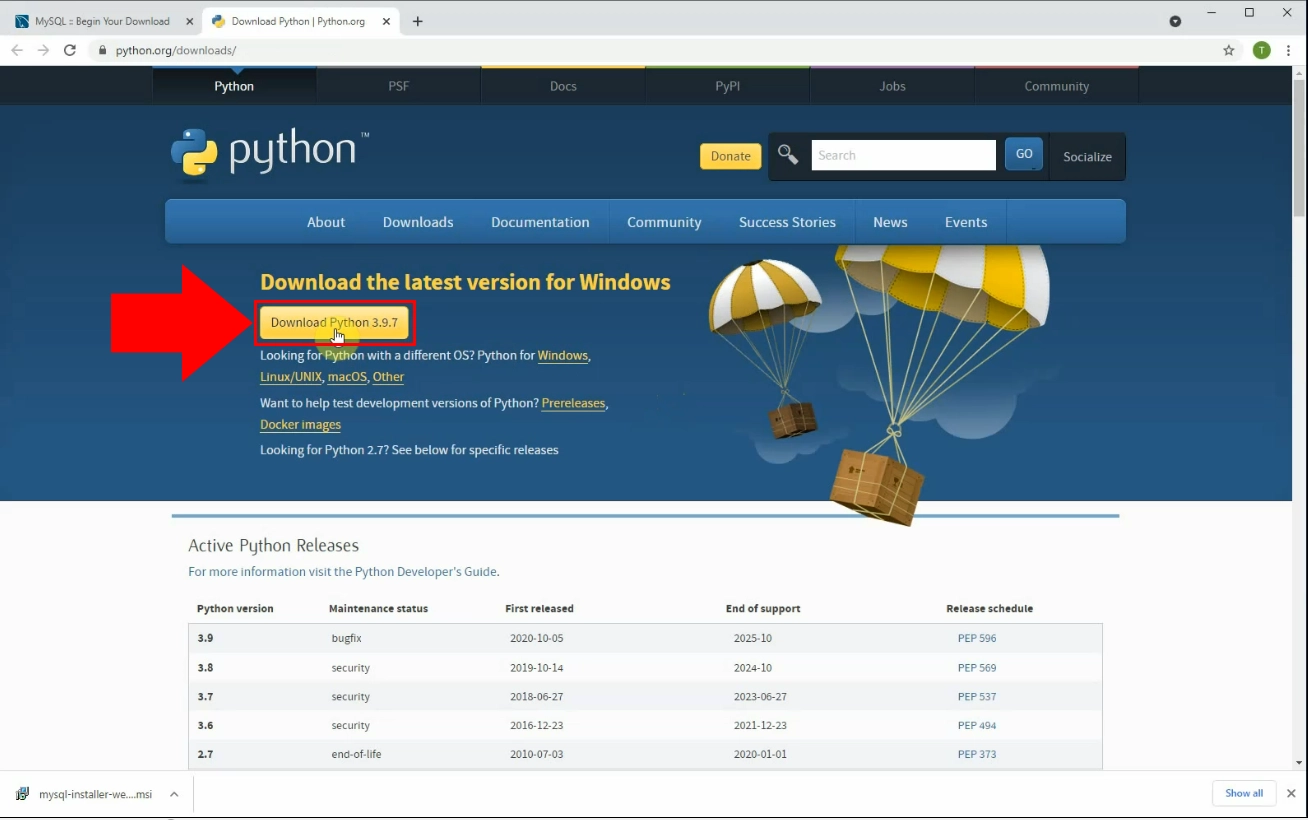
On Figure 4, you can see the download page of Python. This site will always offer the latest version of the software. You can see the yellow Download Python button below the title. Click it to start the download process. After you clicked, you will see the file downloading in your browser. This python installer will enable you to use the Python programming language on your computer.
Install python
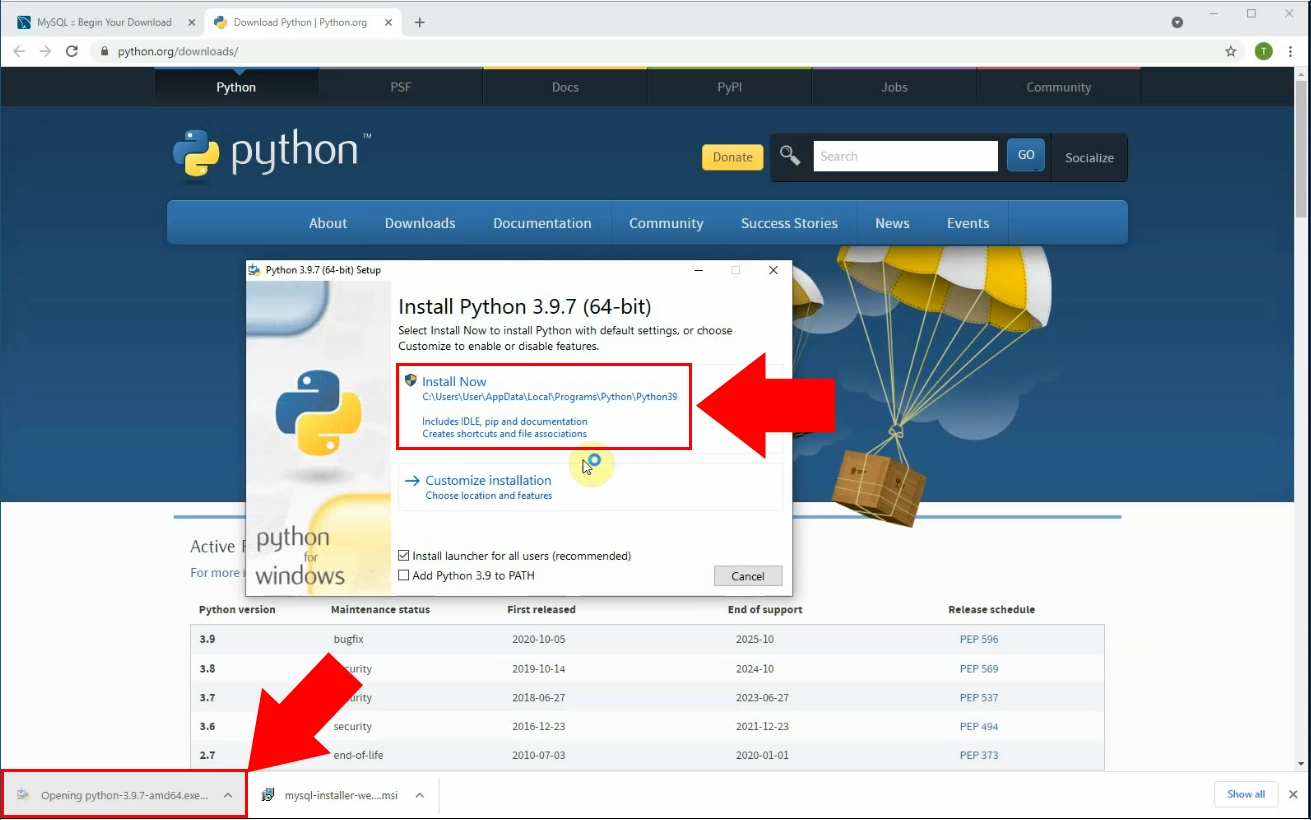
After you have clicked the downloaded file in your browser, you will see the Python installer (Figure 5). You can now choose if you would like to install python with the default settings, or with you own custom settings. Choosing Install Now with the default settings is the easiest way to install Python on your computer. If you click the Install Now option, the installer will now install Python on your computer. No further action required after it.
Download all products
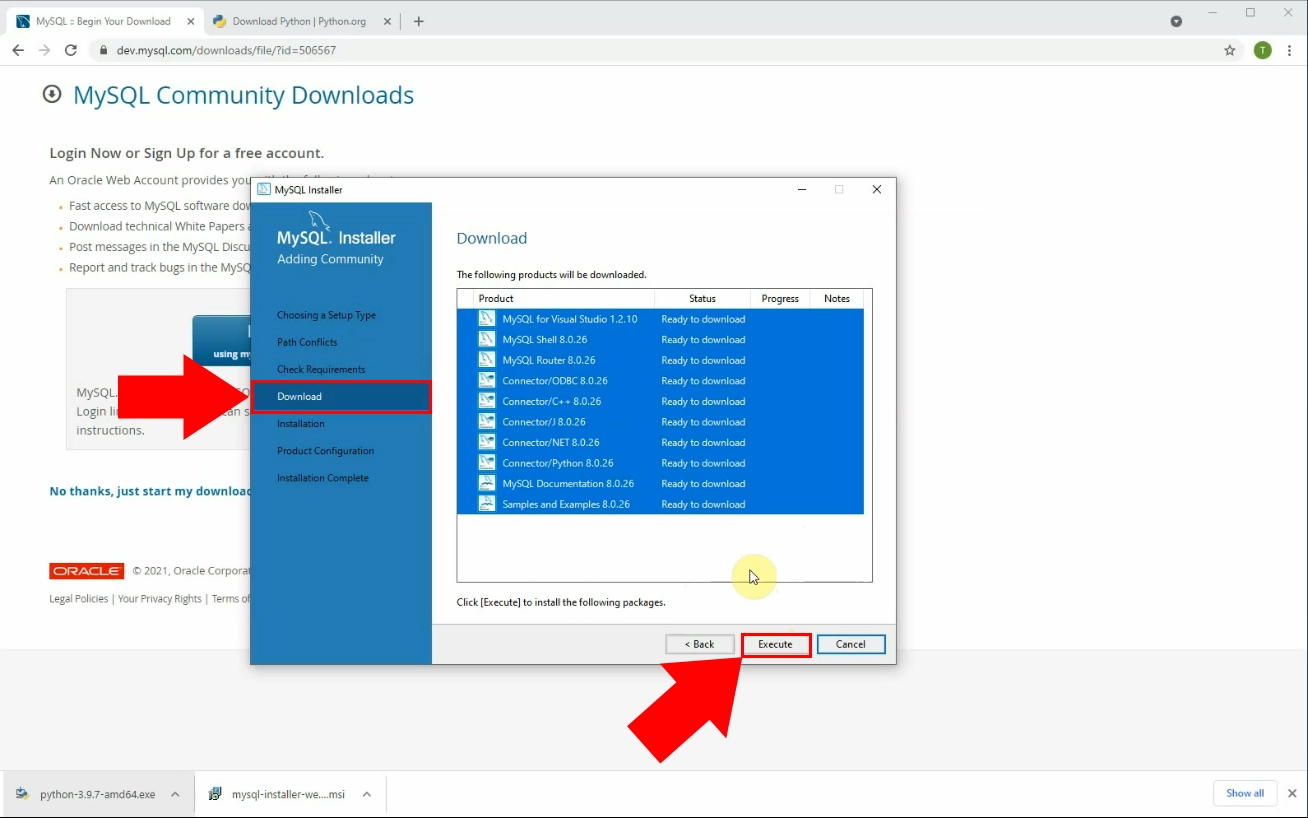
Now you can start installing MySQL. Your installer will not detect the Python missing error now. In the next step of the MySQL installer, you can see the list of products you will need to install to have a working copy of MySQL (Figure 6). In this step, you will Download all the products. To start the Downloading process, click the Execute button located at the bottom of the dialog window. Now the installer will start to download all the necessary products.
Install all products
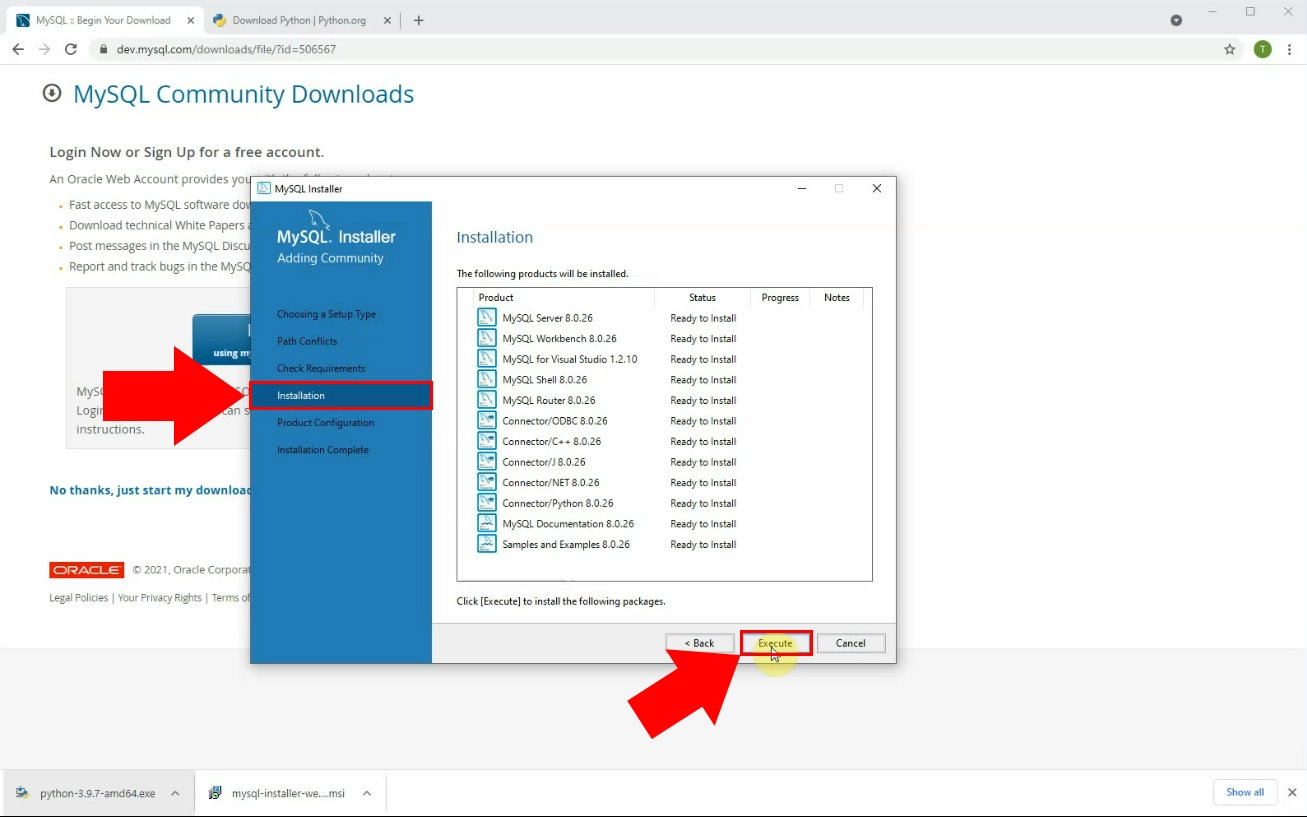
In the next step of installation, you will install all the product that you just downloaded. You can see the list of all the components that MySQL requires. if you see the ‘Ready to Install’ next to the component, you can start installing it (Figure 7). If you would like to start the installation process, press the Execute button. This will install all the components at once.
Wait for the installation to complete
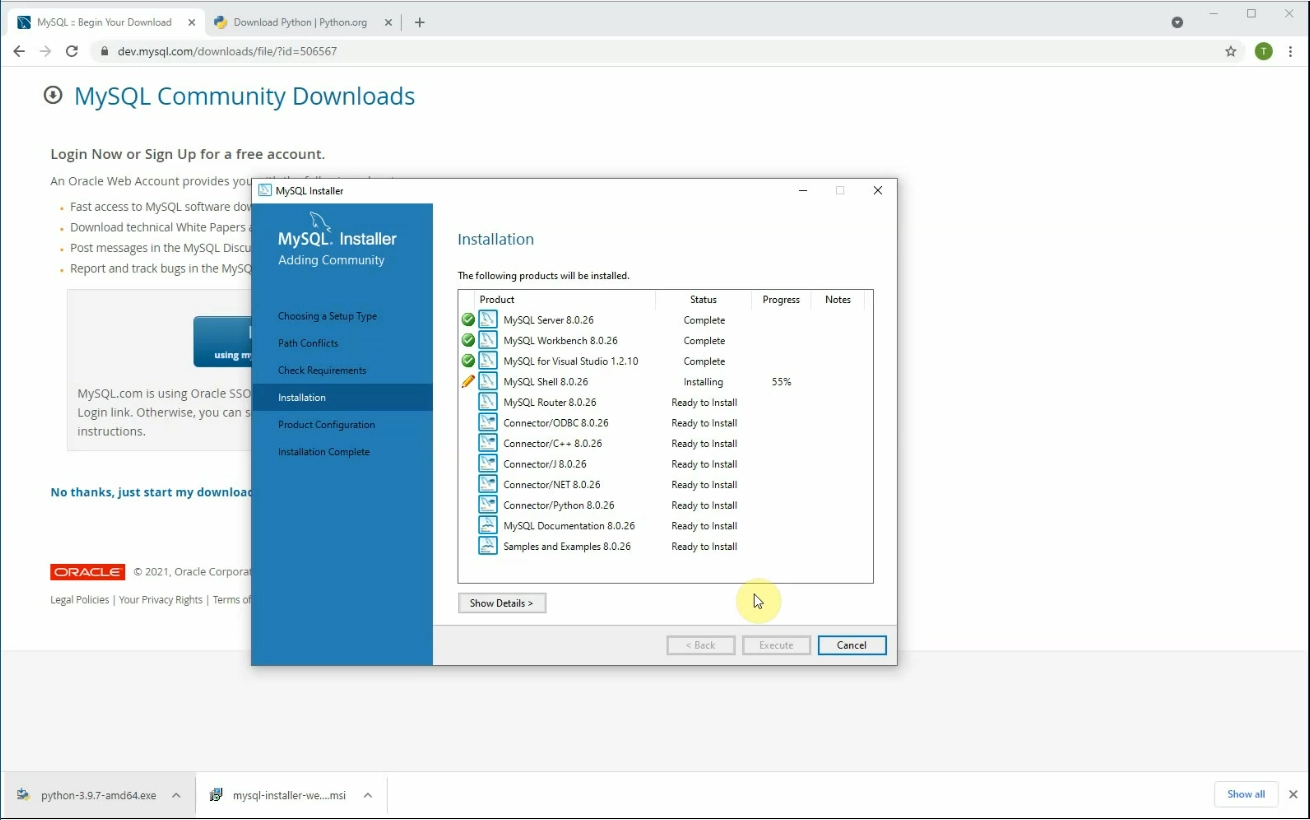
Now if you pressed the Execute button, you will see that the first component is installing. If it is marked with a pencil icon, it means that the components is installing. If it is successfully installed, you will see a green checked icon before the name of the component. You will also see a percentage under the Progress title. The higher it is, the closer the component is to being finished. If you have all of the list installed, you will see the window where the rest of the configuring will be done.
Create a password for the root account
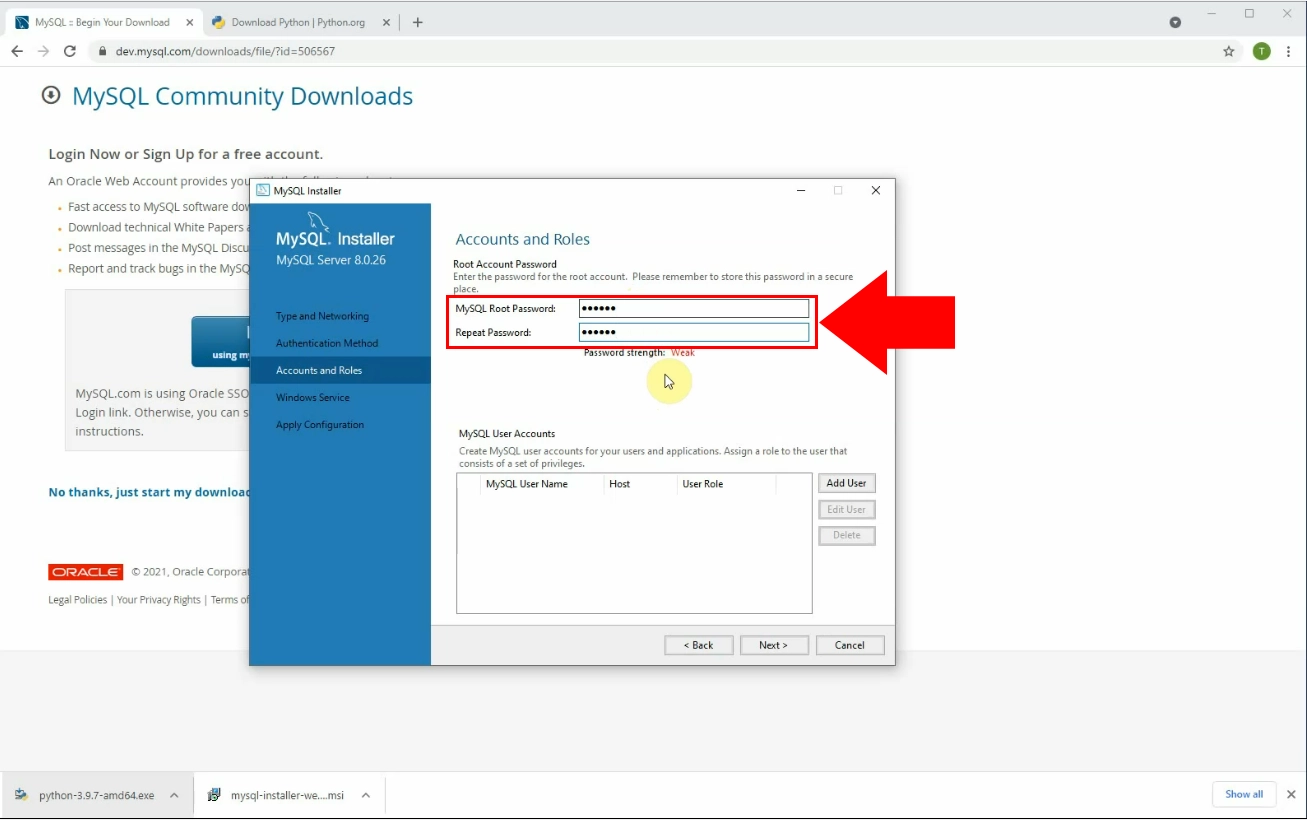
In the next step of the MySQL installer, you will set the MySQL Root superusers password. When you install MySQL, it will only create a superuser called a root user. It has all the privileges and can do anything. If the password bracket is empty, it means that anyone can connect to the MySQL server as root and can modify anything in the server.
The root password needs to be something easy to remember but hard to guess. Type in your password in the MySQL Root Password bracket. To avoid misspelling, you need to type in your password a second time. If you have the password typed in, click the Next button.
Complete the installation process
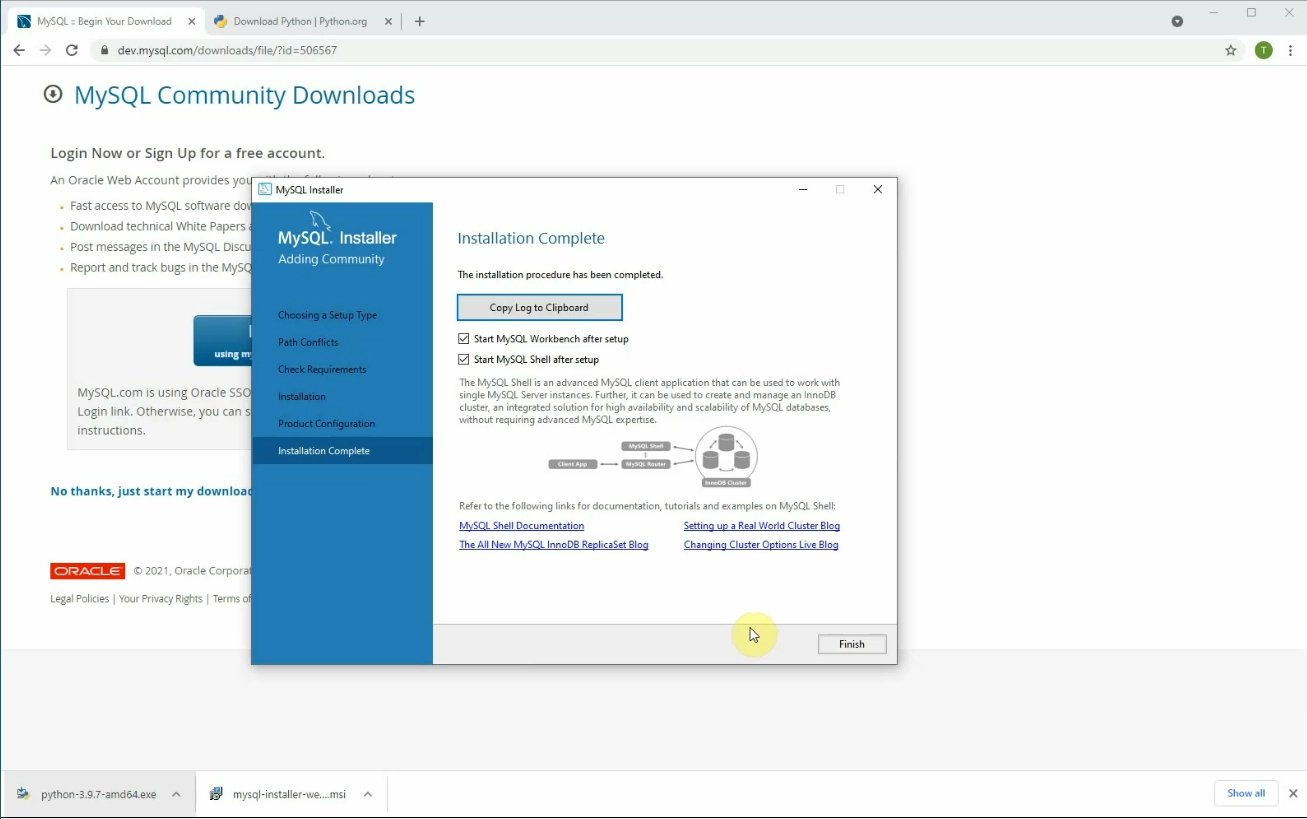
If you see the window that is visible on Figure 8, it means that you have all the components successfully installed. As you can see on Figure 10, you have a button to copy the log file of the installation to your clipboard. You can also choose to run the MySQL Shell or Workbench after closing this window. You can see the two options under the ‘Copy Log to Clipboard' button. Click the Finish button to close this window
Create the required database and user
If you want to use MySQL with the Ozeki SMS Gateway, you need to create a database and a user. The database will be named ‘ozekidb’ and the user will be ‘ozekiuse@localhost’. The user you just created will need to have access to everything in the database. You can give all permission to the user with the command grant. You can see the whole code on Figure 11.
Create a table for incoming calls
To have a place to store the incoming calls, you need to create a table called ‘ozekicallsin’. This table will save all the incoming calls and will store information about the calls. It will store the id of the call, the sender, the receiver, the message, the time it was received and the operator of the call. Make sure that the index is the id column (Figure 12).
Create a table for outgoing calls
You will also need a table to store the data for the outgoing calls. This will also have an id, a sender a receiver, a message a receivedtime and an operator column. But also it will have a column for the time the call request was sent. Make sure that the id is the index of the table (Figure 13). You can find the code for it above in this page.
Create a table for call scripts
You also need a table that you will store your scripts. It will be called ozekicallscript. It will feature an id,a message and a phonenumber column. You can also find the code above. Copy it and paste it into the query of MySQL. Make sure that the index of the table is the id column (Figure 14).
Create a new service extension
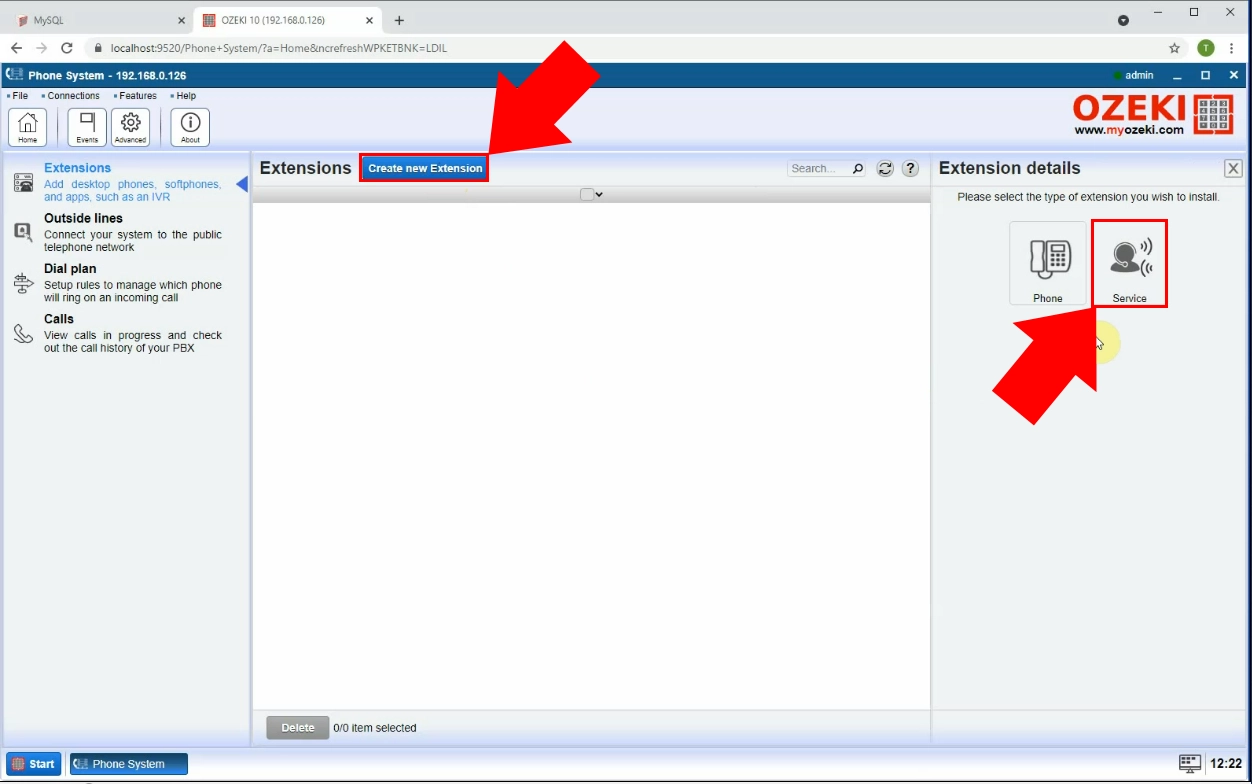
Now we are going to start configuring the Ozeki Phone System. The first step is to add a new extension. Start the Ozeki Phone System and search for the ‘Create new Extension’ button. It is a blue button located next to the Extensions title (Figure 15). After clicking the button, you will see a panel on the right-side of the window where you can choose if you would like to create a Phone extension or a service extension. Click the Service extension button to start creating the extension.
Select the SQL call option
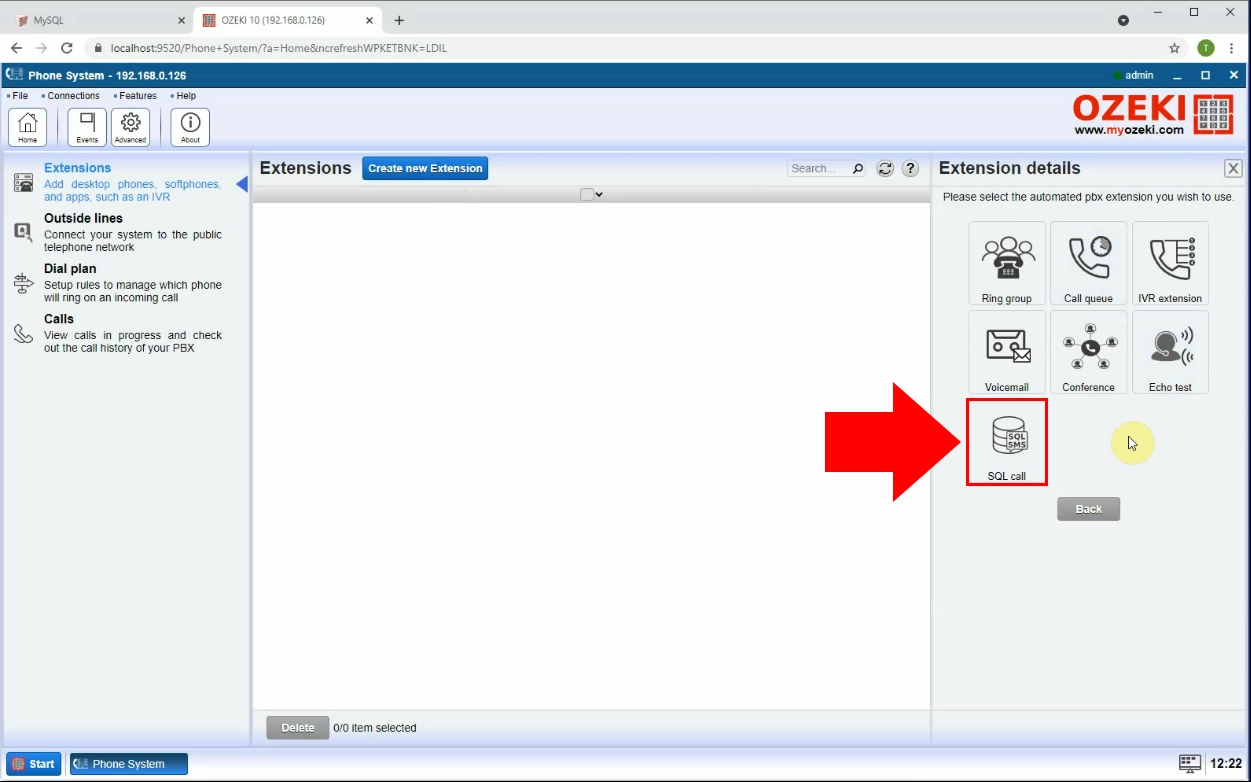
In the next step, you can see your options of extensions. The Ozeki SMS Gateway is a multipurpose software that you can use to setup many extensions like a voicemail or a conference call extension. This time choose the SQL call option (Figure 16). This will start the setup process of a system that uses and SQL database as a data storage.
Choose MySQL Calls
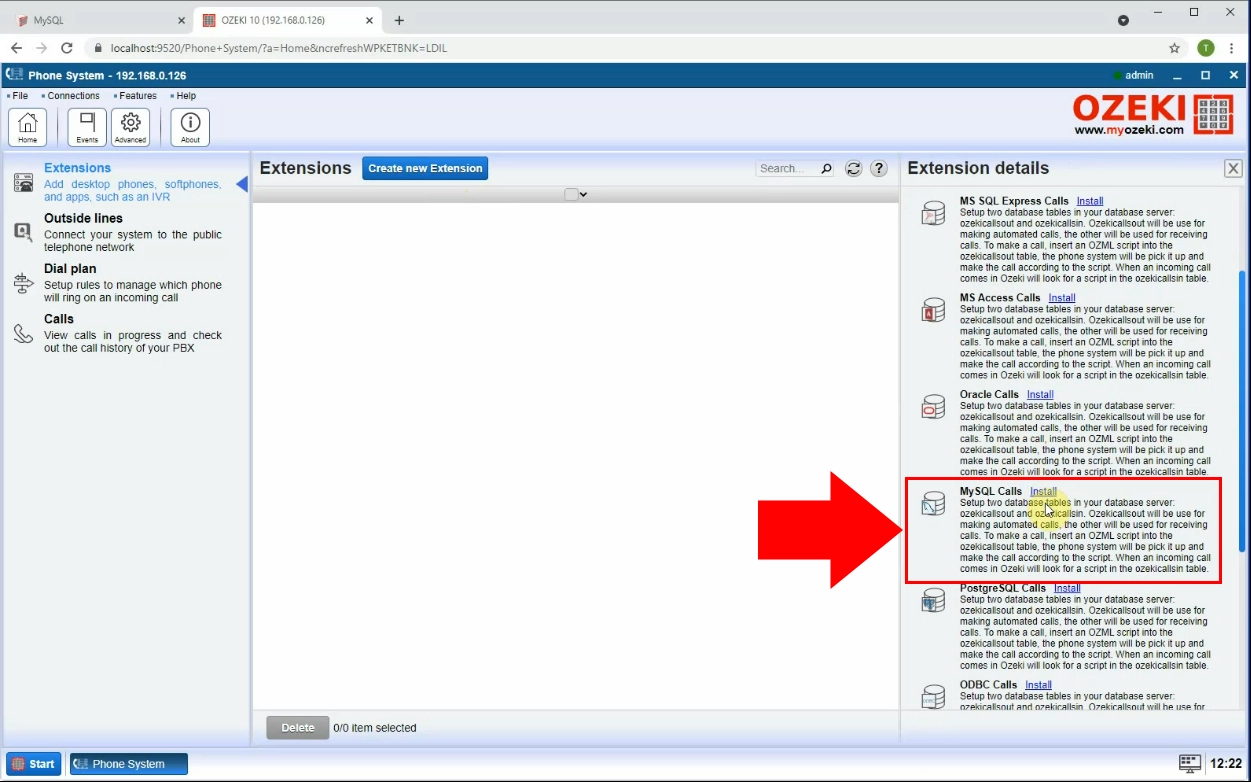
In this step you can choose which database management software you want to use to store data in. The Ozeki Phone System handles most of the used database management software like MS Access or Oracle. It means that you can start phone calls using on of them. In our case, choose the MySQL Calls option. You can choose an option by clicking the blue button next to the name of the option (Figure 17).
Provide the connection settings
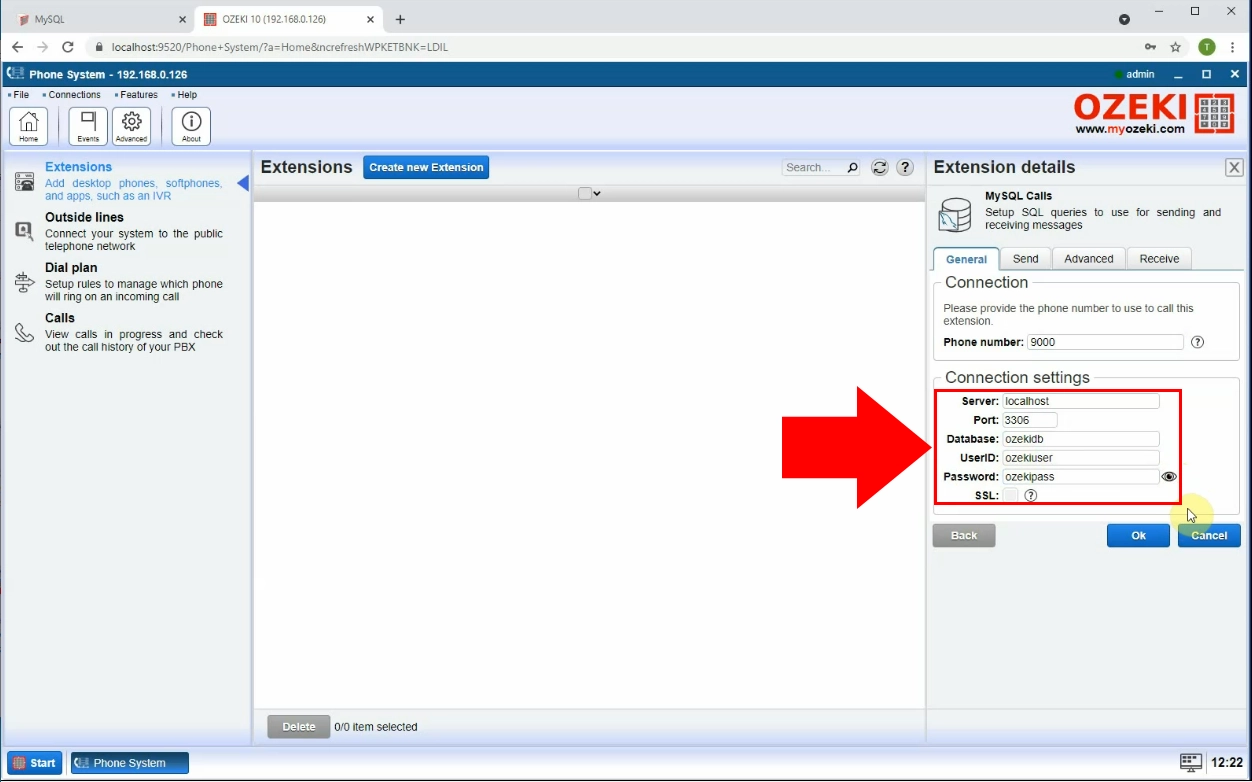
Now you have a connection. In this step we are going to show you what settings you need to provide for the extension. You need to set the server to localhost. The port number will be 3306, the database will be the previously created ozeki database called ‘ozekidb’. The user and the password will be the created ‘ozekiuser' and ‘ozekipass’. If you have finished with the setup, click the Ok button.
Turn on the connection
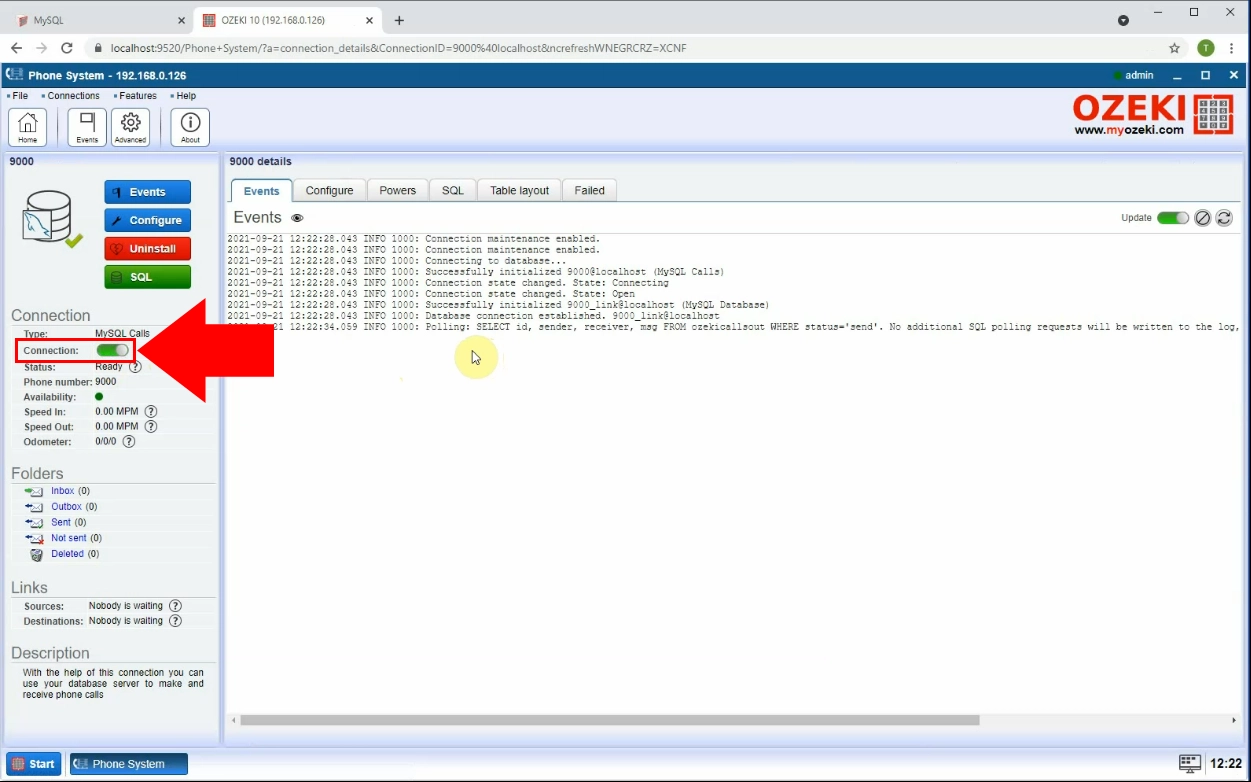
If you have successfully created the connection, all you need to do is to turn it on. You can do this with the ‘Connection’ switch button. This will automatically establish the connection between the Ozeki Phone System and the MySQL database. As you can see on Figure 19, the ‘Events’ tab will show all the happenings of the connection in real time. This way you will easily recognize if there is an error in your system.
Create a new VoIP PBX line
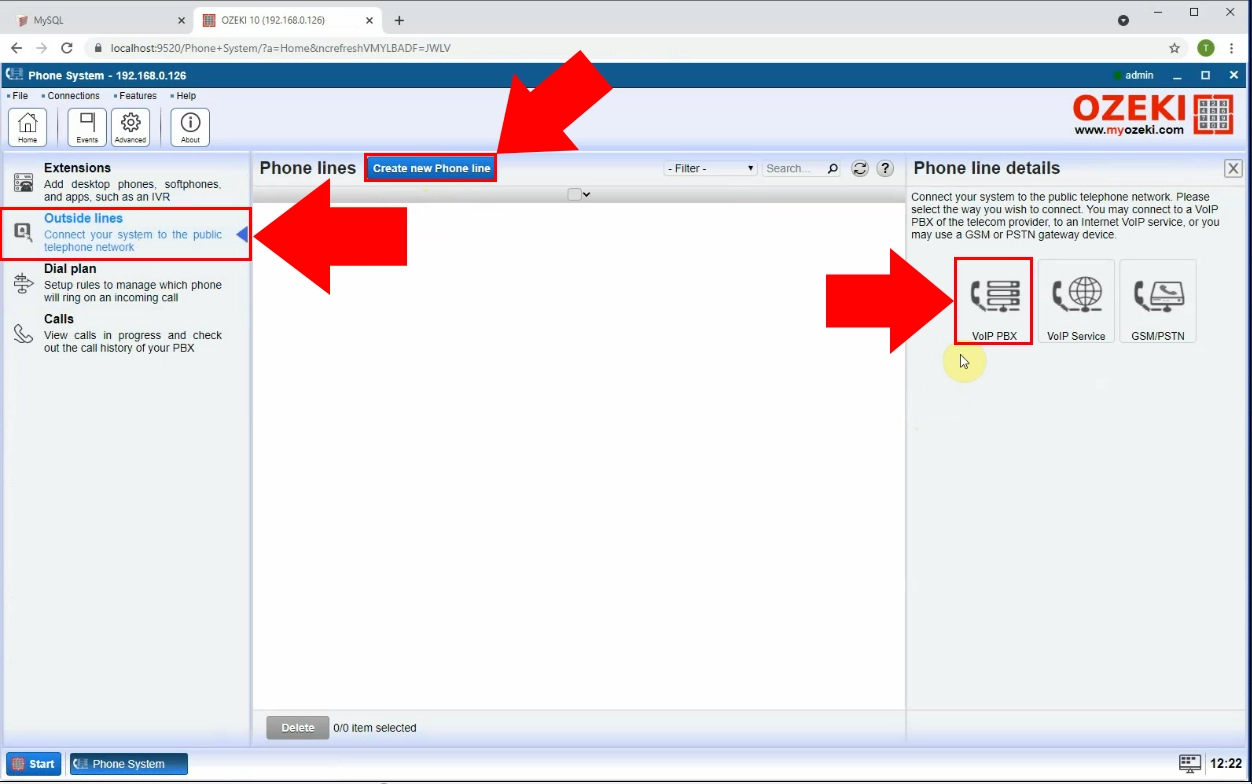
To have a connection with a phone line, you need to setup a new VoIP PBX line. To do so, search for the Outside lines option in the left-side panel of the Ozeki Phone System. There you will find the blue button titled ‘Create new Phone line’ (Figure 20). Click it to see the right-side panel where you can select the VoIP PBX. Click the VoIP PBX option to start providing settings for the connection.
Provide SIP settings
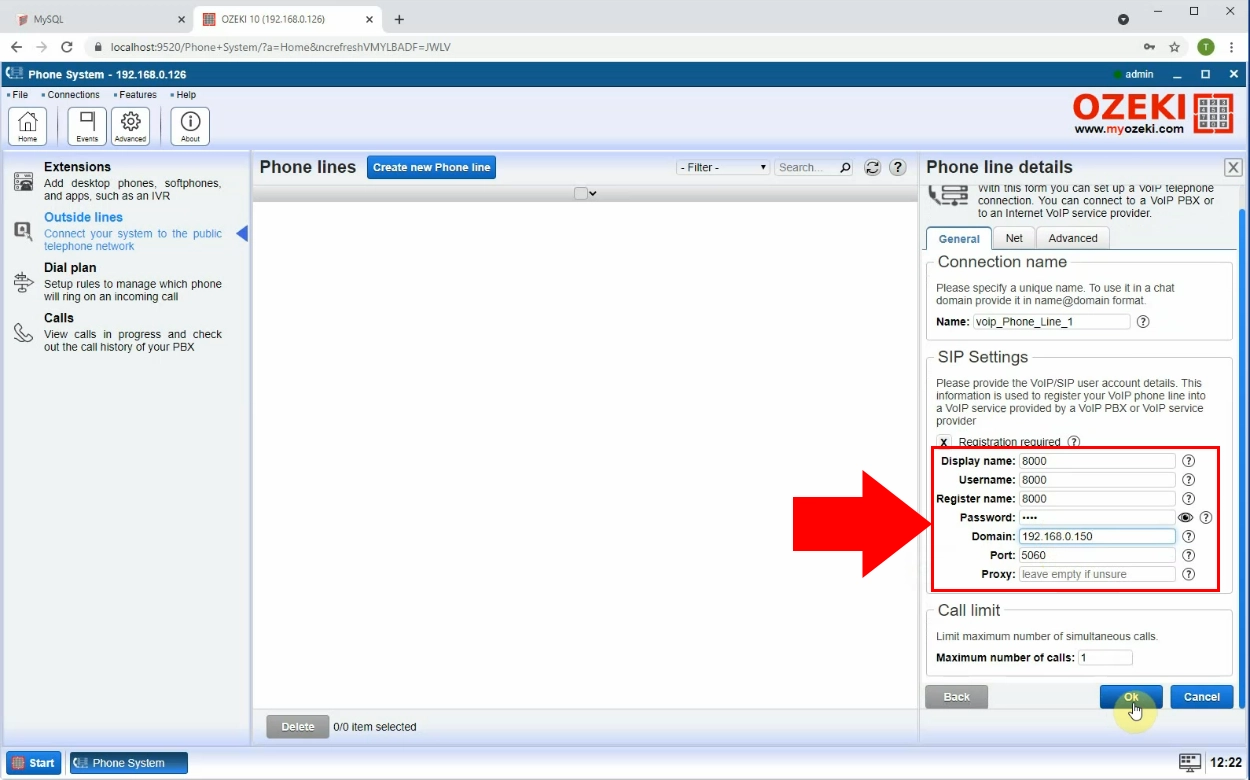
To have the connection between the Ozeki Phone System, you will need to provide the settings like a Display name, a Username, a Register name, a Password, a Domain and a Port for the connection (Figure 21). If you have provided all the SIP settings, click the Ok button to finalize you’re the settings. The display name will be the name that the call receiver will see on the phone when the call is arrived.
Setup a new Route
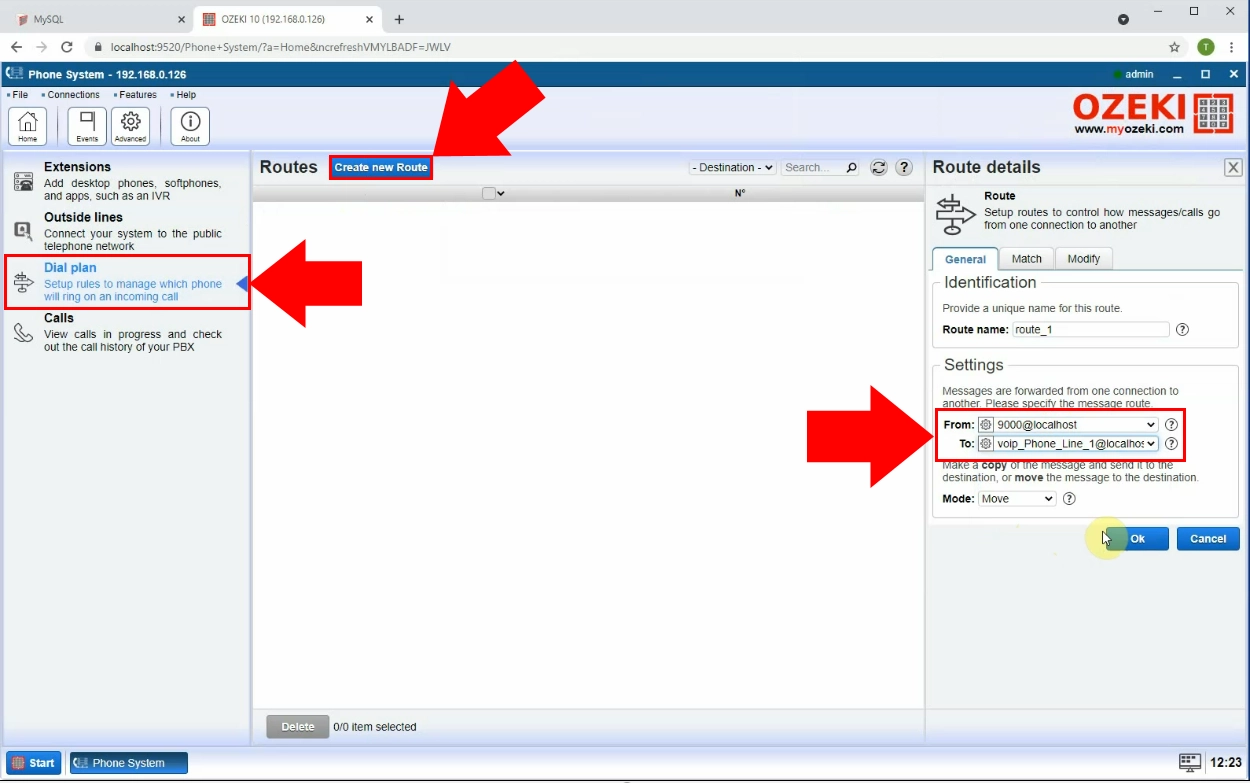
In this step, you need to create a new dial plan. To do so, you need to search for the ‘Create new Route’ button located next to the ‘Routes’ title on the Routes panel. Click it and choose the Dial Plan option. In the right-side panel find the settings group-box. There you will find the two settings called ‘From’ and ‘To’. The ‘From’ textbox needs to be the MySQL database, the ‘To’ textbox needs to be the VoIP Phone line (Figure 22). If you have finished setting up the connection, click the ‘Ok’ button.
Now you are finished with the software configuration of the system. All you need to do is testing the system. In the following two steps, you will see how you can test your system.
Insert a call into the database
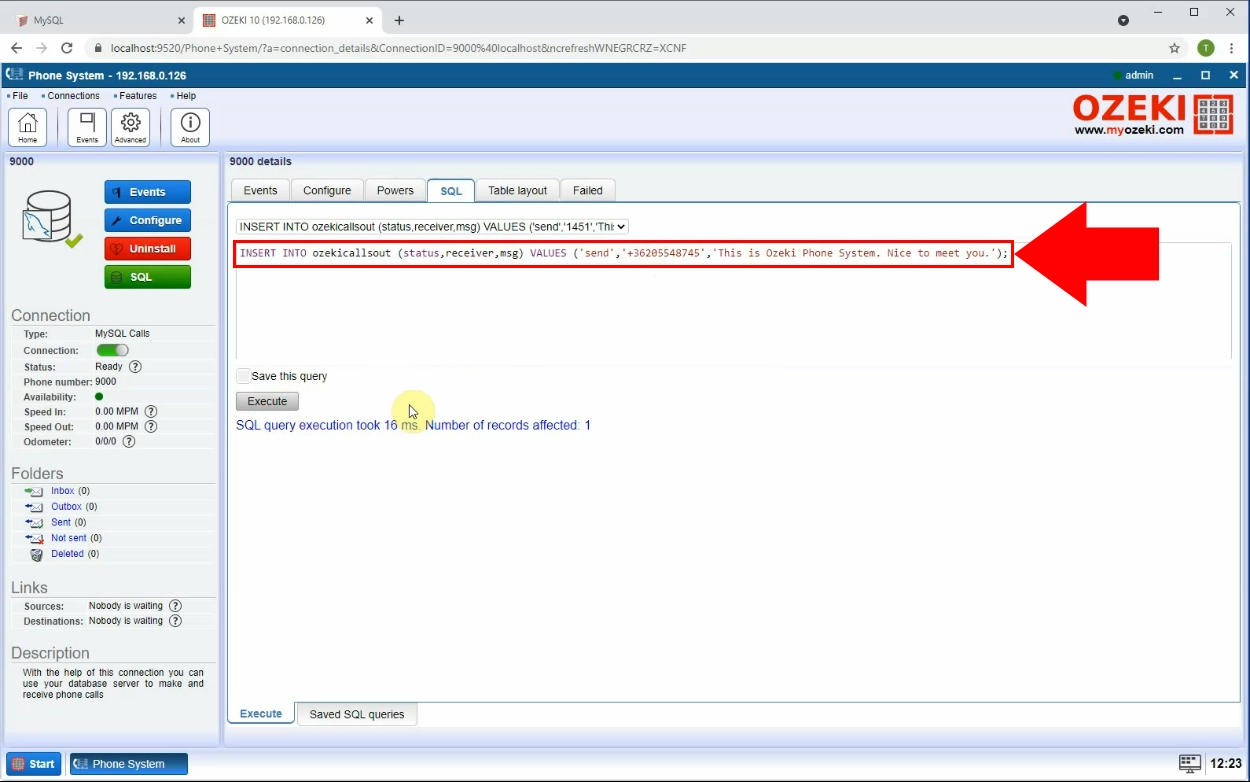
The best way to test your system is to create a test call and insert it into the database. If your system is working correctly, it will scan the table that stores the outgoing calls and will call the given phone number. To insert the new call into the database, provide the code snippet that you see on Figure 23. Click the Execute button under the code part to execute the SQL command. Now all you have to do is wait for the test call to arrive at your test mobile phone.
Test the system
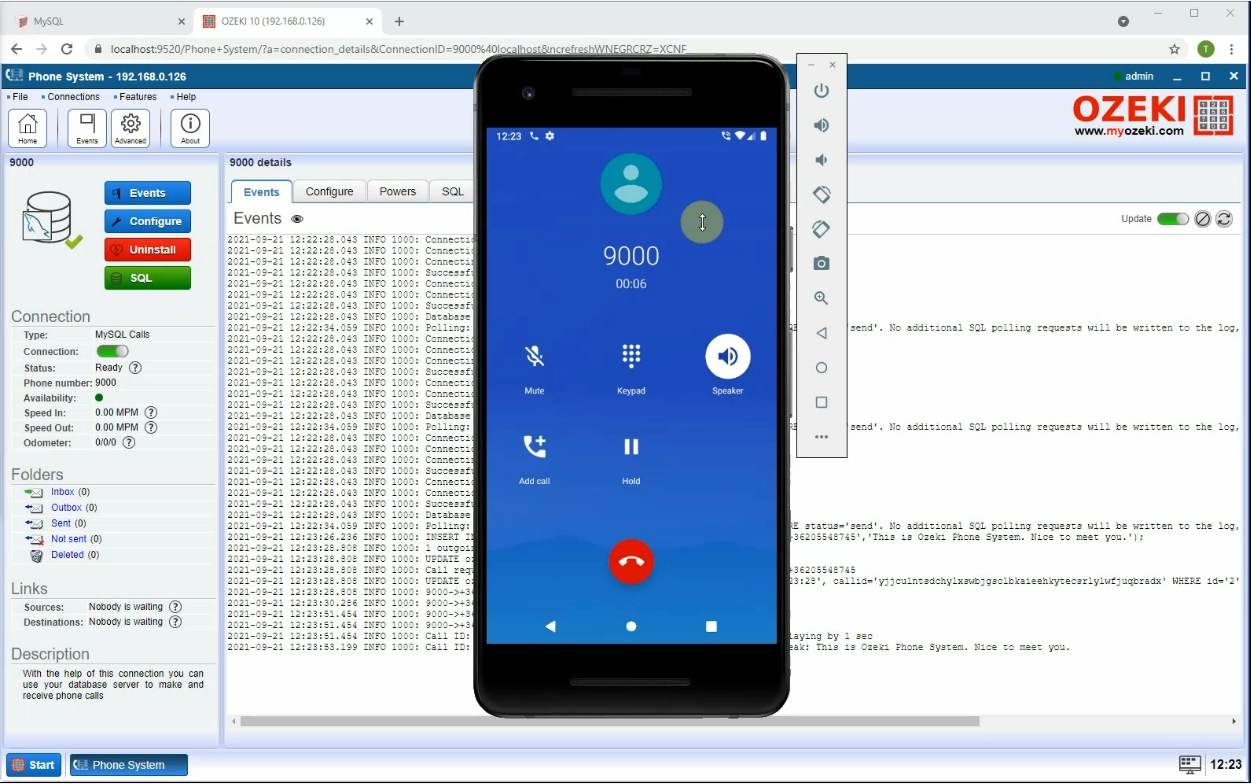
If you have done everything according to the tutorial, your test mobile will ring and you will see the given Display name as the caller ID. If you accept the call, you will hear the provided test message read to you.
Conclusion
By reading this article, you have learned how to configure a system that can call numbers from an SQL database automatically and forward messages. This allows you to save on human resources and time. The system will automatically call all the phone numbers from a specified column of a database table and forward the specified message to them.
If you want to know more about the technology, feel free to discover the article on the Ozeki webpage. For example start with how to make calls from MS Access and how to make calls from Oracle.
To start automated calling, all you need to do is download the Ozeki Phone System and start developing the solution above. Start now!.
