How to make scripted calls from Oracle
This article contains a detailed explanation on how to make scripted calls form Oracle using Ozeki SMS Gateway. It will help you set up an SQL database in SQL Plus and install all dependencies inside Ozeki SMS Gateway to make scripted calls possible. This is an incredibly powerful tool to script calls using SQL. We hope this article will be helpful in setting up the solution.
What is Oracle?
Oracle is a database management software product. A database contains an organized collection of information. A database management system is not only used for storing the data but to effectively manage it and provides high performance, authorized access and failure recovery features.
What is SQL Plus?
SQL Plus is the most basic Oracle Database utility, with a basic command-line interface, commonly used by users, administrators, and programmers. In this article we use it to make scripted calls.
What is Ozeki SMS Gateway?
Ozeki SMS gateway is a very reliable, high performance SMS gateway software for Windows and Linux. It can send or receive a massive amount of SMS messages in short time. With it you will get the highest performance, availability and security to run your most demanding SMS applications.
How to make scripted calls from Oracle (video tutorial)
In this video tutorial you will learn how to make scripted calls using Oracle. It contains all the necessary steps to setting up and using this connection. Mainly, we need SQL Plus and Ozeki SMS Gateway to complete this task. Follow along the steps presented in this video to install and use this solution for the first time successfully.
// *******************************************
// Create the database
// *******************************************

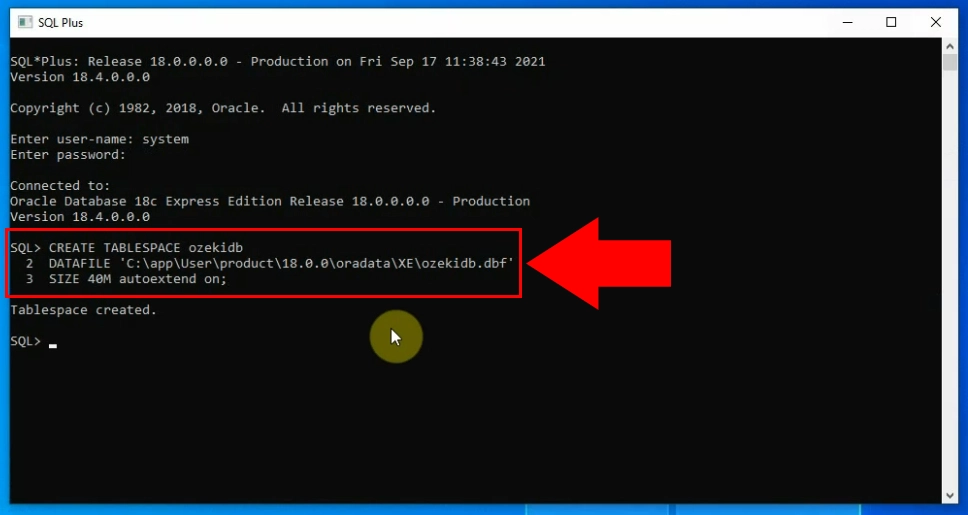
CREATE TABLESPACE ozekidb
DATAFILE 'C:\app\User\product\18.0.0\oradata\XE\ozekidb.dbf'
SIZE 40M autoextend on;

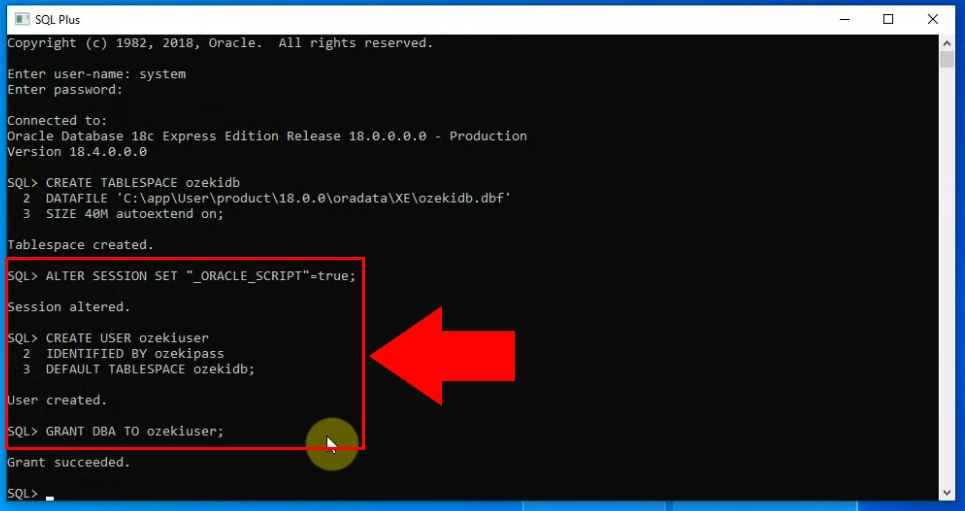
ALTER SESSION SET "_ORACLE_SCRIPT"=true;

CREATE USER ozekiuser
IDENTIFIED BY ozekipass
DEFAULT TABLESPACE ozekidb;

GRANT DBA TO ozekiuser;

// *******************************************
// Create the database table layout
// *******************************************

CREATE TABLE ozekicallsin (
    id int,
    sender varchar(255) default NULL,
    receiver varchar(255) default NULL,
    msg long default NULL,
    senttime varchar(100) default NULL,
    receivedtime varchar(100) default NULL,
    operator varchar(120) default NULL,
    msgtype varchar(160) default NULL,
    reference varchar(100) default NULL
    );
CREATE index index_id1 ON ozekicallsin(id);
CREATE SEQUENCE X;
CREATE TRIGGER ozekicallsin_auto BEFORE INSERT on ozekicallsin
    for each row
    when (new.id is null)
    begin
    SELECT x.nextval INTO :new.id FROM DUAL;
    end;
    /

CREATE TABLE ozekicallsout (
    id int,
    sender varchar(255) default NULL,
    receiver varchar(255) default NULL,
    msg long default NULL,
    callid varchar(255) default NULL,
    startime varchar(40) default NULL,
    endtime varchar(40) default NULL,
    status varchar(40) default NULL,
    talkduration varchar(40) default NULL,
    ringduration varchar(40) default NULL,
    operator varchar(100) default NULL,
    errormsg varchar(1024) default NULL
    );
CREATE index index_id2 ON ozekicallsout(id);
CREATE SEQUENCE Y;

CREATE TRIGGER ozekicallsout_auto BEFORE INSERT on ozekicallsout
    for each row
    when (new.id is null)
    begin
    SELECT y.nextval INTO :new.id FROM DUAL;
    end;
    /

CREATE TABLE ozekicallscripts (
    id int,
    msg long default NULL,
    phonenumber varchar(40) default NULL
);
CREATE INDEX index_id3 ON ozekicallscripts(id);
CREATE SEQUENCE Z;
CREATE TRIGGER ozekicallscripts_auto BEFORE INSERT on ozekicallscripts
    for each row
    when (new.id is null)
    begin
    SELECT z.nextval INTO :new.id FROM DUAL;
    end;
    /

// *******************************************
// How to make a call: example 1
// The script is in the ozekicallsout table
// *******************************************

INSERT INTO ozekicallsout (status,receiver,msg)
VALUES ('send','101','
<?xml version="1.0"?>
<Response>
	<Request>
        <OnAnswered>
            <Speak Party="caller">You will get dtmf keys 123.</Speak>
            <SendDTMF Party="caller" Keys="123"></SendDTMF>
            <Hangup/>
        </OnAnswered>
    </Request>
</Response>
');
COMMIT;

// *******************************************
// How to make a call: example 2
// The script is in a file on drive C
// *******************************************

INSERT INTO ozekicallsout (status,receiver,msg) VALUES ('send','101','C:\ozml\script.ozml');
COMMIT;

// *******************************************
// How to make a call: example 3
// The script is in the ozekicallscripts table
// *******************************************


INSERT INTO ozekicallscripts (id,msg)
VALUES ('1','
<?xml version="1.0"?>
<Response>
	<Request>
        <OnAnswered>
            <Speak Party="caller">You are using call script 1. Thank you for calling. </Speak>
            <Hangup/>
        </OnAnswered>
    </Request>
</Response>
');
COMMIT;

INSERT INTO ozekicallsout (status,receiver,msg) VALUES ('send','101','1');
COMMIT;
Download Oracle database installer
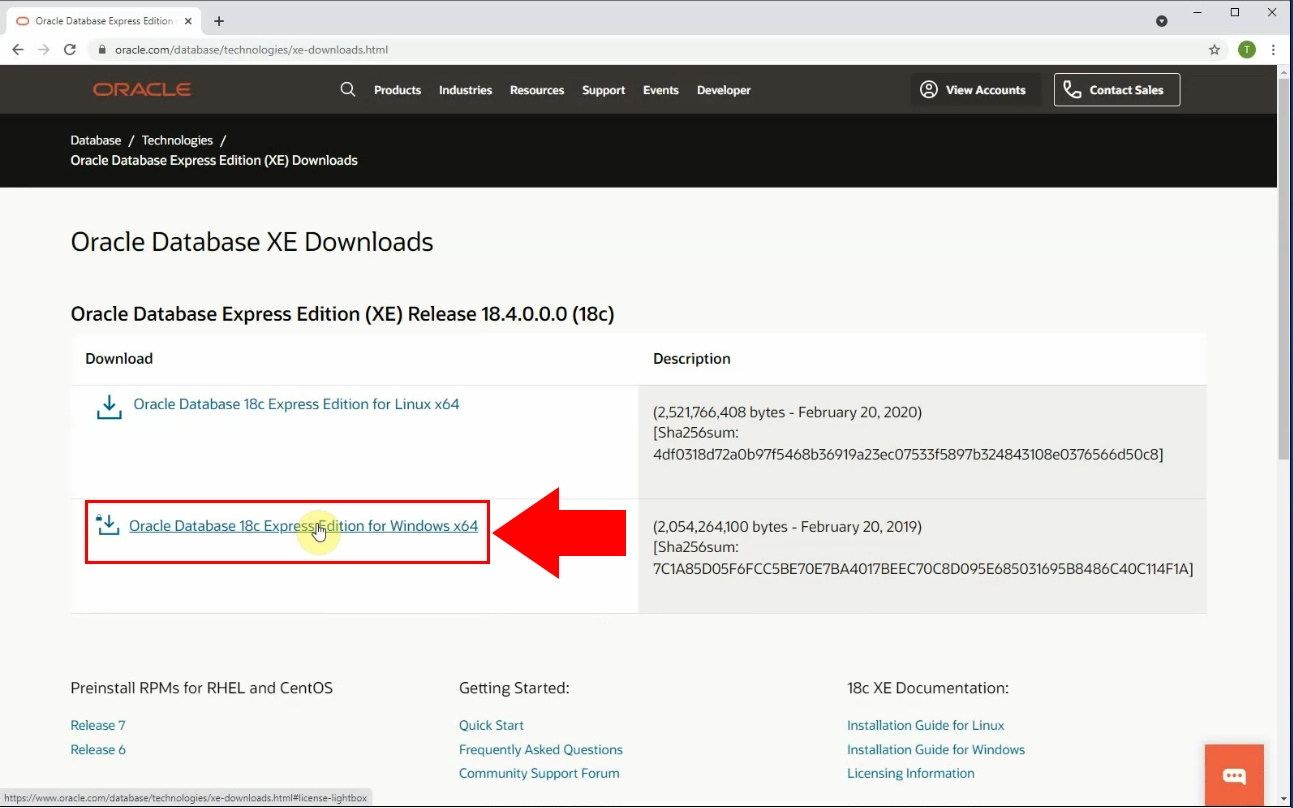
To start working in Oracle Database, first you need to download the Oracle Databese Express Edition installer from this link: (Figure 1). Click on Oracle Database 18c Express edition for Windows x64 to begin downloading the installer.
Setup Oracle database
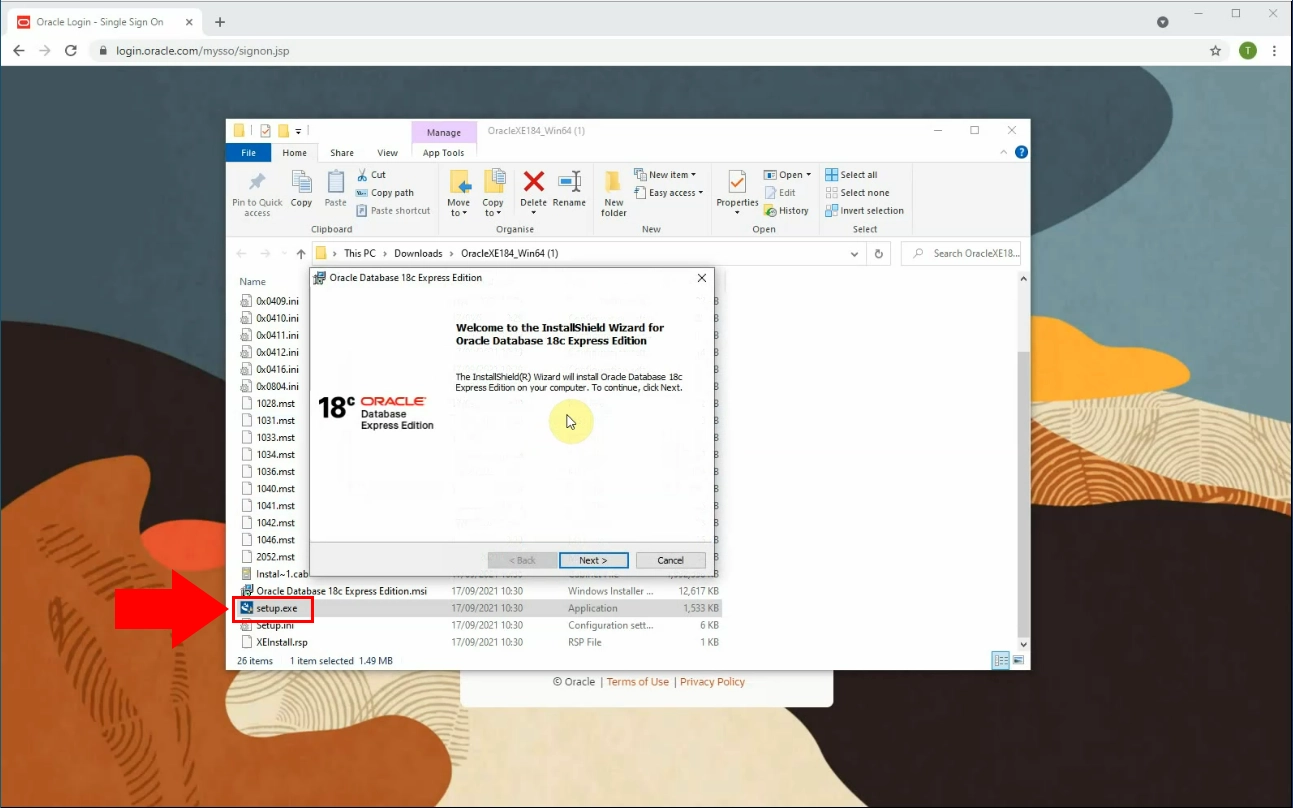
When the download has finished, run the installer to begin the installation process (Figure 2). The installer should be located in your browser's deafult download directory. Upon opening the installer, you will be greeted by the welcome screen. Click Next to continue.
Enter Admin password
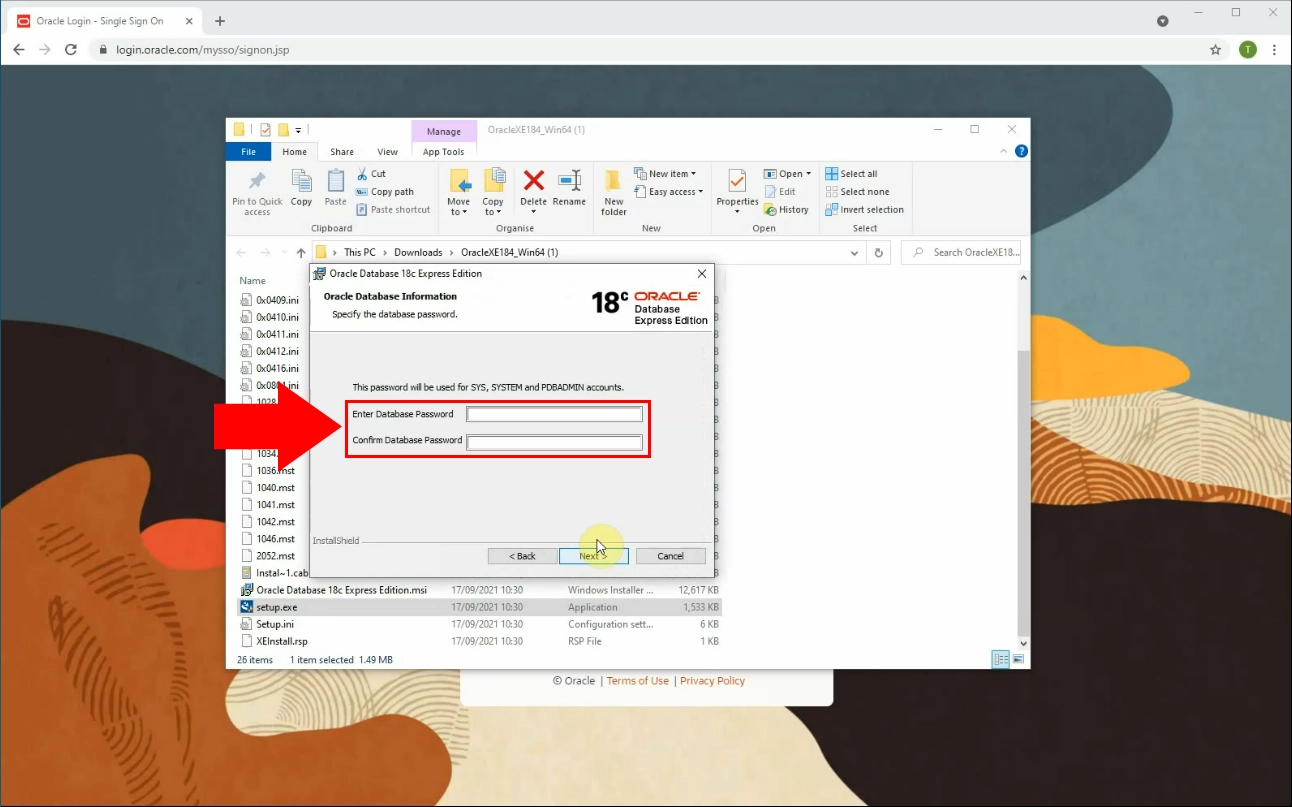
On this screen you will be asked to provide the Admin password for your database. Type the password into the first textbox (Figure 3). Confirm the password by typing it again into the second textbox. Click on the Next button to continue.
Installation process
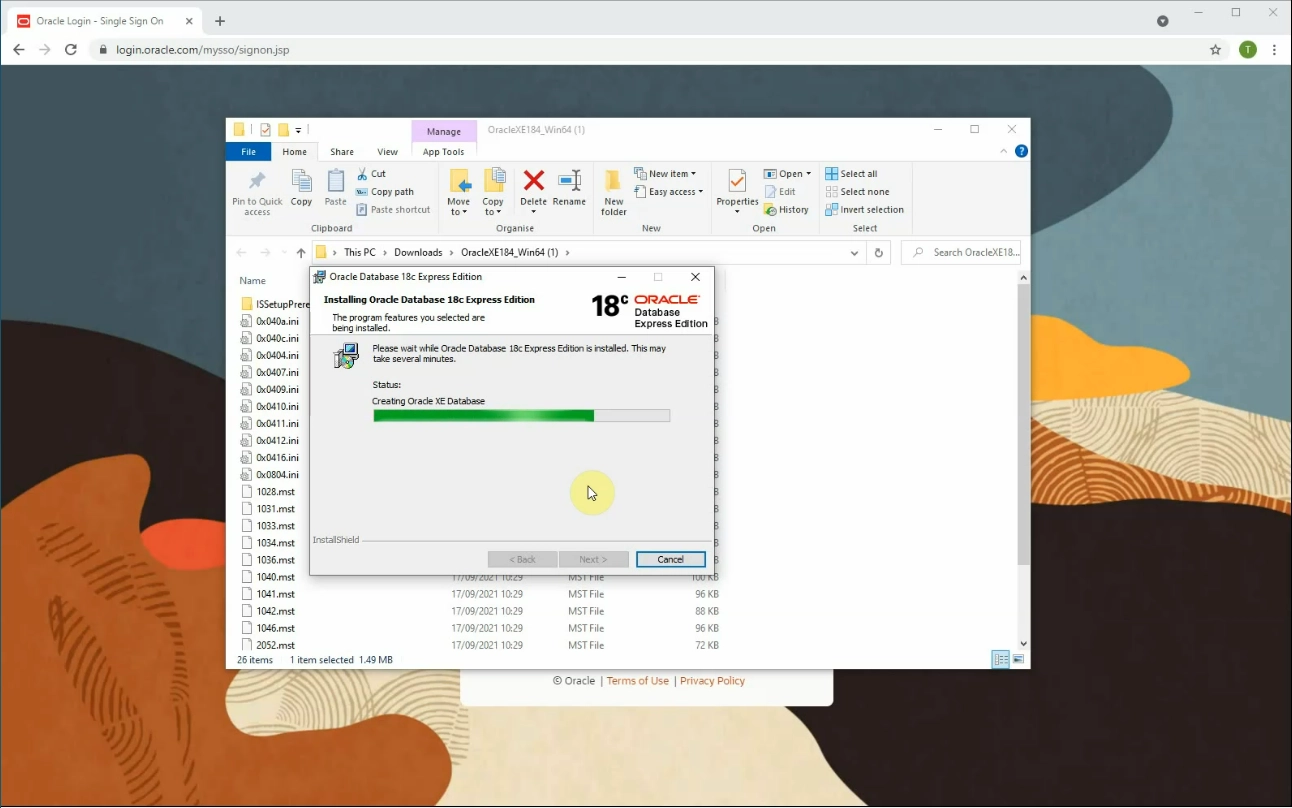
Wait for the installer to set up the program on your computer (Figure 4).
Install finished
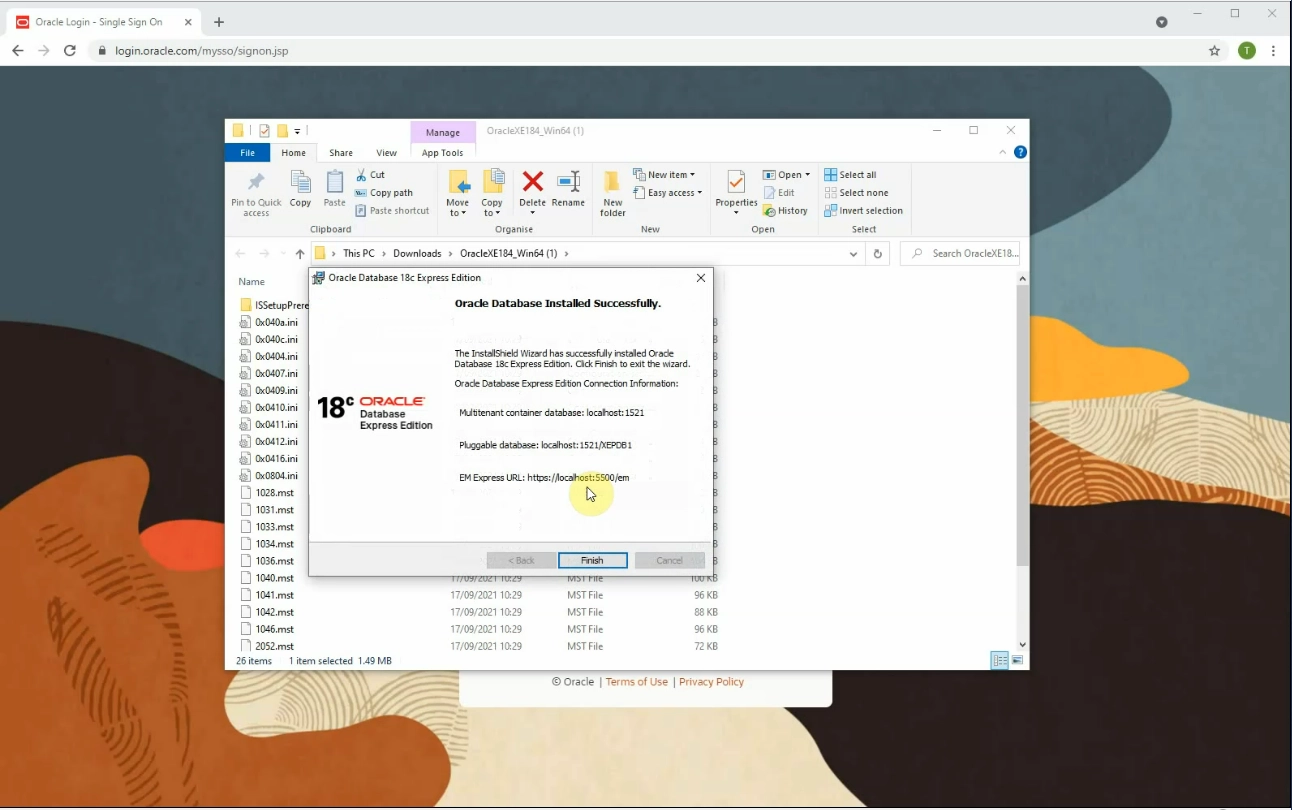
Once the installation process is complete, the installer will forward you to the final screen. Click on Finish to complete the installation.
Login to database
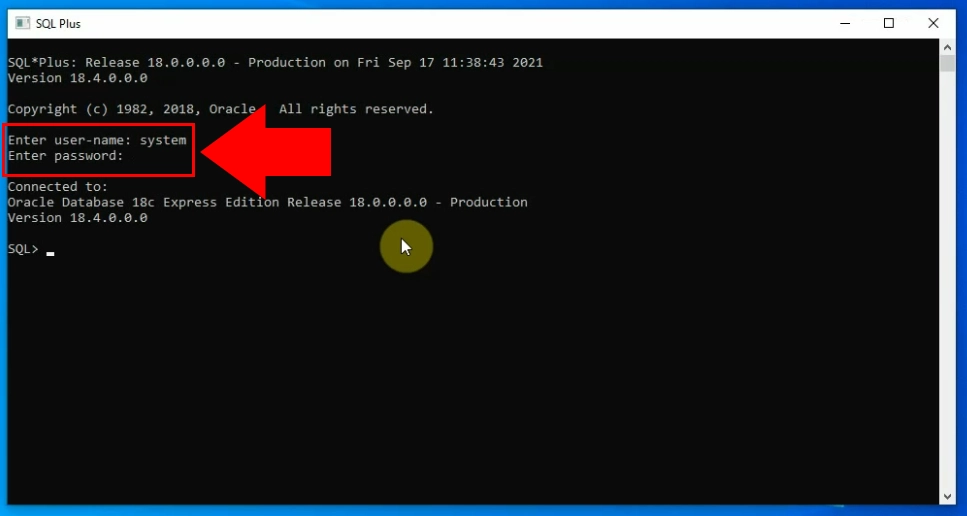
After successfully installing SQL Plus you may now open the software. Simply double click the program to run it. You will then be asked to log in (Figure 6). Enter your username, followed by your password to do so. After logging in you are now connected to the database.
Create tablespace
The next step is to create a tablespace. Copy and paste these lines found in the code above into the SQL Plus terminal (Figure7). Hit enter to run the code and create a tablespace. The terminal will notify you once the tablespace has been created.
Create database user
Next up is to create a database user. Do this by entering the piece of code into the terminal found in the code above (Figure 8). Run this command to create a new database user. The terminal will read "User created" if the code ran successfully.
Create ozekicallsin table
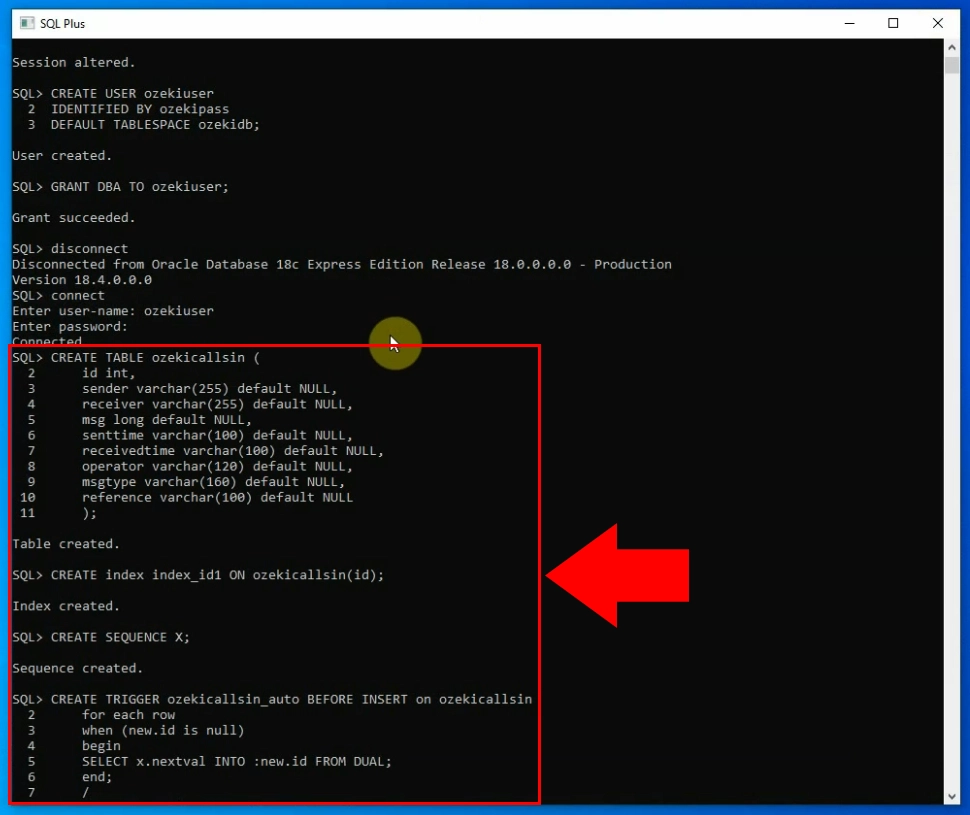
Next you have to create tables for your database. This is done through the use of the CREATE command in SQL. Paste the corresponding piece of code again into the terminal and run it (Figure 9). This will create the ozekicallsin table which will contain incoming calls.
Create ozekicallsout table
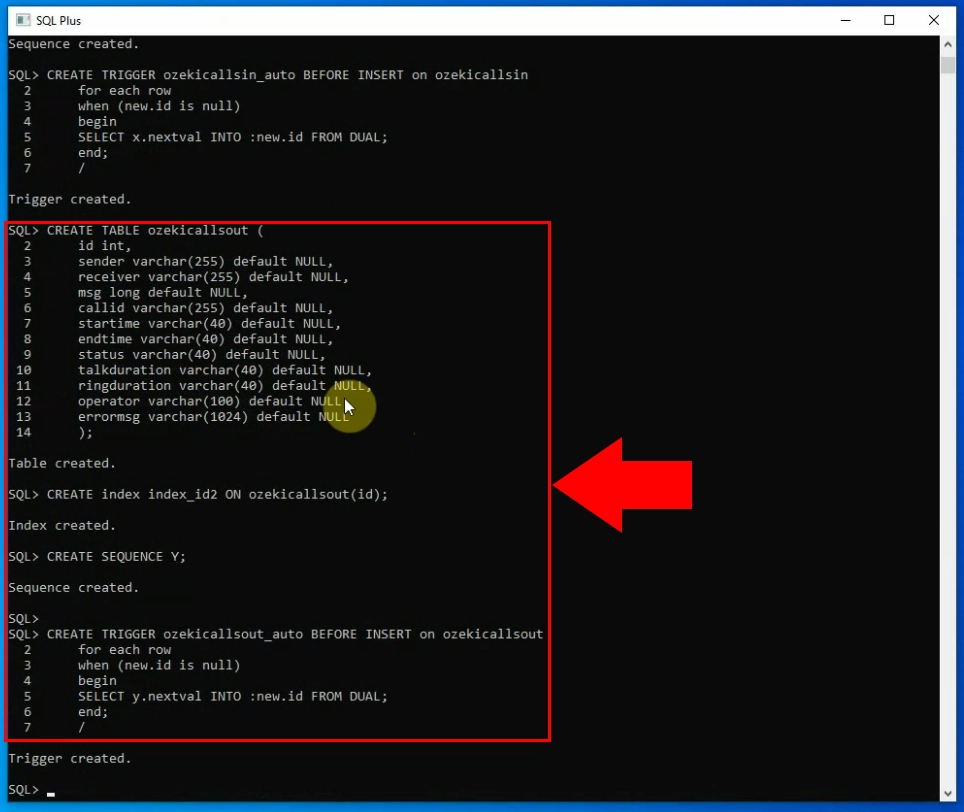
Similarly to the previous step, you need to create another table. Paste this piece of code into the terminal and run in to create the ozekicallsout table (Figure 10). This table will handle outgoing calls, just like how the ozekicallsin table contains incoming calls.
Create ozekicallscripts table
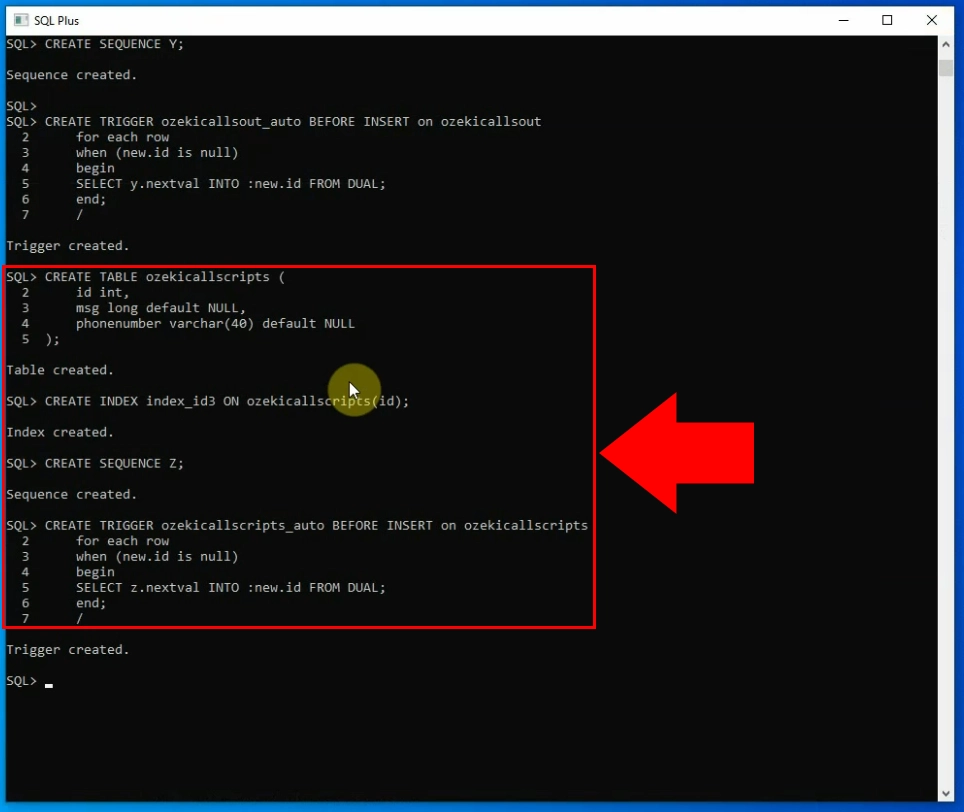
The last table you need to create is the ozekicallscripts table. This table is used to handle call scripting. Paste the piece of code found above into the terminal and run it, just like for the previous two tables (Figure 11). After you ran it, the final table is created.
Install service extension
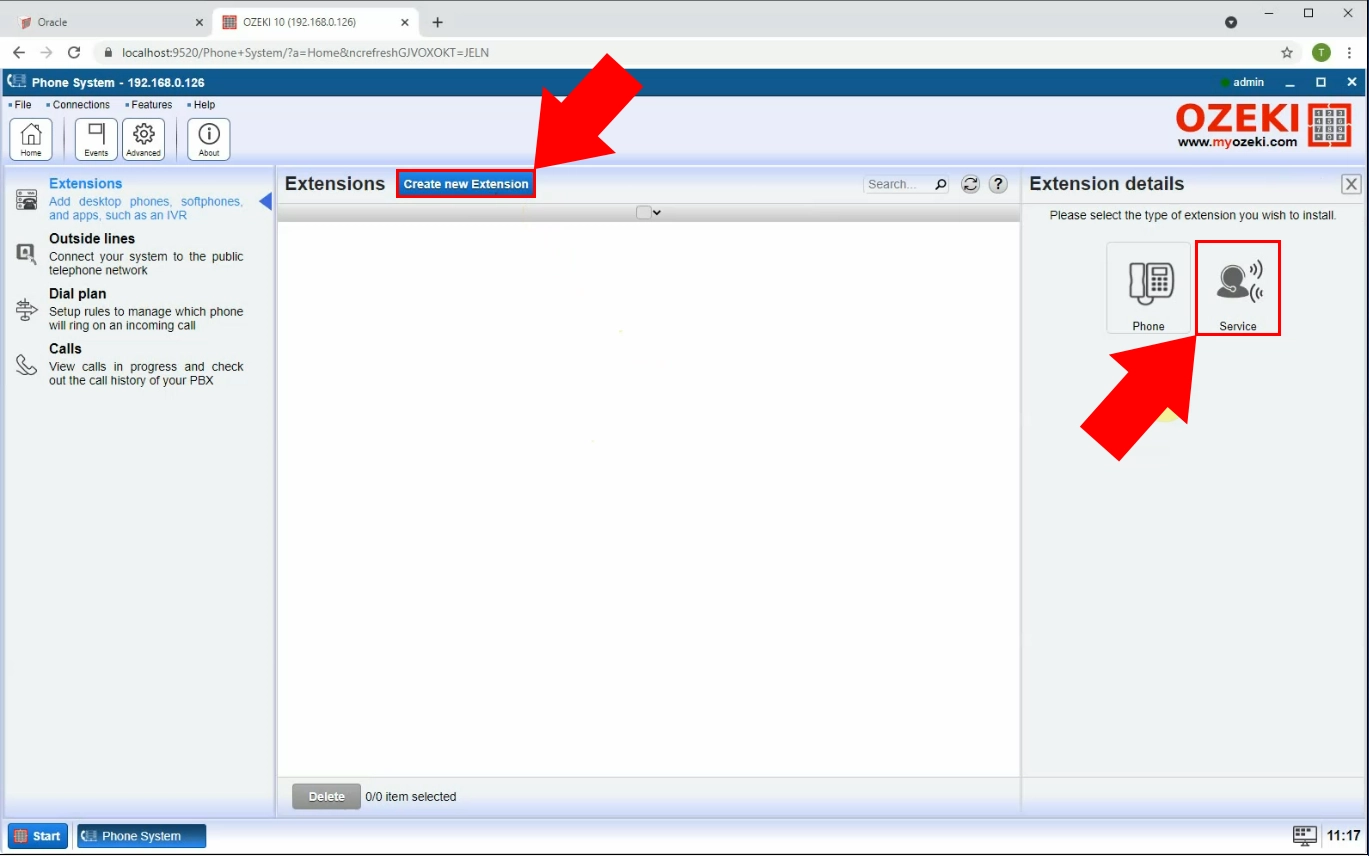
After setting up the database you need to open Ozeki SMS Gateway and install a service extension. Click on the blue Create new Extension button on the top (Figure 12). Next, click on Service on the right hand menu titled "Extension details".
Create SQL Call Extension
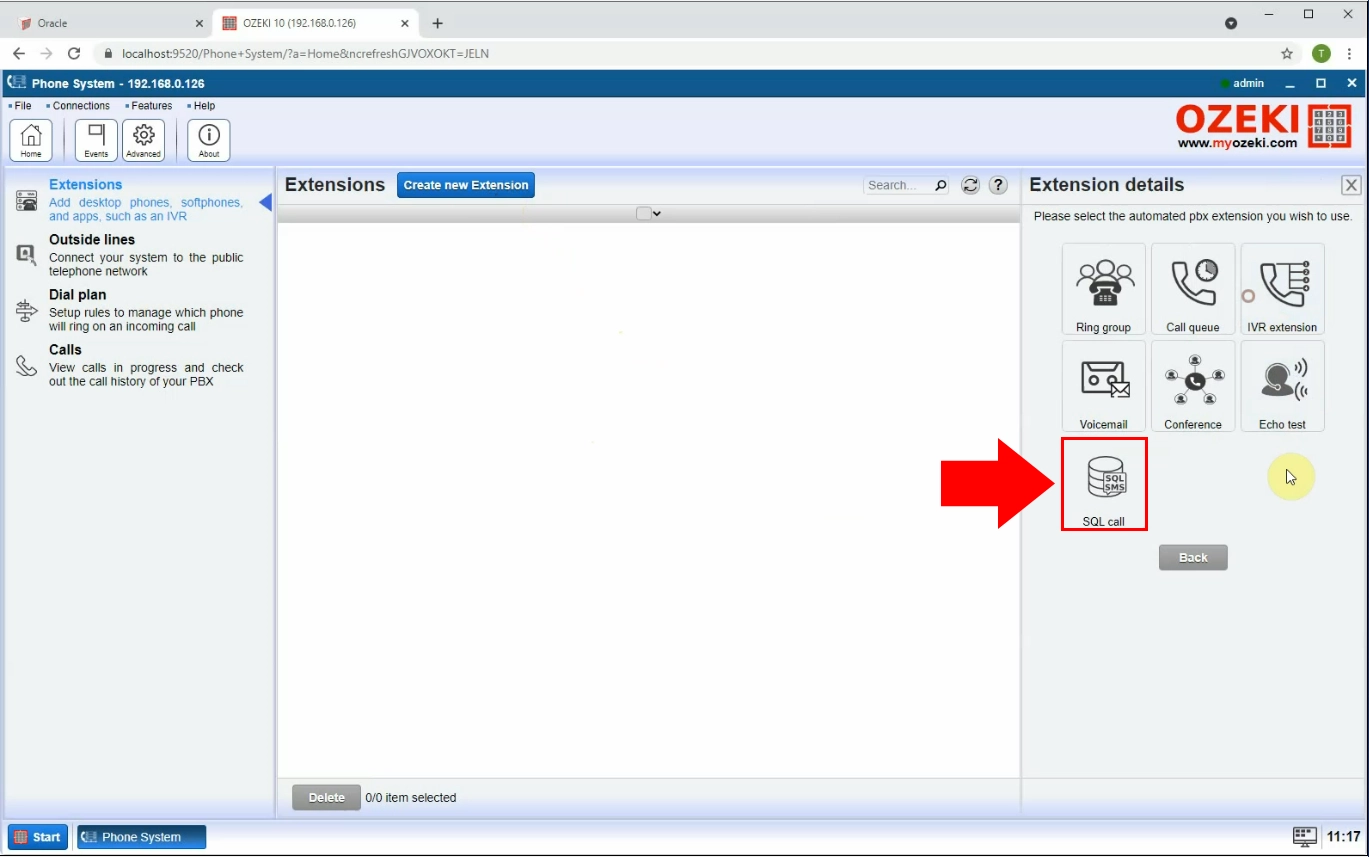
For this operation you need to create an SQL Call extension. Click on SQL Call in the Extension details menu to browse SQL call extension types (Figure 13).
Install Oracle calls
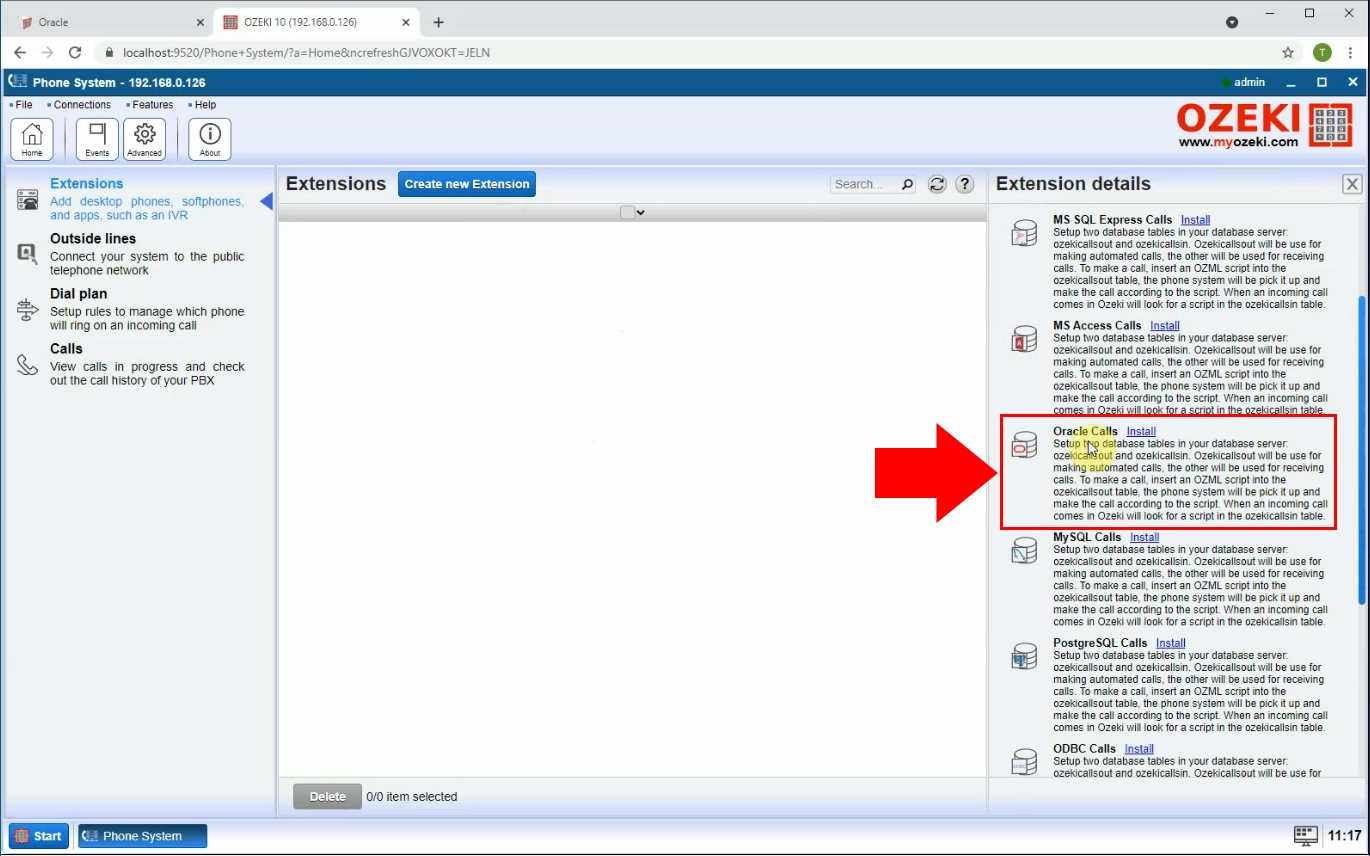
Find Oracle calls in the Extension details menu on the right. Click Install highlighted in blue next to Oracle calls (Figure 14). This will take you to a configuration screen where you can set up your Oracle calss SQL Call Extension.
Setup connection details
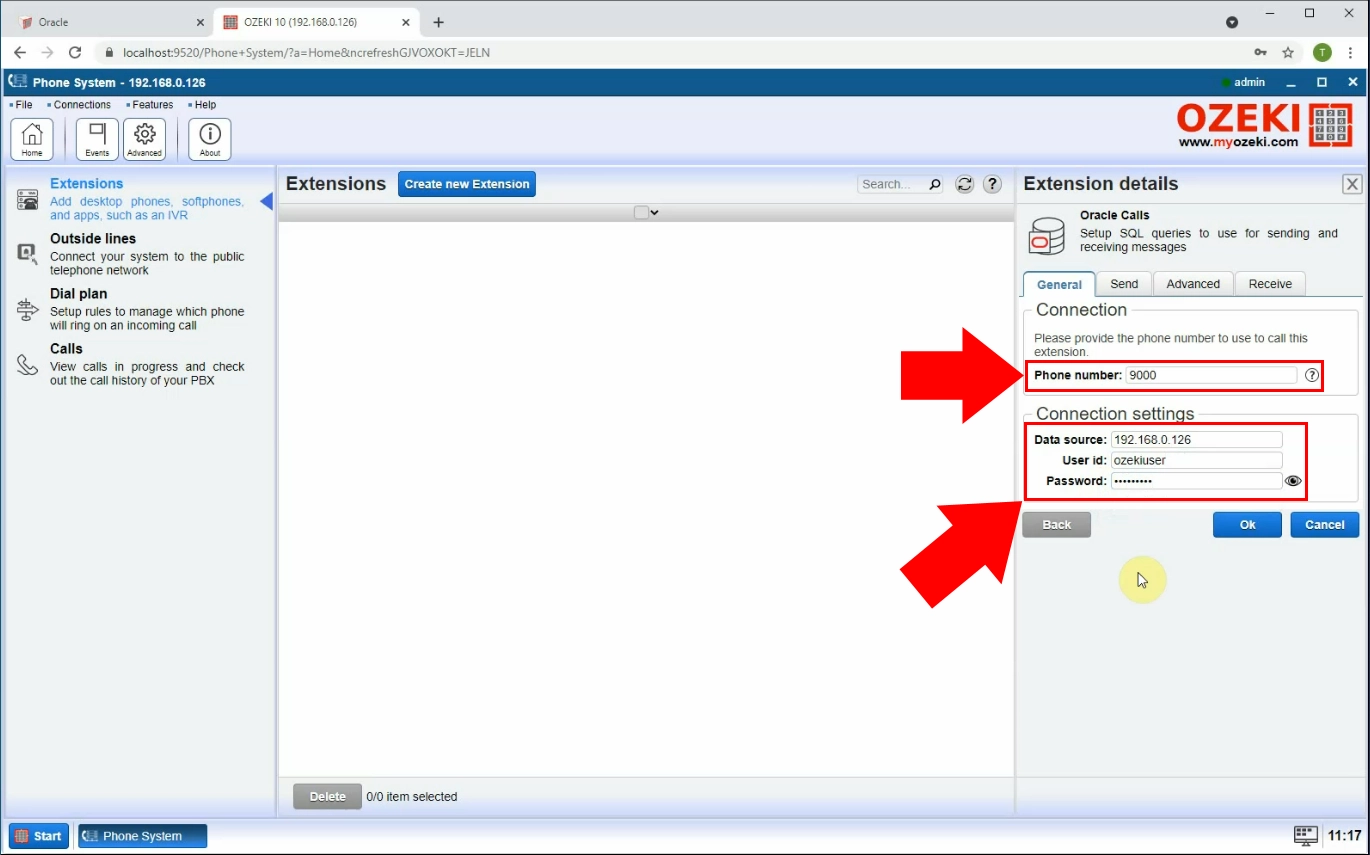
The next step is to enter your connection details (Figure 15). Enter your phone number into the first textbox on the right under the Connection section. Next enter the IP address next to Data sourceinto the first textbox on the right under the Connection settings section. Then enter the User id and Password into the corresponding textboxes. Finally, click on OK to set up your connection.
Connect to Oracle database
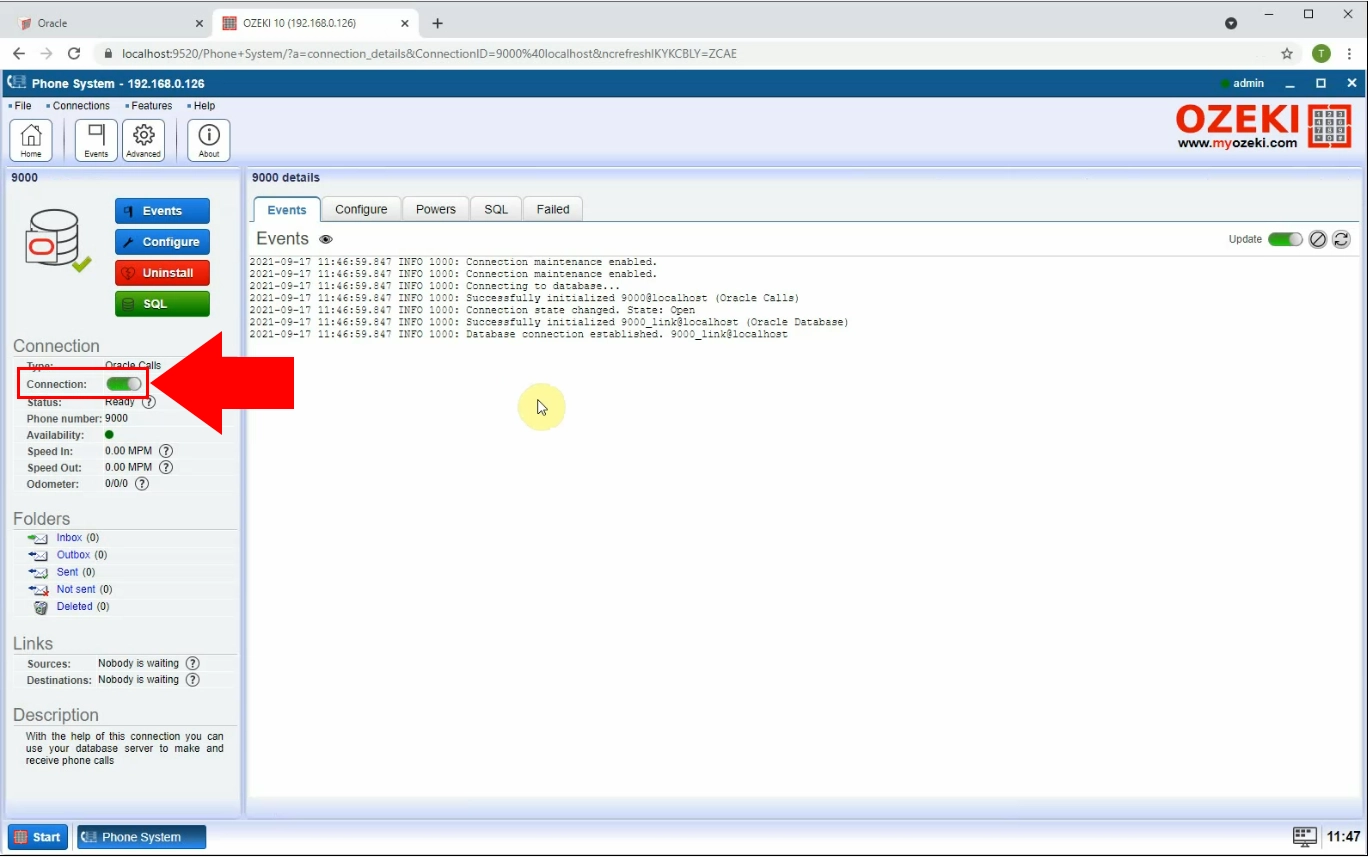
Turn your connection on by clicking on the switch button on the left (Figure 16). The switch turns green to indicate that your connection is enabled.
Create new outside line connection
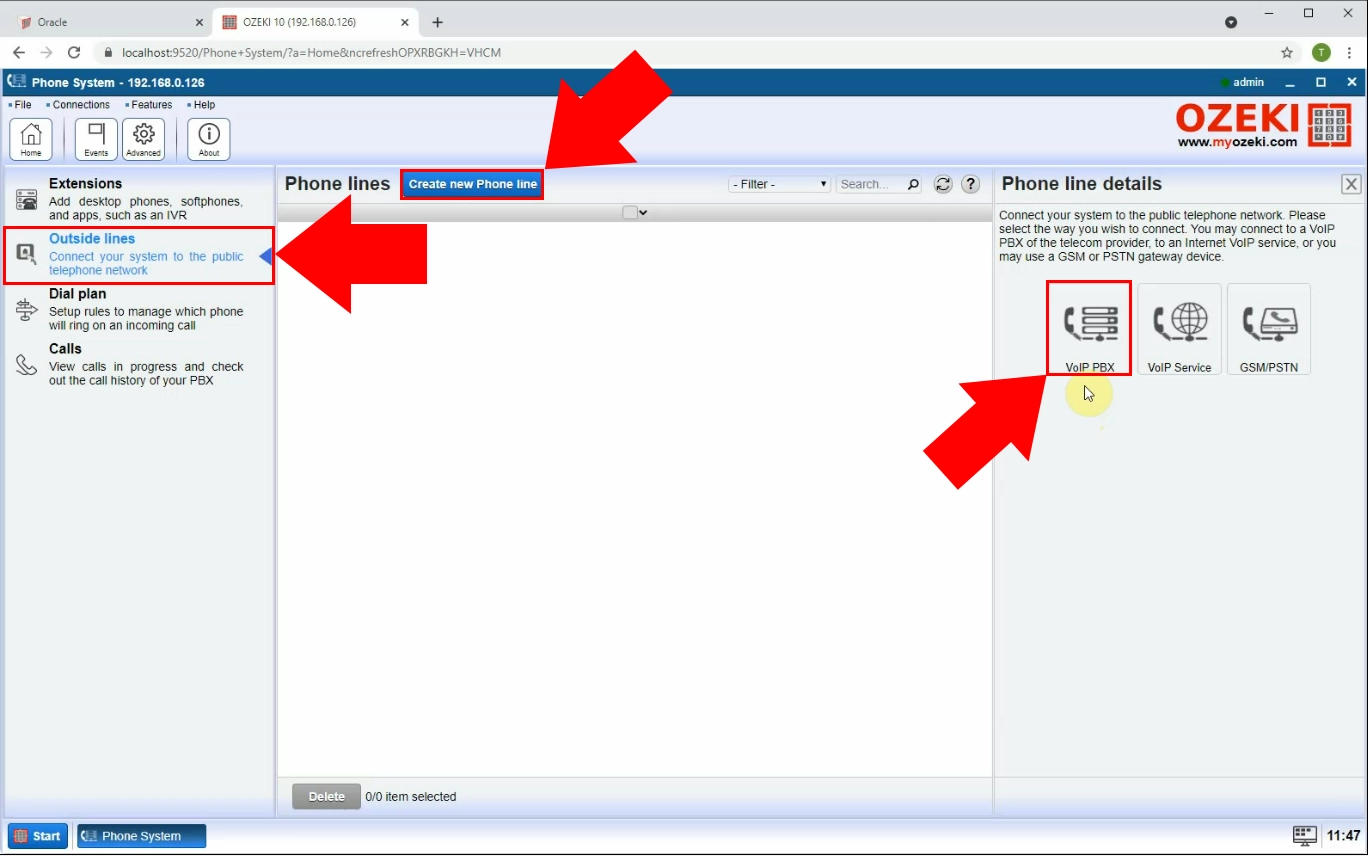
Next you need to create a new outside line connection. Select Outside lines in the menu on the left (Figure 17). Click on the blue Create new Phone line button on top. Lastly, select VoIP PBX in the menu on the right. This will let you configure the details of your outside line connection.
Setup outside line connection
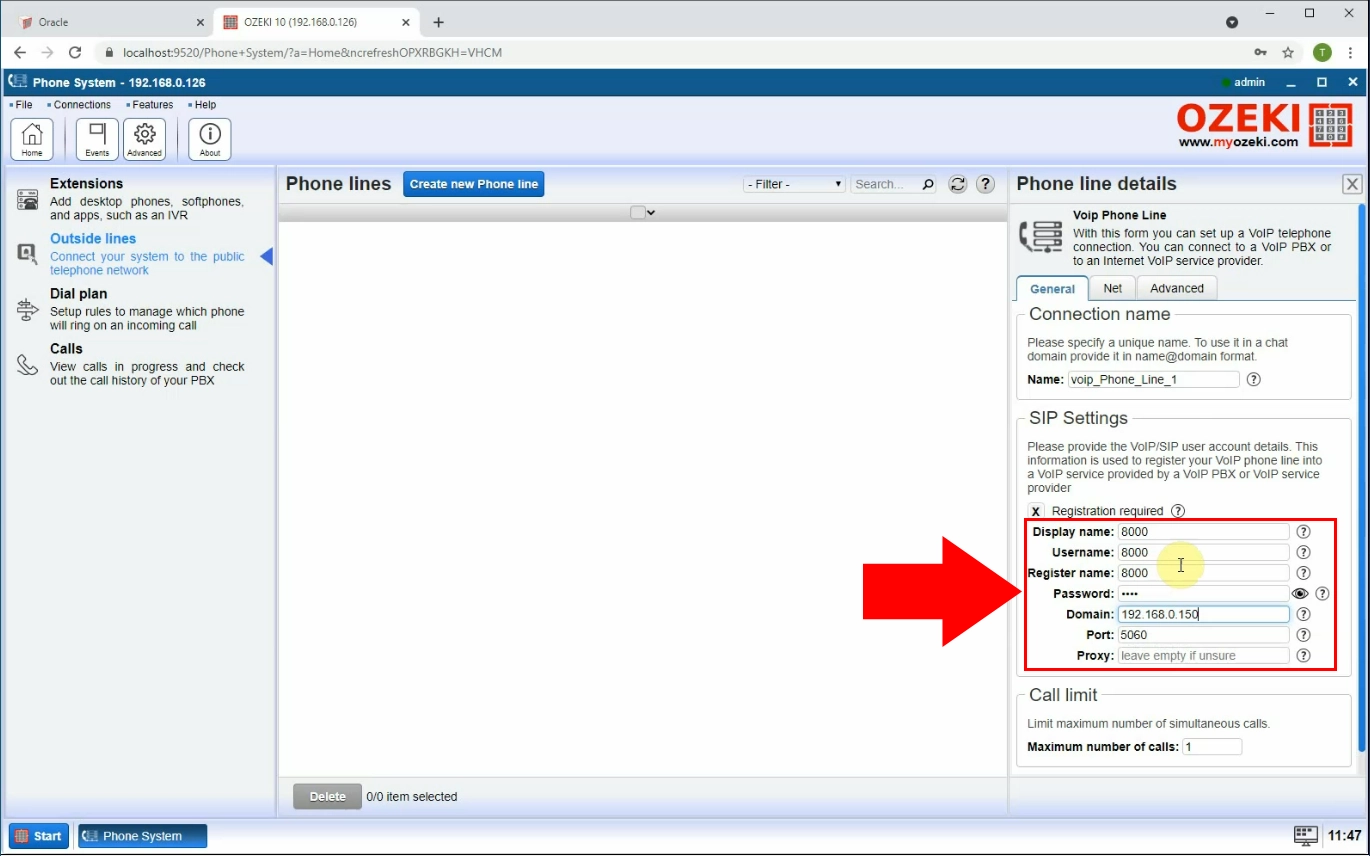
After selecting the required connection type, you must configure your new connection. This is done in the Phone line details menu on the left (Figure 18) Here you need to enter you Display name, Username, Register name, Password, Domain, and Port (and Proxy if needed). Click OK to finialize your settings.
Create dial plan rule
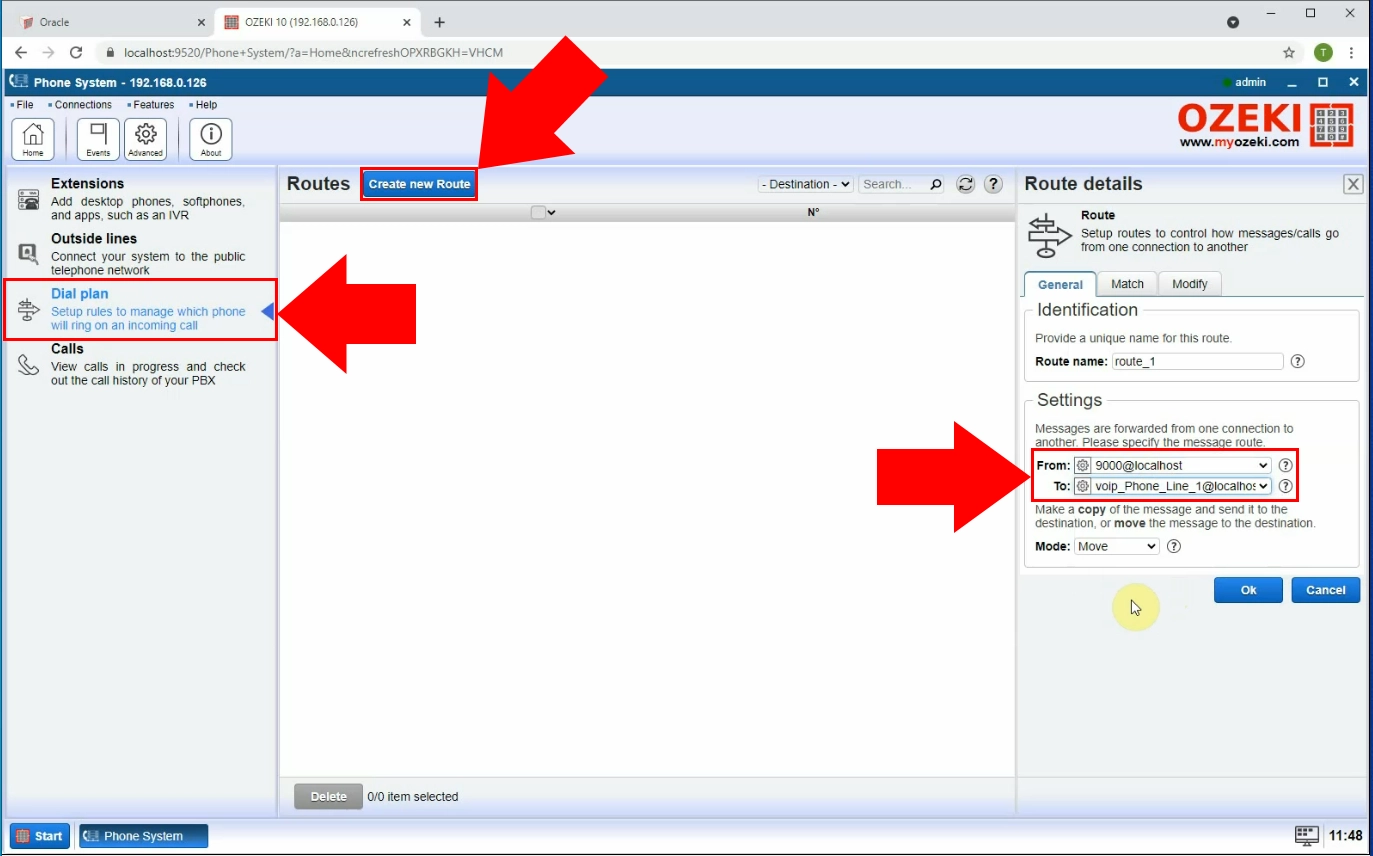
After you set up your outside lines, the next step is to create a dial plan rule. Select Dial plan in the menu on the right (Figure 19). Click on the blue Create new Route button on top. Now select the From and To addresses from the comboboxes in the Settings menu on the right. Click on OK to finish.
Insert call into database
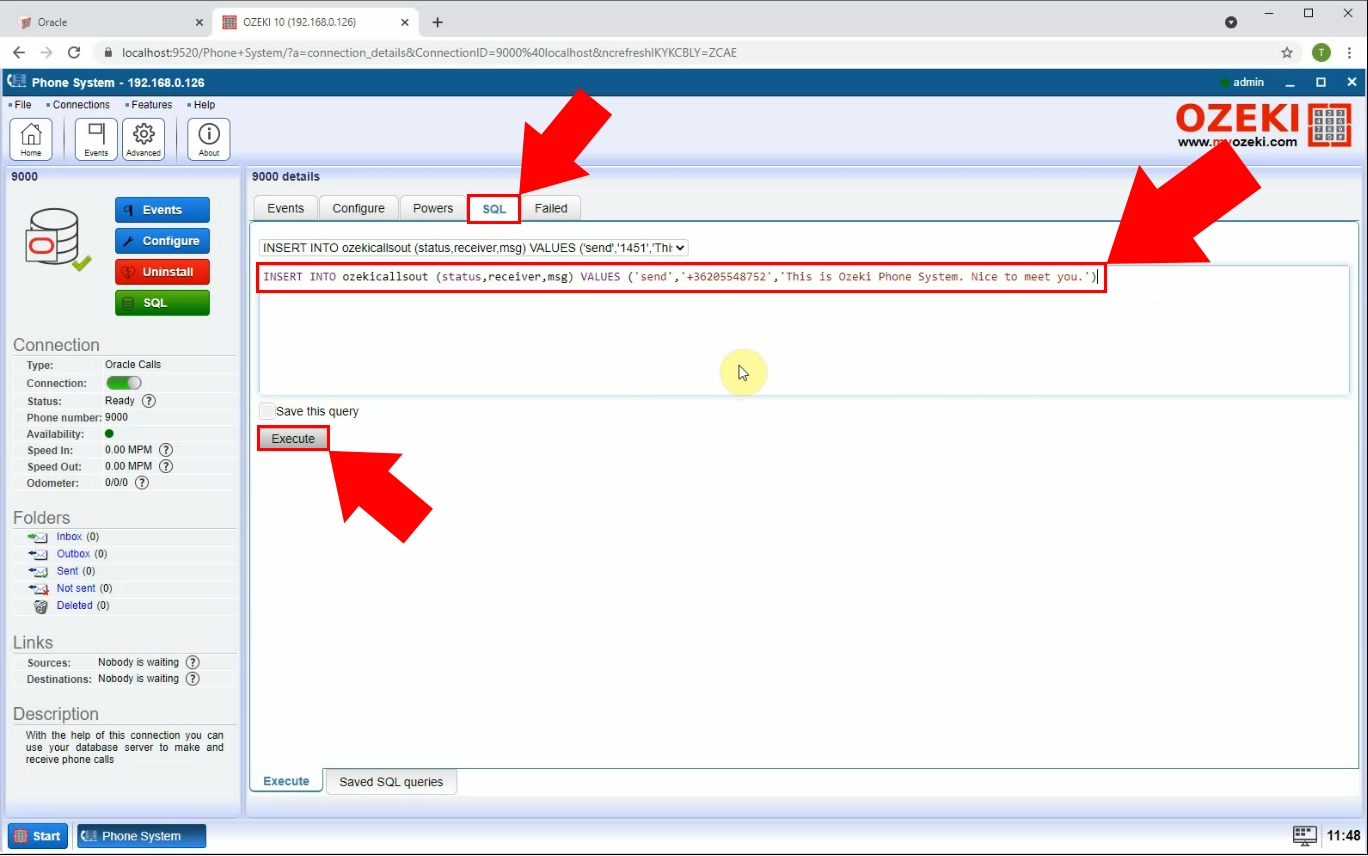
For this step you need to head over to the SQL tab of your Oracle calls connection. Enter the command seen in Figure 20. Hit the grey Execute button on the bottom to run the command. This will insert the call into the database.
Phone called from database
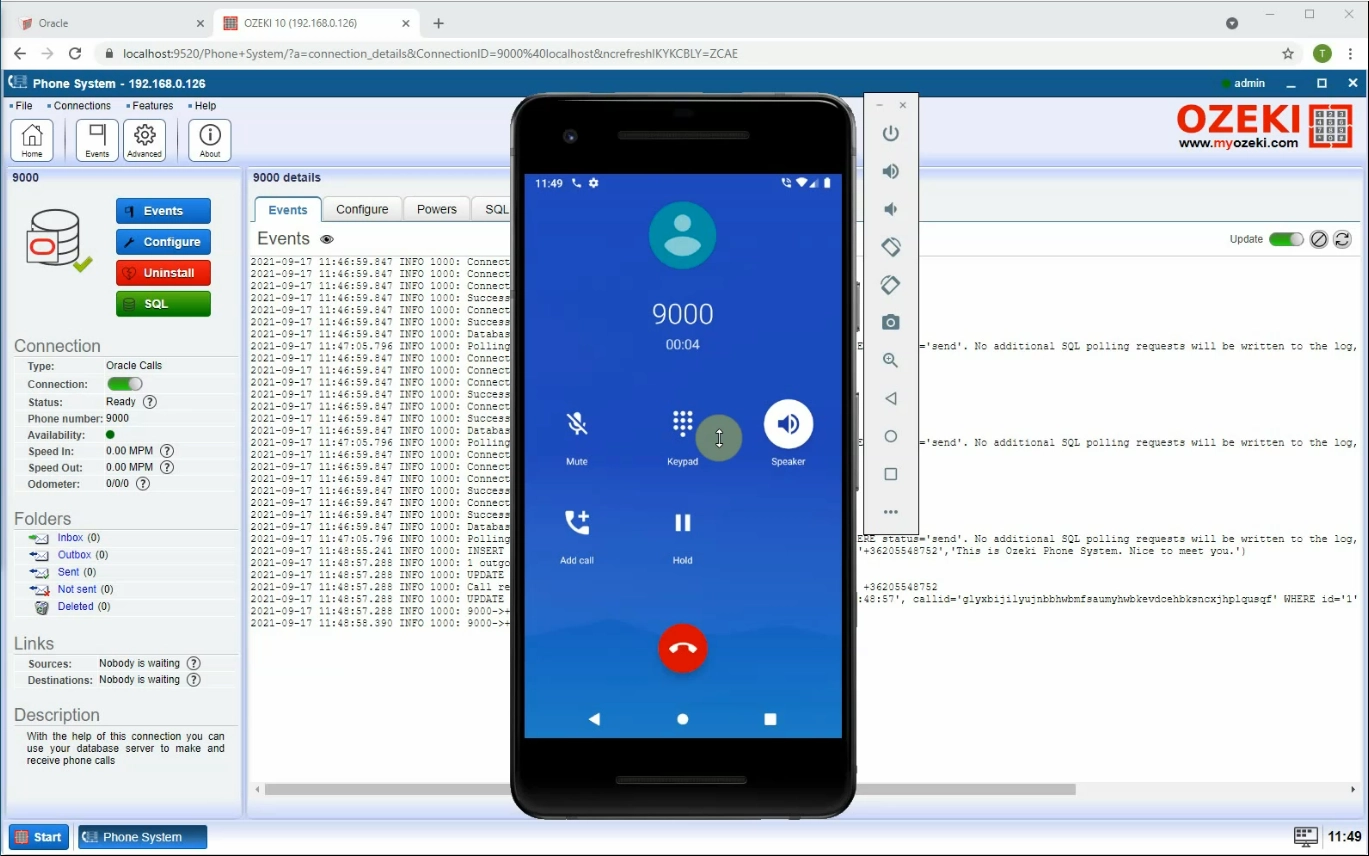
Finally you can check your phone and see that the database has made the call. In addition, if you head over to the Events tab, you can see that the pohne has been called from the database (Figure 21).
Summary
Everything is now set up for you to make scripted calls from an Oracle database. We hope the article was informative and helpful in implementing this solution. For more information on Ozeki SMS Gateway, check out our other tutorials. Ozeki have created numerous solutions for databases, SMS routing and many more.
