How to make scripted calls from ODBC
This article is a detailed guide on how to make scripted calls from ODBC. You are required to have Ozeki Phone System installed to implement this solution. We are going to create a database and set up all neccessary configurations in Ozeki Phone System, then use this system to make a test call to a mobile device. We hope you will find this article helpful and informative. Now let's get started!
What is ODBC?
An ODBC driver uses the Open Database Connectivity (ODBC) interface by Microsoft that allows applications to access data in database management systems (DBMS) using SQL as a standard for accessing the data. ODBC permits maximum interoperability, which means a single application can access different DBMS.
What are scripted calls?
A call script, a written script entailing correct wording and logic, assists an agent in handling a contact. Call scripts can be easily integrated with telephone and IVR systems in order to provide the agent useful information about the customer and tailor each interaction accordingly.
What is Ozeki Phone System?
Ozeki Phone System is software for Windows that transforms a computer into a communication server. Ozeki Phone System lets you build applications like PBX, VoIP gateway, IVR and ACD. It can be used for voice calls, video calls, SMS messaging and new-, revolutionary channels like real time communication through webbrowsers and mobile phones.
How to make scripted calls from ODBC (video tutorial)
In this video tutorial you will leatn how to make scripted calls from ODBC. For this process you need to install MS SQL and Ozeki Phone System. In this example, we are going to create a database and make a call with this database using Ozeki Phone system. Follow along the steps presented in this video to implement this solution successfully.
// *******************************************
// Create the database
// *******************************************

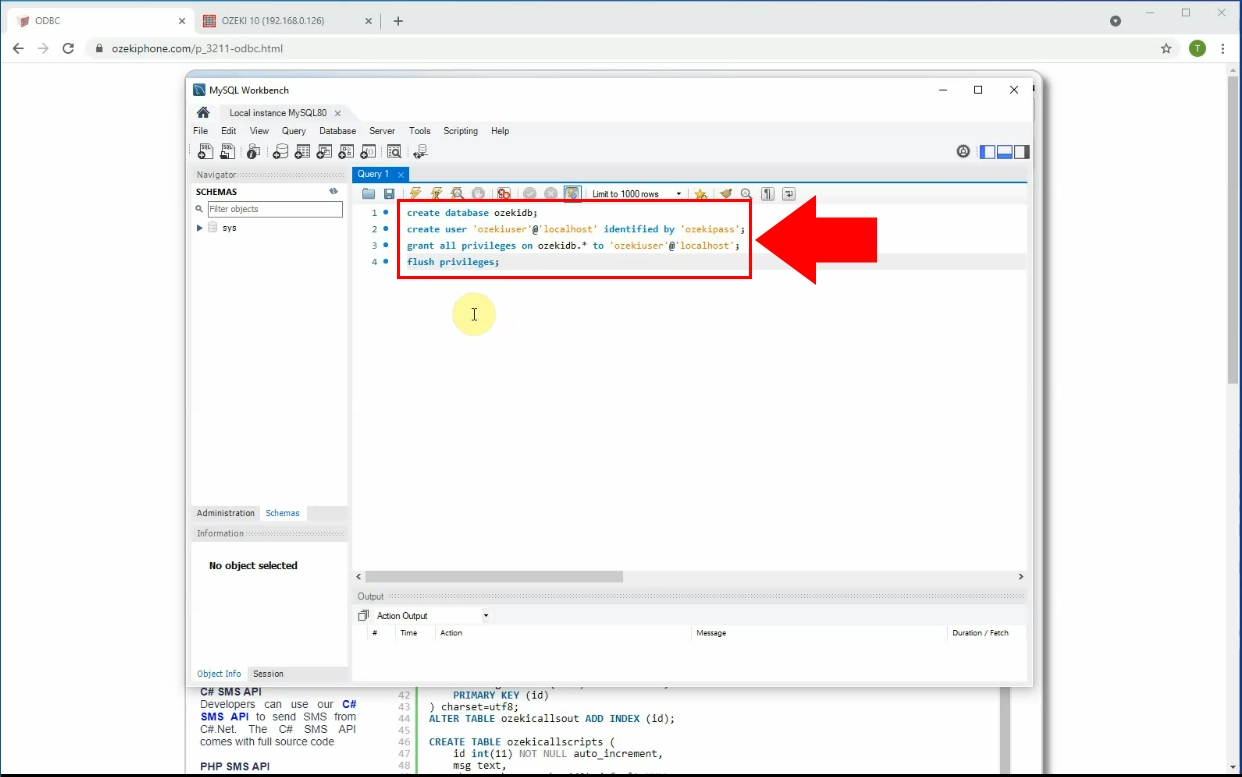
create database ozekidb;
create user 'ozekiuser'@'localhost' identified by 'ozekipass';
grant all privileges on ozekidb.* to 'ozekiuser'@'localhost';
flush privileges;

use ozekidb;

// *******************************************
// Create the database table layout
// *******************************************

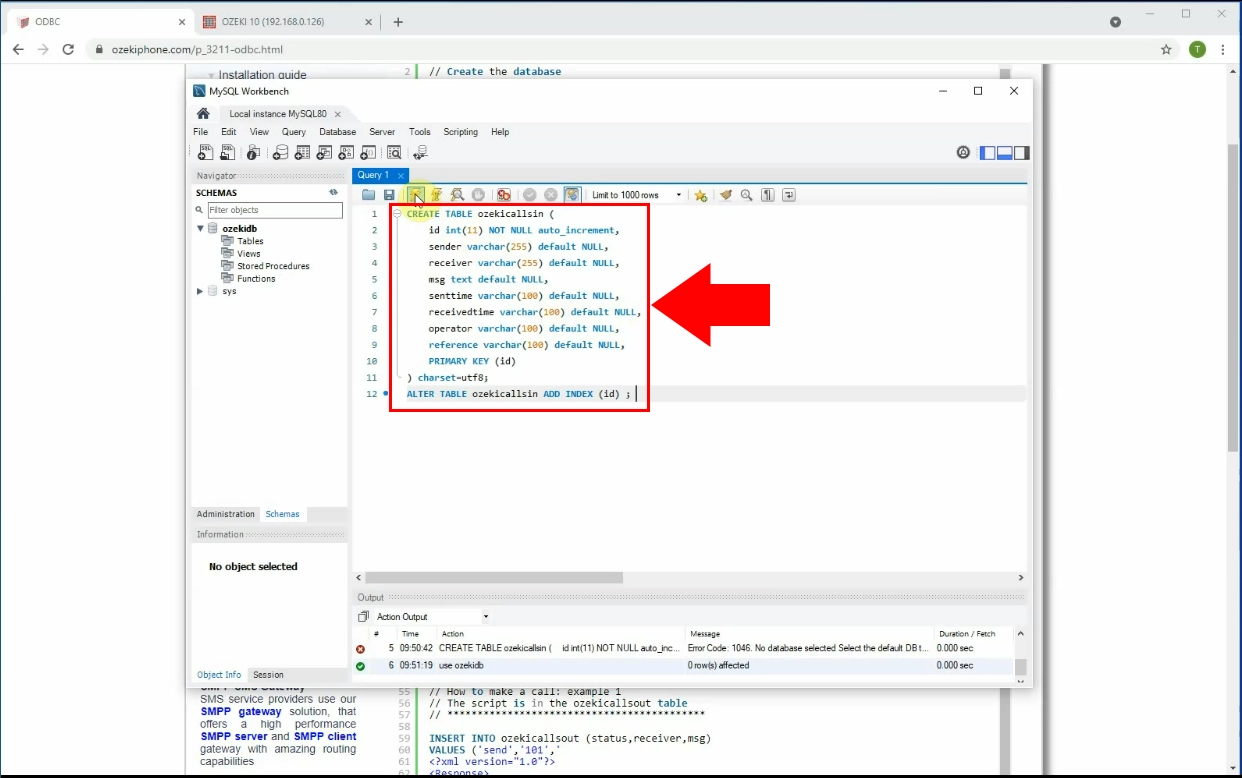
CREATE TABLE ozekicallsin (
    id int(11) NOT NULL auto_increment,
    sender varchar(255) default NULL,
    receiver varchar(255) default NULL,
    msg text default NULL,
    senttime varchar(100) default NULL,
    receivedtime varchar(100) default NULL,
    operator varchar(100) default NULL,
    reference varchar(100) default NULL,
    PRIMARY KEY (id)
) charset=utf8;
ALTER TABLE ozekicallsin ADD INDEX (id) ;

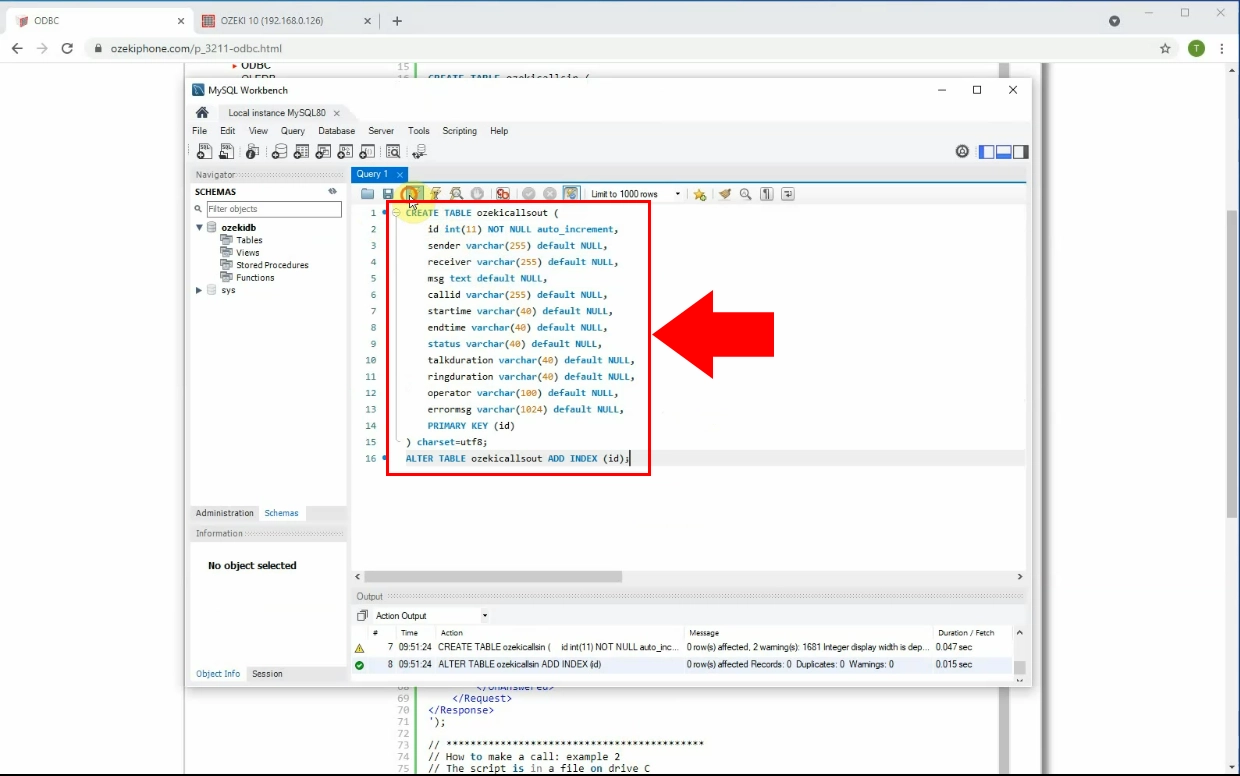
CREATE TABLE ozekicallsout (
    id int(11) NOT NULL auto_increment,
    sender varchar(255) default NULL,
    receiver varchar(255) default NULL,
    msg text default NULL,
    callid varchar(255) default NULL,
    startime varchar(40) default NULL,
    endtime varchar(40) default NULL,
    status varchar(40) default NULL,
    talkduration varchar(40) default NULL,
    ringduration varchar(40) default NULL,
    operator varchar(100) default NULL,
    errormsg varchar(1024) default NULL,
    PRIMARY KEY (id)
) charset=utf8;
ALTER TABLE ozekicallsout ADD INDEX (id);

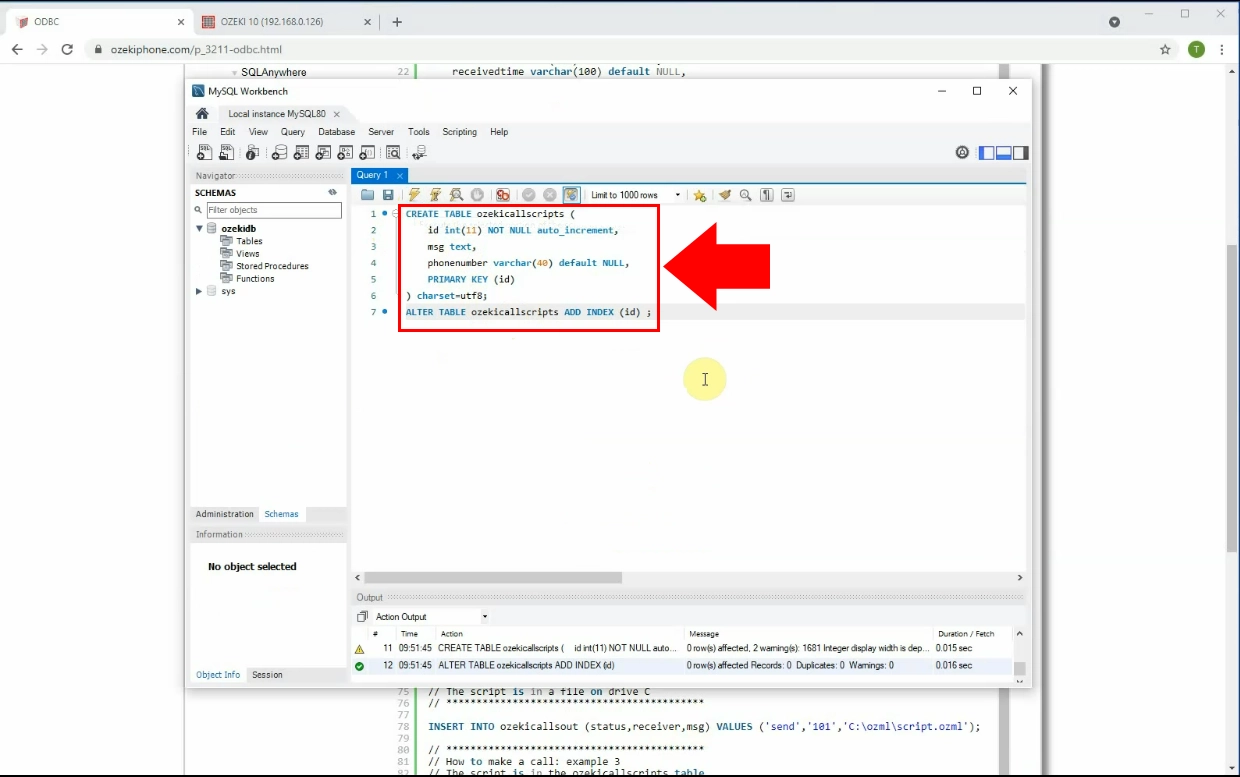
CREATE TABLE ozekicallscripts (
    id int(11) NOT NULL auto_increment,
    msg text,
    phonenumber varchar(40) default NULL,
    PRIMARY KEY (id)
) charset=utf8;
ALTER TABLE ozekicallscripts ADD INDEX (id) ;

// *******************************************
// How to make a call: example 1
// The script is in the ozekicallsout table
// *******************************************

INSERT INTO ozekicallsout (status,receiver,msg)
VALUES ('send','101','
<?xml version="1.0"?>
<Response>
	<Request>
        <OnAnswered>
            <Speak Party="caller">You will get dtmf keys 123.</Speak>
            <SendDTMF Party="caller" Keys="123"></SendDTMF>
            <Hangup/>
        </OnAnswered>
    </Request>
</Response>
');

// *******************************************
// How to make a call: example 2
// The script is in a file on drive C
// *******************************************

INSERT INTO ozekicallsout (status,receiver,msg) VALUES ('send','101','C:\ozml\script.ozml');

// *******************************************
// How to make a call: example 3
// The script is in the ozekicallscripts table
// *******************************************

INSERT INTO ozekicallscripts (id,msg)
VALUES ('1','
<?xml version="1.0"?>
<Response>
	<Request>
        <OnAnswered>
            <Speak Party="caller">You are using call script 1. Thank you for calling. </Speak>
            <Hangup/>
        </OnAnswered>
    </Request>
</Response>
');

INSERT INTO ozekicallsout (status,receiver,msg) VALUES ('send','101','1');
Download ODBC driver installer
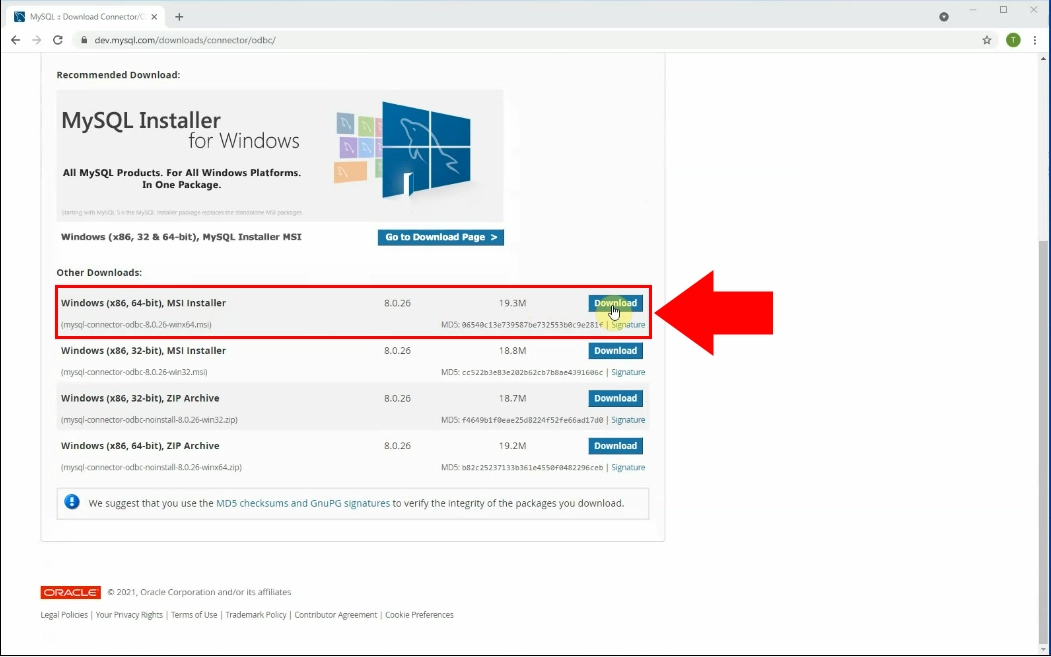
The first step to implementing this solution is to download the ODBC driver installer. The download link can be found here. Click on the blue Download button next to Windows 64-bit installer (Figure 1). This will begin downloading the ODBC driver installer to your browser's default download directory.
Install MySQL ODBC driver
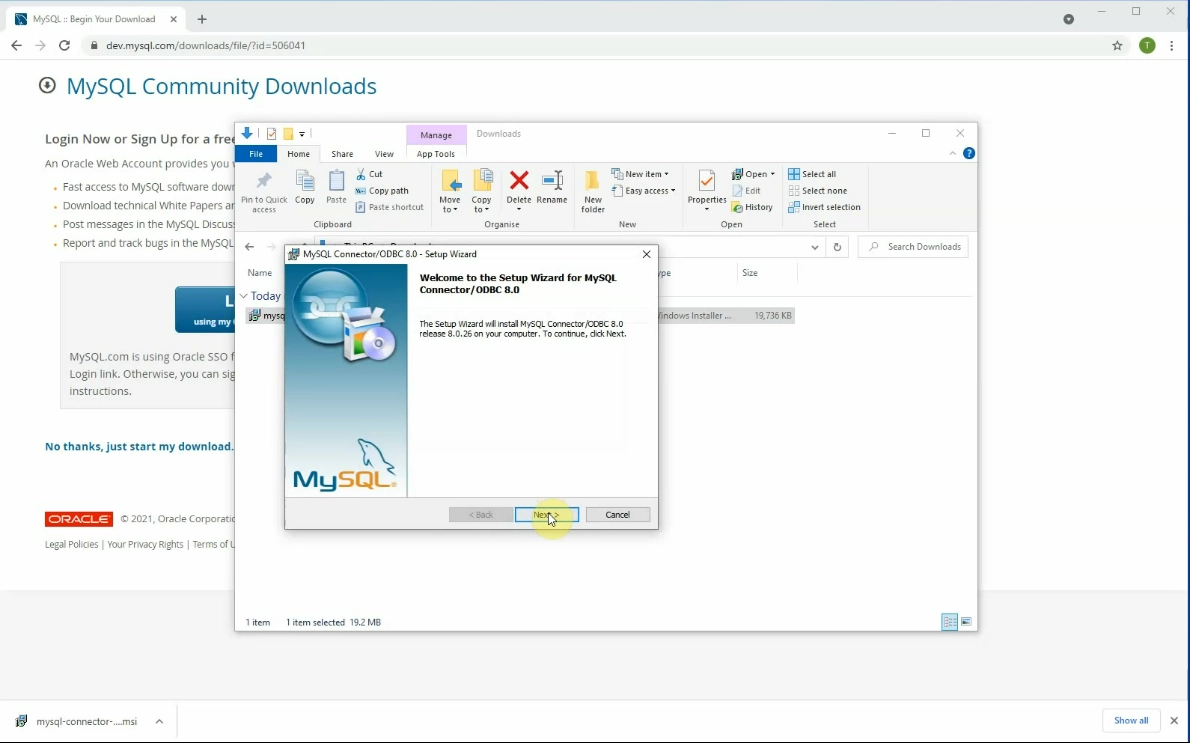
After the download is complete, you can run the installer. On the welcome screen, click the Next button on the bottom of the installer window to proceed (Figure 2).
Installation process
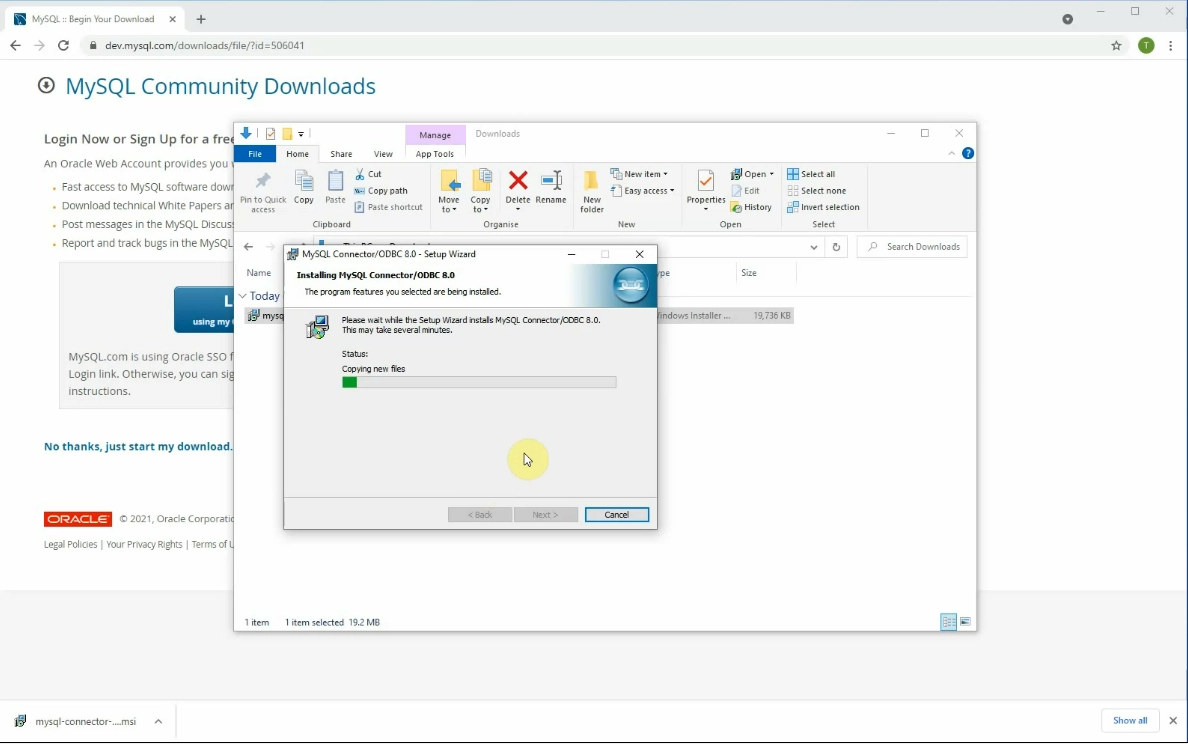
Here you will be asked to accept a lincese agreement. Click on the Accept checkbox, then click Next. Then, specify the type of installation and the directory where you want ODBC to be installed. Click on the Next button to begin the installation. Lastly, wait for the installation process to complete (Figure 3).
Create database and ozekiuser
Create ozekicallsin table
Create ozekicallsout table
Create ozekicallsscripts table
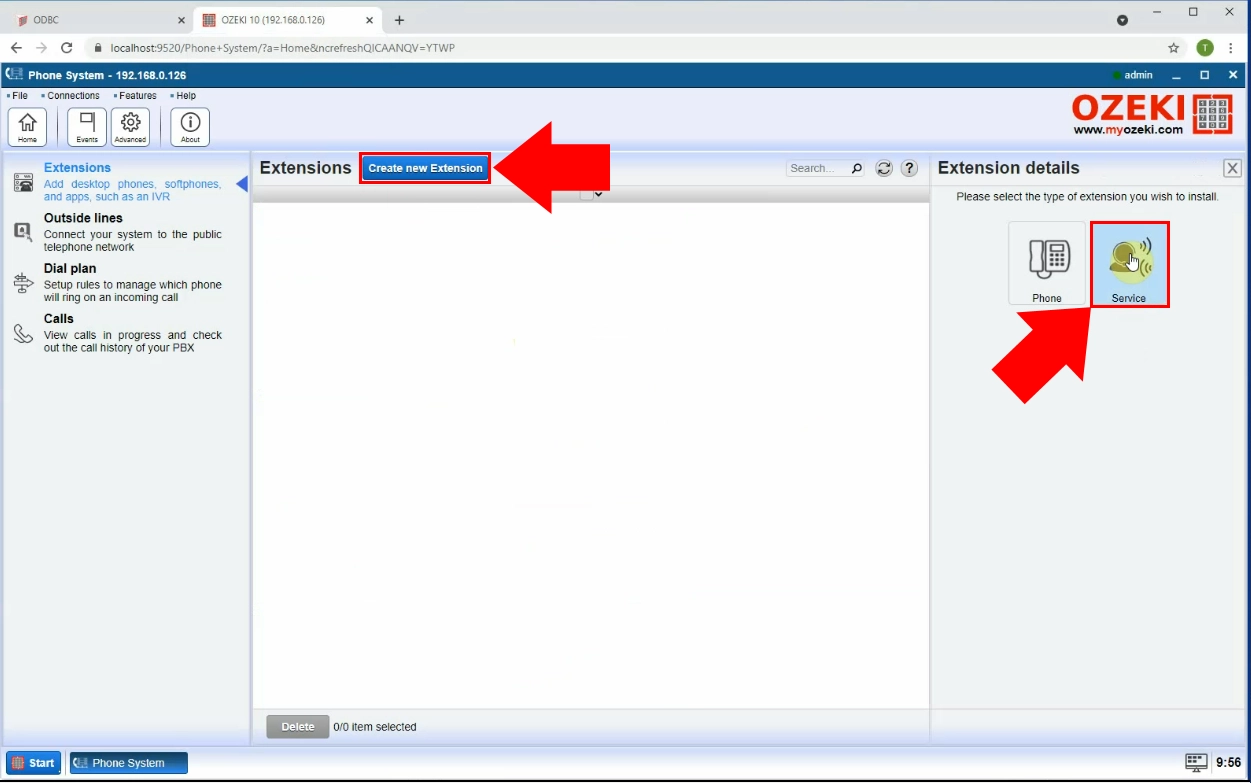
Create new service extension
The database is now properly set up. Now you have to switch over to Ozeki Phone System. Click on Extensions inside the menu on the right (Figure 8). Click on the blue Create new Extension button on the top. Click on the Service icon on the right.
Create SQL Call extension
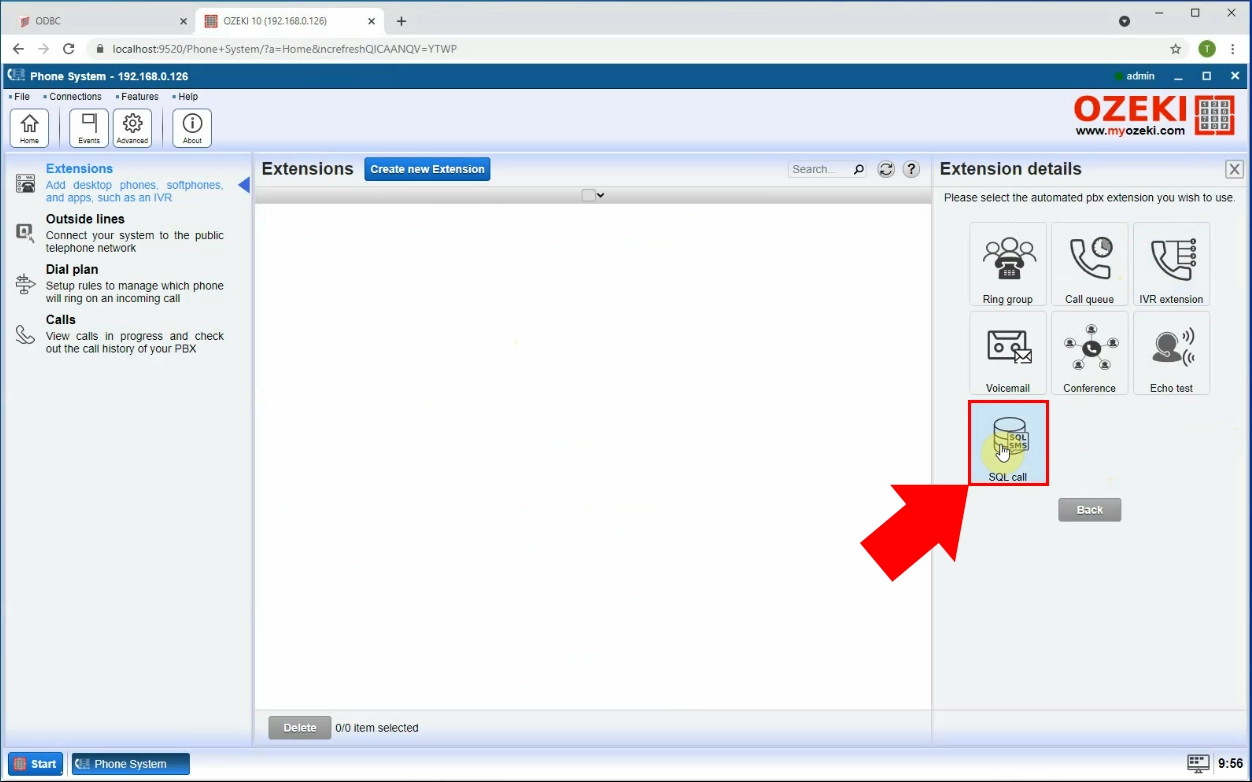
Here you need to select which type of call extension you want to create. Select SQL Call by clicking on it (Figure 9).
Install ODBC call extension
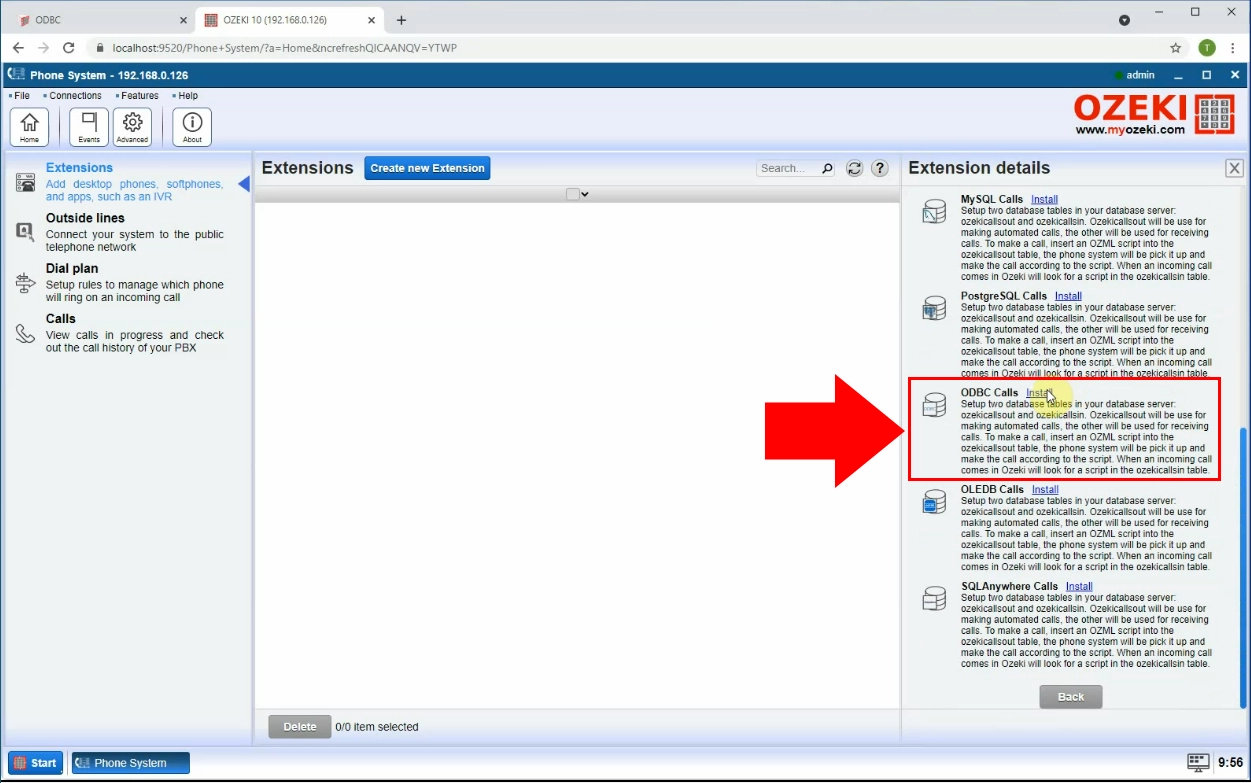
Find ODBC Calls and click on Install next to it (Figure 10).
Setup connection details
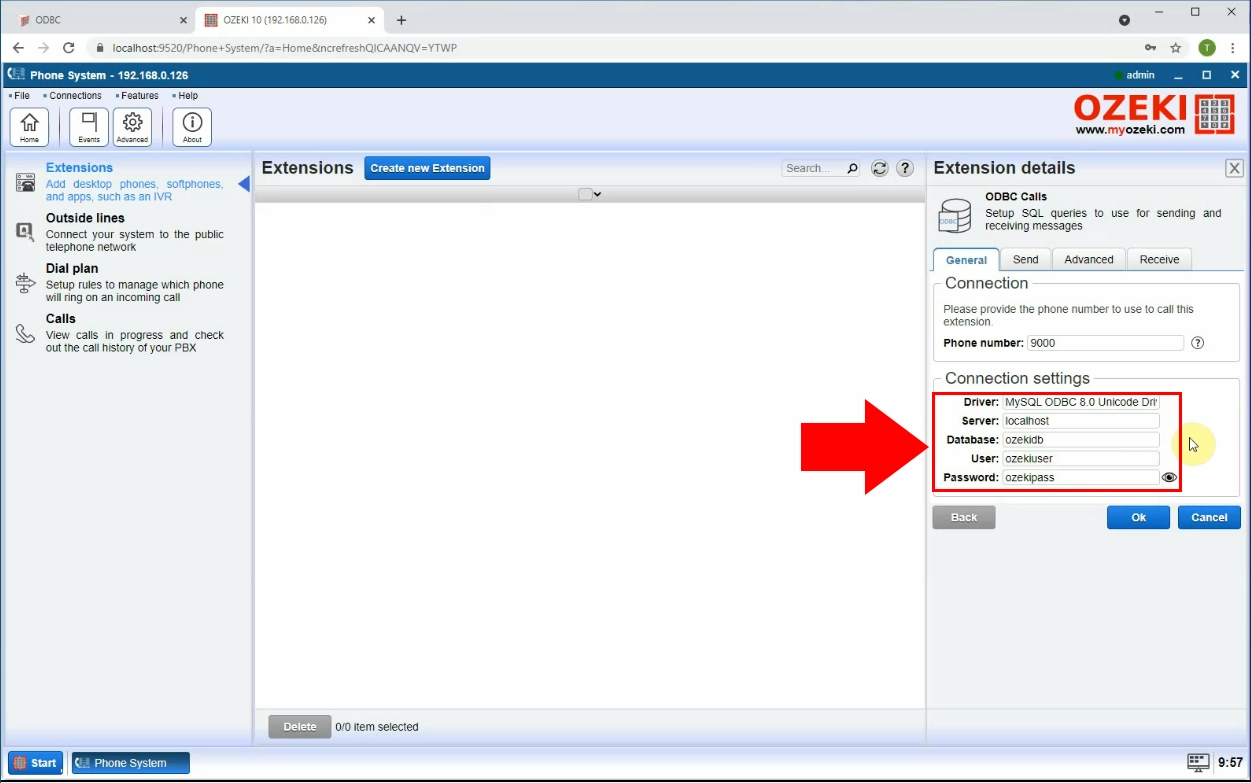
After you have selected ODBC Calls, you must configure your new connection. This is done in the Connection settings section of Extension details (Figure 11). Here you need to provide the following details by entering them into the corresponding textboxes:
- Driver
- Server
- Database
- User
- Password
Connect to database
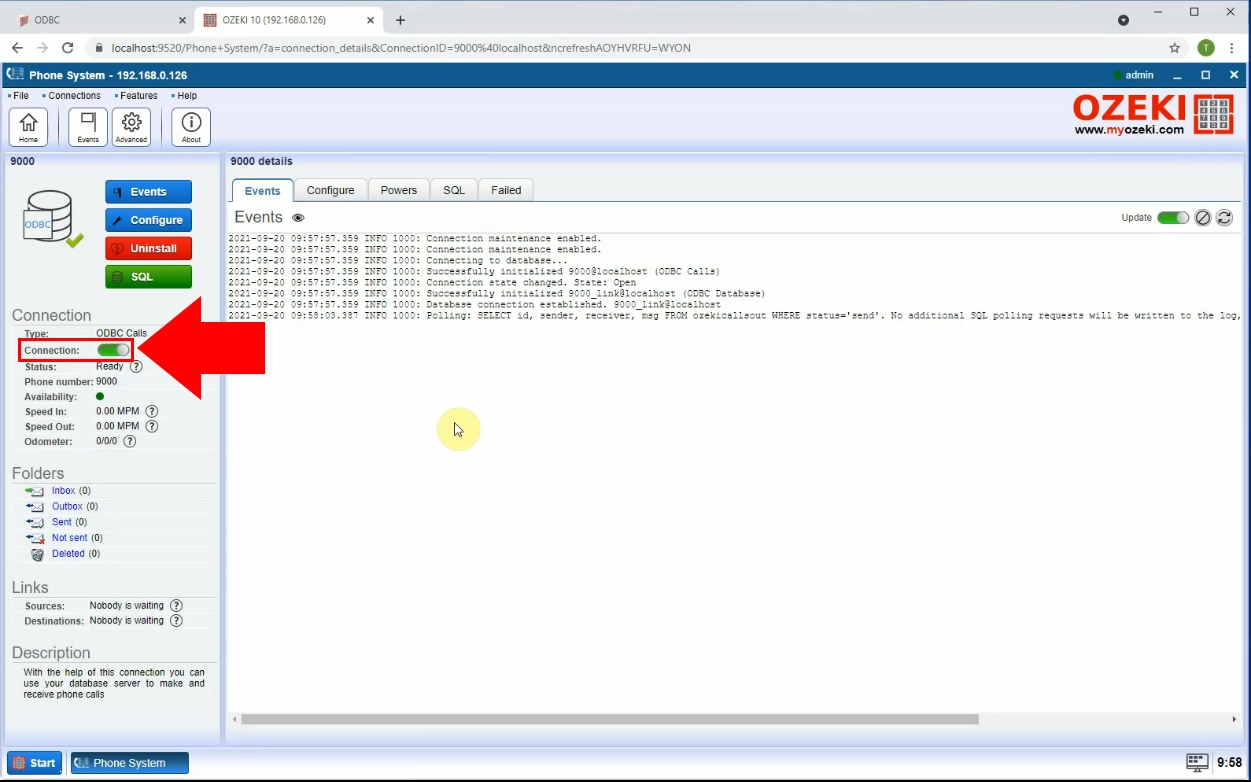
You have now created your connection. Enable your connection by clicking on the swtich button on the right (Figure 12). The switch turns green to indicate that a connection is active.
Create new outside line connection
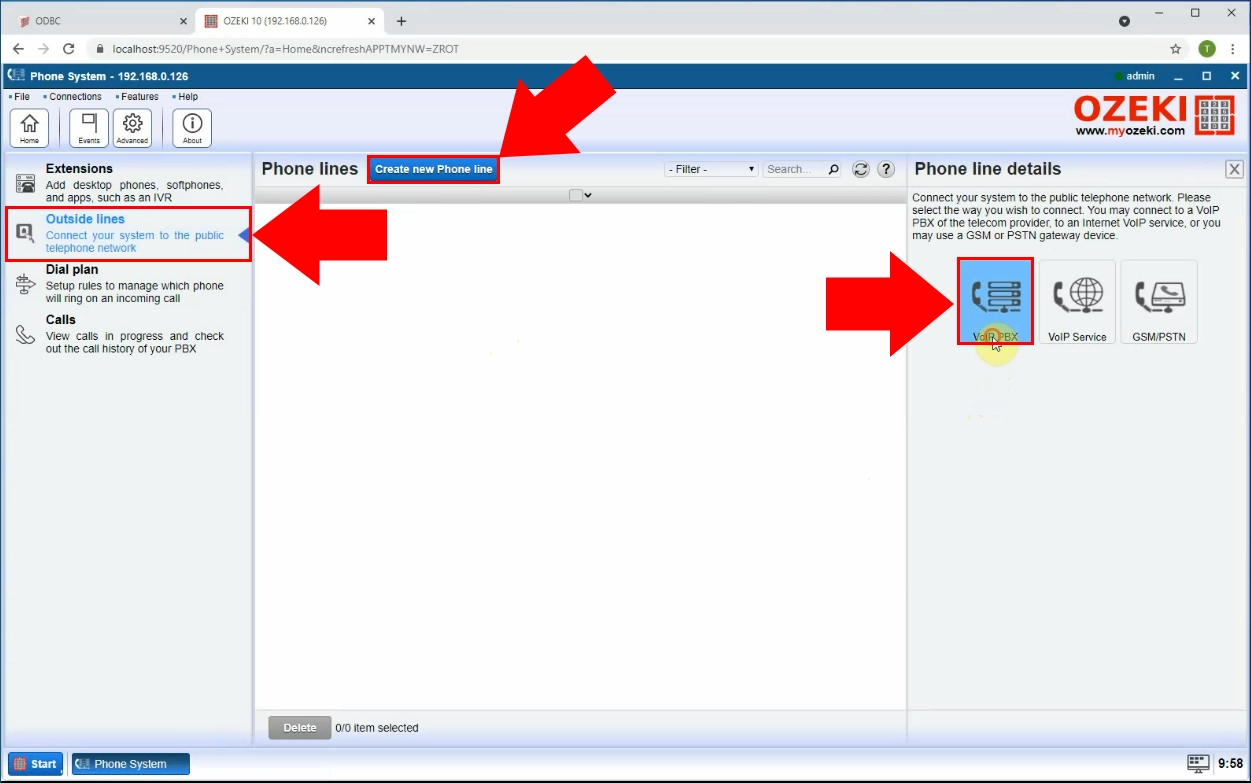
After you have successfully created the database connection, you have to create a new outside line connection. Click on Outside lines inside the menu on the left (Figure 13). Click on the blue Create new Phone Line button on the top. In the Phone line details menu on the right, click on VoIP PBX. This will bring you to a configuration menu.
Set up outside line connection
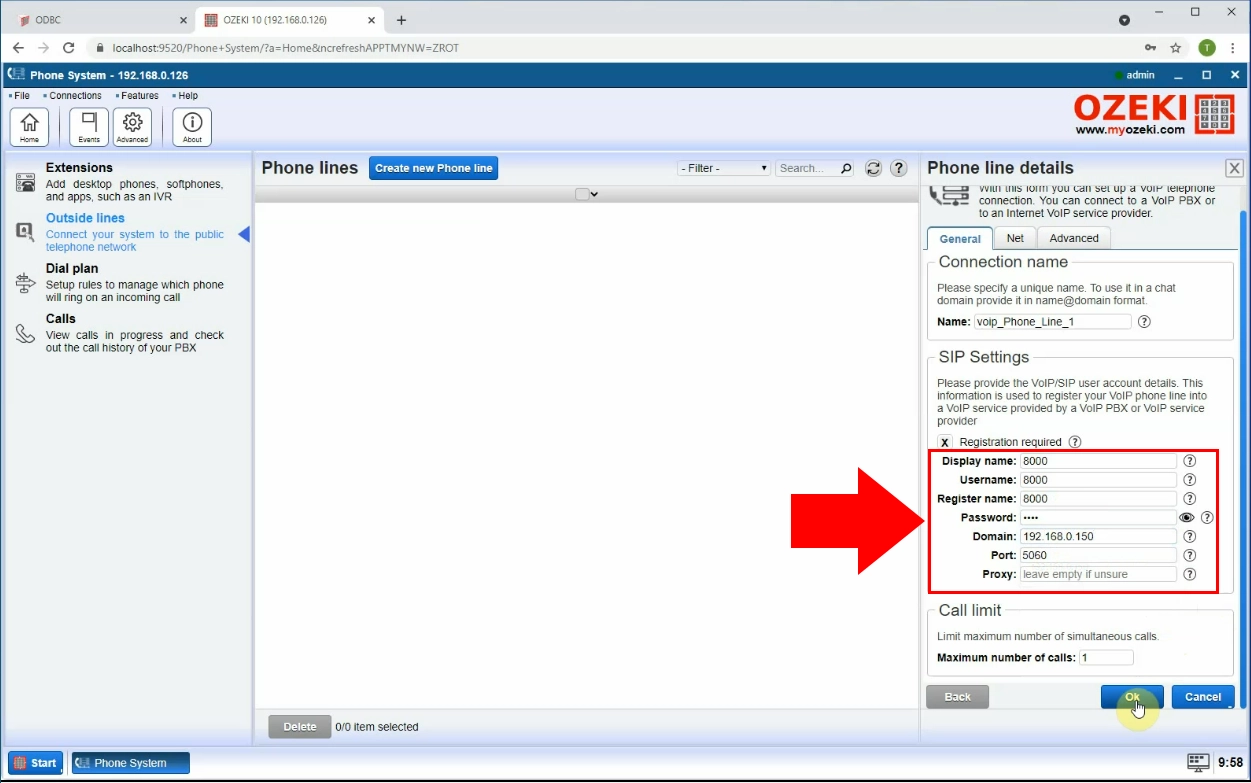
In this menu on the right side of the screen, you need to configure your outside line connection (Figure 14). Here you need to provide the following details by entering them into the corresponding textboxes:
- Display name
- Username
- Register name
- Password
- Domain (IP address)
- Port
Create dial plan rule
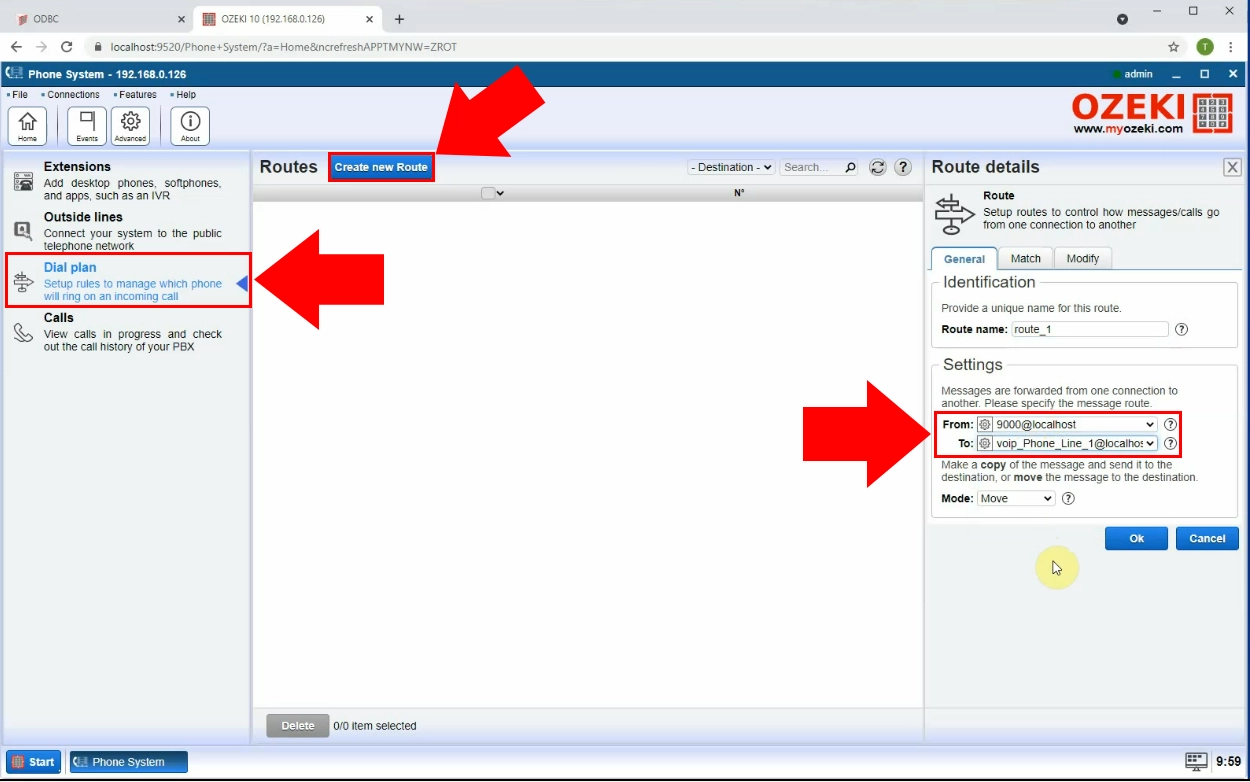
The last step before you are able to use the database, is to create a dial plan rule. Click on Dial plan inside the menu on the left (Figure 15). Click on the blue Create new Route button on the top. Look for the Settings section in the Route details menu on the right. Set From: as 9000. Set To: as voip_Phone_Line_1.
Insert call into database
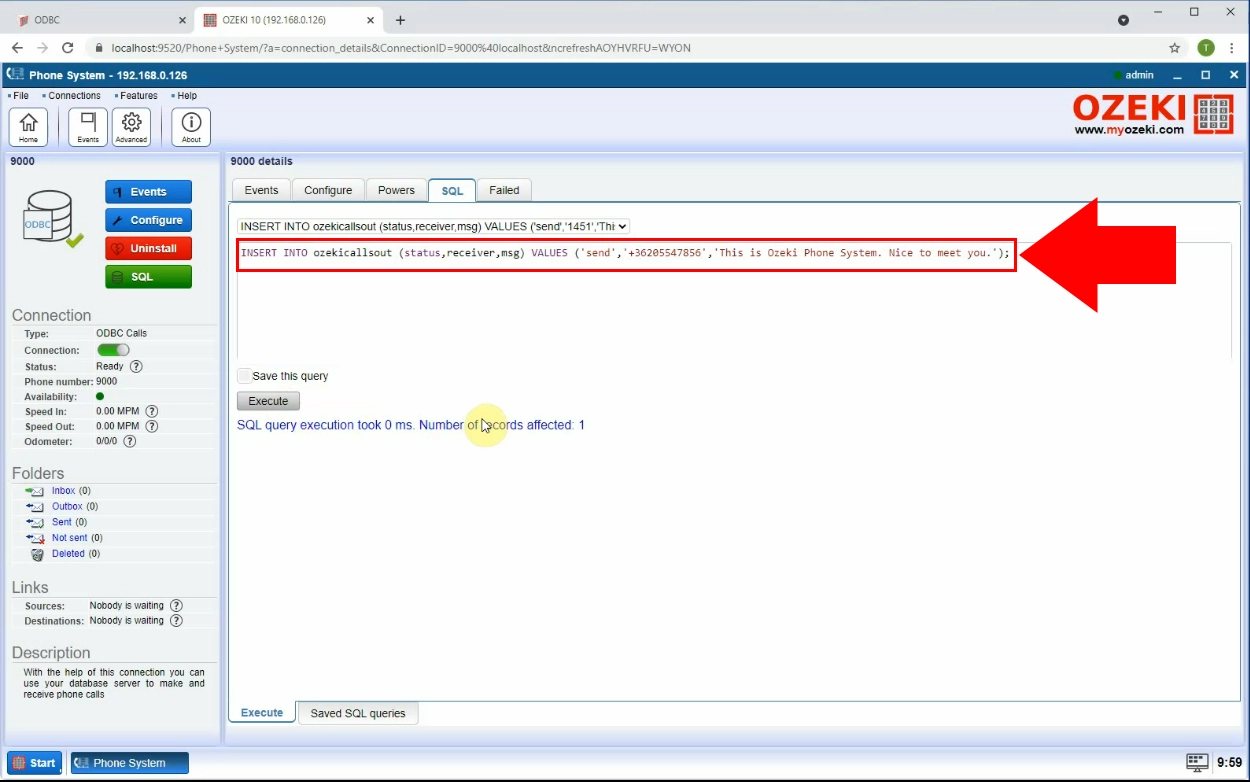
You are now able to use the databas for scripting calls. Open the details page of your ODCB connection. Click on the SQL tab to open the SQL text editor. Paste the code shown in Figure 16. Click on Execute to run the code, and insert the call into the database.
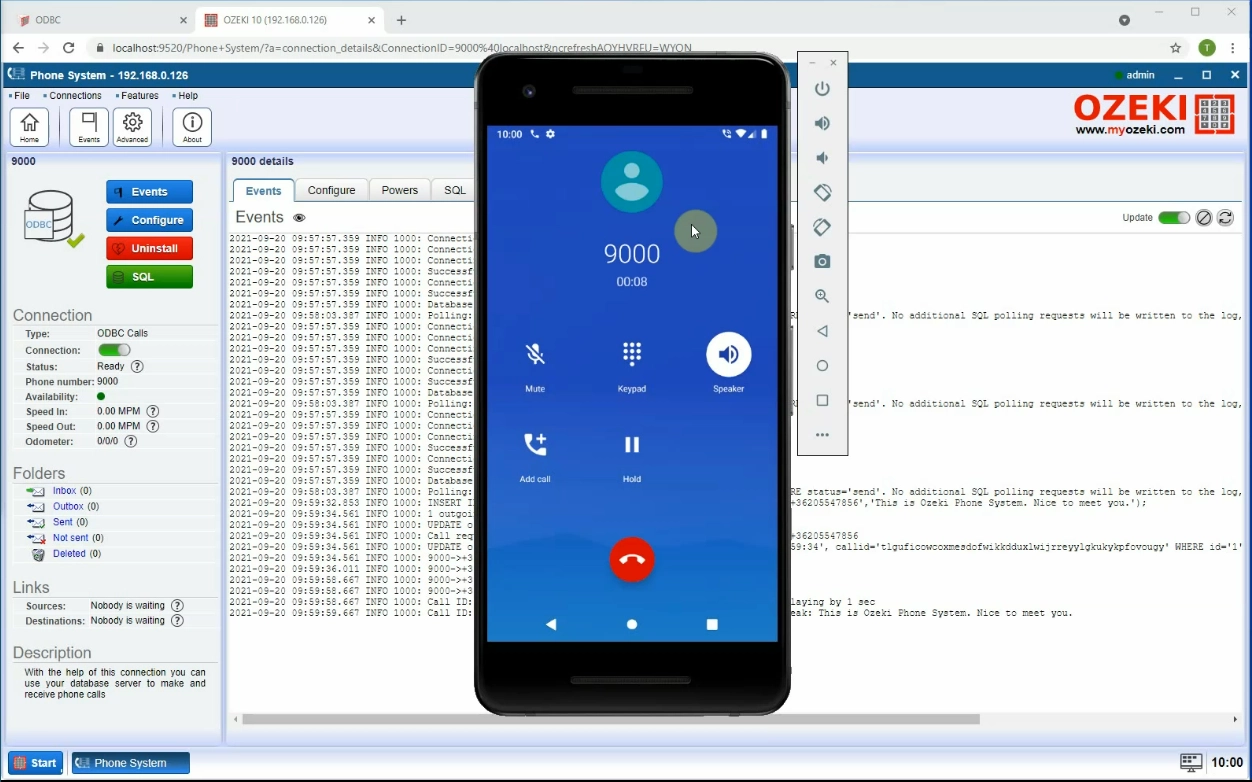
Phone called from database
Here you can see that the phone is being called from the database (Figure 17).
Summary
This is the end of the tutorial. You are now able to send SMS using ODBC and Ozeki Phone System. We hope you found the information presented in this article helpful. For more information on Ozeki Phone System and our various different solutions, check out our other guides too.
