How to make scripted calls from OLEDB
Scripted calls are a way to make your organization more efficient with human resources. Scripting a phone call and storing all the information about it in a database means that you can automate the process very easily. In this article, we are going to talk about the three main steps you need to take to have a working system. Connecting the Database to the Ozeki Phone System, creating an extension to the public telephone network, and set up routes calls. This process is easy to do and the article is supplemented with a detailed video tutorial. You will have no problem with following it and it only takes about 20 minutes to perform. Do not waste any more time. Start now!
What is a scripted call?
Scripted calls are phonecalls that are suited with a pre-written text. This text will be read aloud to the recipient by a text-to-speak system.
What is Oledb?
Oledb is an API that offers interface for data acces that is more felxible than other data other interfaces like SQL. It supports all forms of data stores and it is not tightly bound to a command system.
How to make scripted calls from OLEDB (Video tutorial)
In this video, we are going to show you how to connect the database to the Ozeki Phone System, how to set up extensions for the public phone network, and how to make the routing for calls. It will start the Ozeki Phone System home page and will take you to the test call. The video is only 2:20 long and it is very detailed. You will have no hard time following it. Plus, we are using the Ozeki Phone System which offers a very intuitive user interface.
// *******************************************
// Create the database
// *******************************************

CREATE DATABASE ozekidb
GO

sp_addLogin 'ozekiuser', 'ozekipass'
GO

sp_addsrvrolemember 'ozekiuser', 'sysadmin'
GO

USE ozekidb
GO

// *******************************************
// Create the database table layout
// *******************************************

CREATE TABLE ozekicallsin (
id int IDENTITY (1,1),
sender varchar(255),
receiver varchar(255),
msg text,
senttime varchar(100),
receivedtime varchar(100),
operator varchar(30),
reference varchar(30),
);

CREATE TABLE ozekicallsout (
id int IDENTITY (1,1),
sender varchar(255),
receiver varchar(255),
msg text,
callid varchar(255),
startime varchar(40),
endtime varchar(40),
status varchar(40),
talkduration varchar(40),
ringduration varchar(40),
operator varchar(100),
errormsg varchar(250)
);

CREATE TABLE ozekicallscripts (
id int IDENTITY (1,1),
msg text,
phonenumber varchar(40)
);

GO

// *******************************************
// How to make a call: example 1
// The script is in the ozekicallsout table
// *******************************************

INSERT INTO ozekicallsout (status,receiver,msg)
VALUES ('send','101','
<?xml version="1.0"?>
<Response>
	<Request>
        <OnAnswered>
            <Speak Party="caller">You will get dtmf keys 123.</Speak>
            <SendDTMF Party="caller" Keys="123"></SendDTMF>
            <Hangup/>
        </OnAnswered>
    </Request>
</Response>
');

// *******************************************
// How to make a call: example 2
// The script is in a file on drive C
// *******************************************

INSERT INTO ozekicallsout (status,receiver,msg) VALUES ('send','101','C:\ozml\script.ozml');

// *******************************************
// How to make a call: example 3
// The script is in the ozekicallscripts table
// *******************************************

SET identity_insert ozekicallscripts ON;

INSERT INTO ozekicallscripts (id,msg)
VALUES ('1','
<?xml version="1.0"?>
<Response>
	<Request>
        <OnAnswered>
            <Speak Party="caller">You are using call script 1. Thank you for calling. </Speak>
            <Hangup/>
        </OnAnswered>
    </Request>
</Response>
');

INSERT INTO ozekicallsout (status,receiver,msg) VALUES ('send','101','1');
Find the 'Create new Extension' button
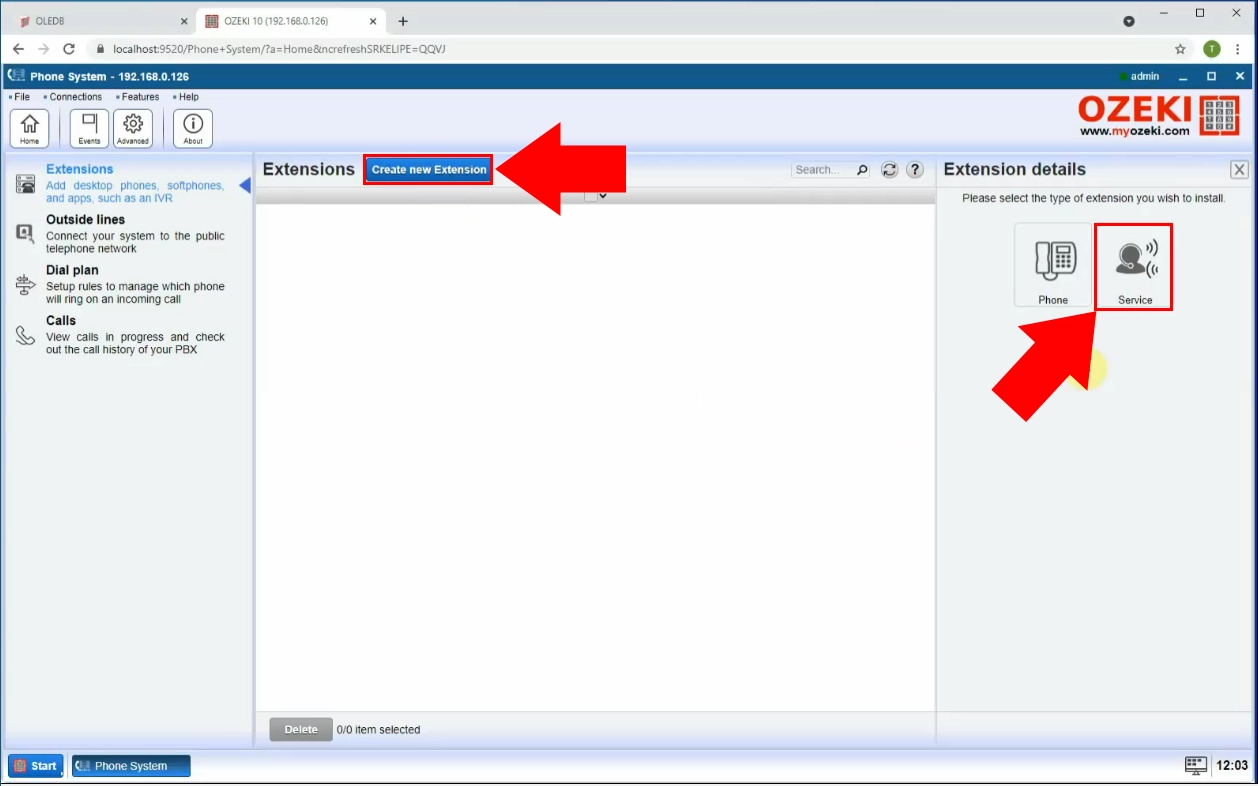
On the upper side of the Ozeki Phone System home page, next to the 'Extensions' title, you can find a blue 'Create New Extension' button (Figure 1). It will open the Extension details panel on the right side of the screen. There, you will be able to select the Service option, where you can choose which automated PBX extension you wish to use. The PBX extension will make sure that your scripted call from the OLEDB API will be connected to the public phone network.
Select the extension type
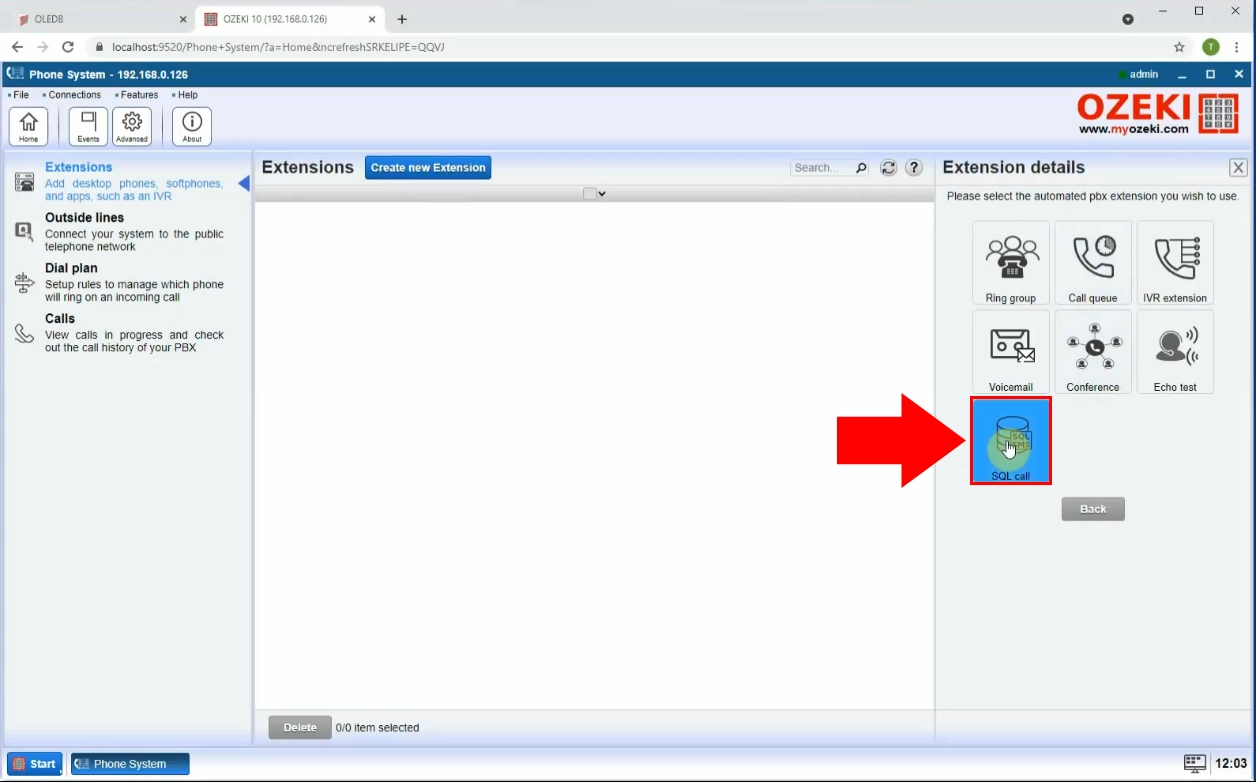
In the panel on the right side, you can see all your automated PBX extensions (Figure 2). Choose the SQL call option, to use an SQL database to store information about each call. Pressing the SQL call button will bring up all the supported SQL Database systems. Your automated PBX extension will make all the stored calls and will deliver the message you provided.
Choose OLEDB calls
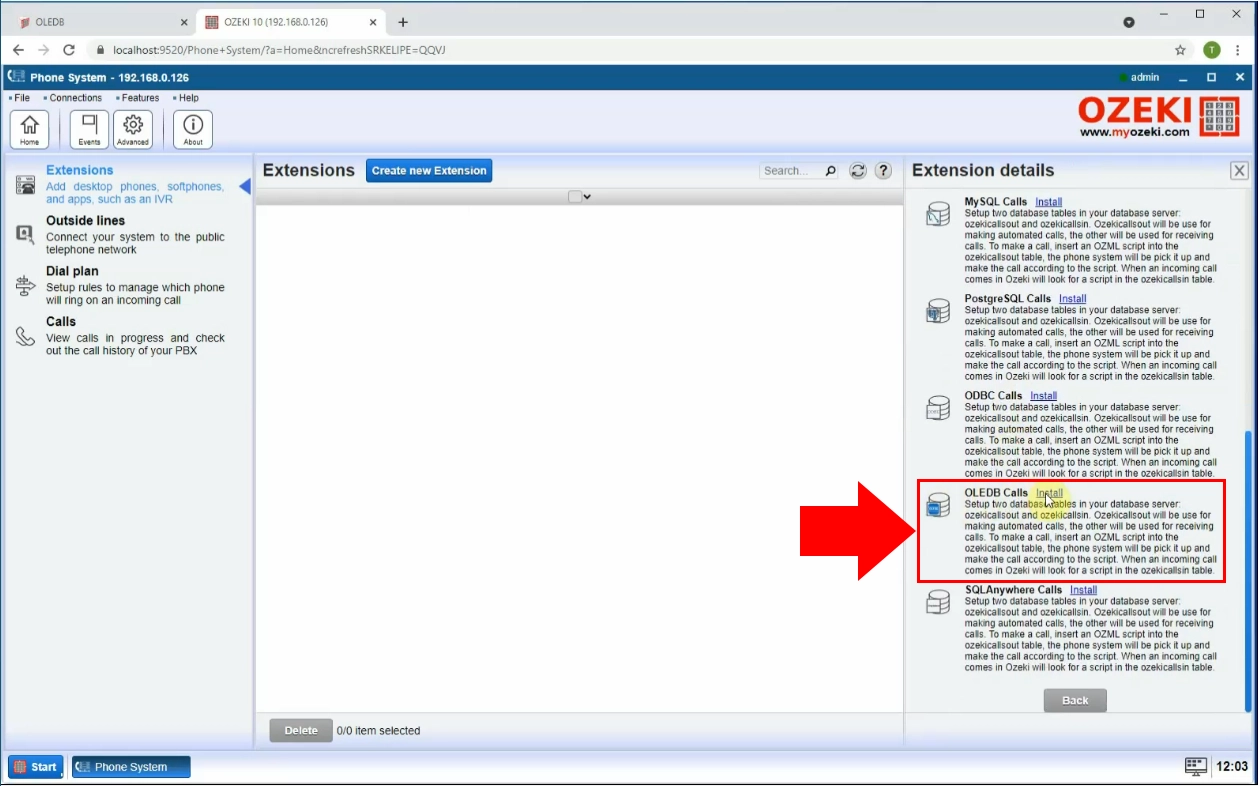
Look for the extension details panel on the right side of the screen. In this list, you will find all the supported SQL database types. Press the 'Install' button next to the OLEDB calls list item (Figure 3). This will open the OLEDB calls details panel. This is where you can provide more necessary details for the automated PBX extension.
Provide connection details
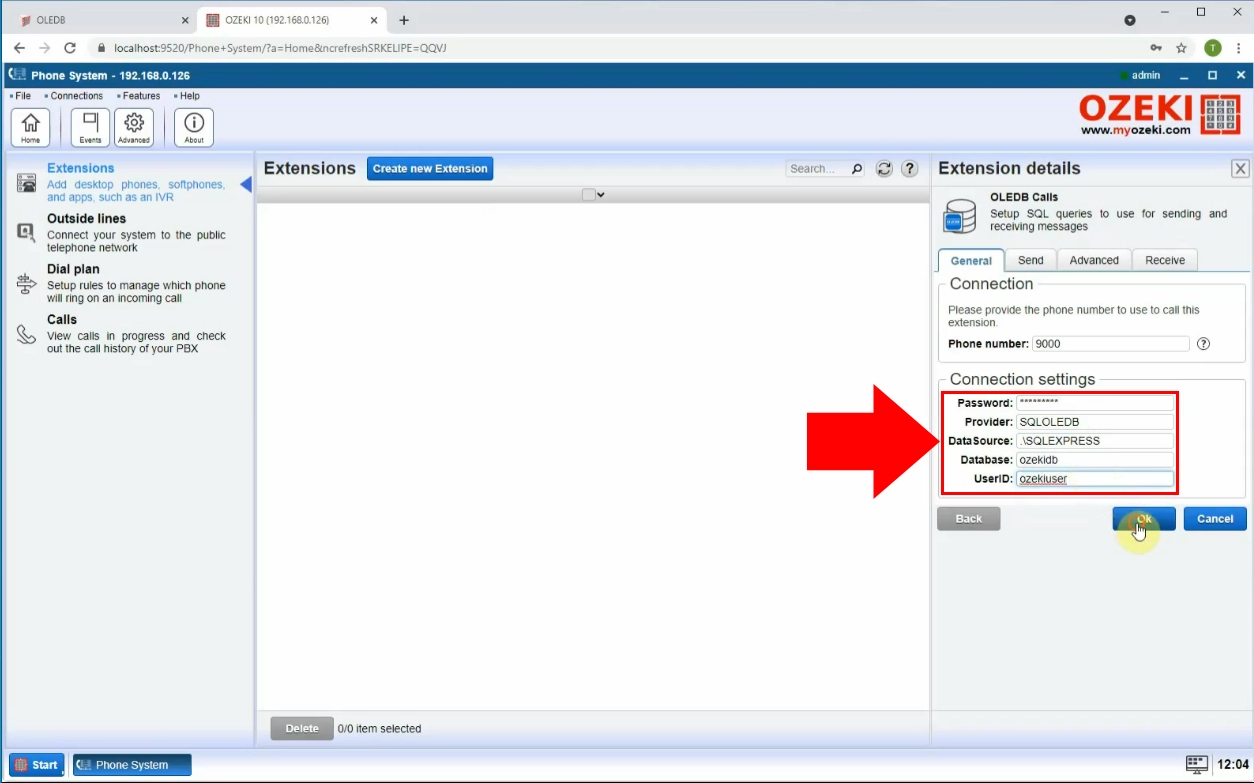
There are 5 input fields in the connection settings group box. Provide login credentials for the SQL database you will use to store data in. The Ozeki Phone System will connect to the SQL Database using these credentials. If the phone system is connected to the database successfully, it means that you can acquire data or modify the database from the phone system software. Click the Ok button to proceed to the next step.
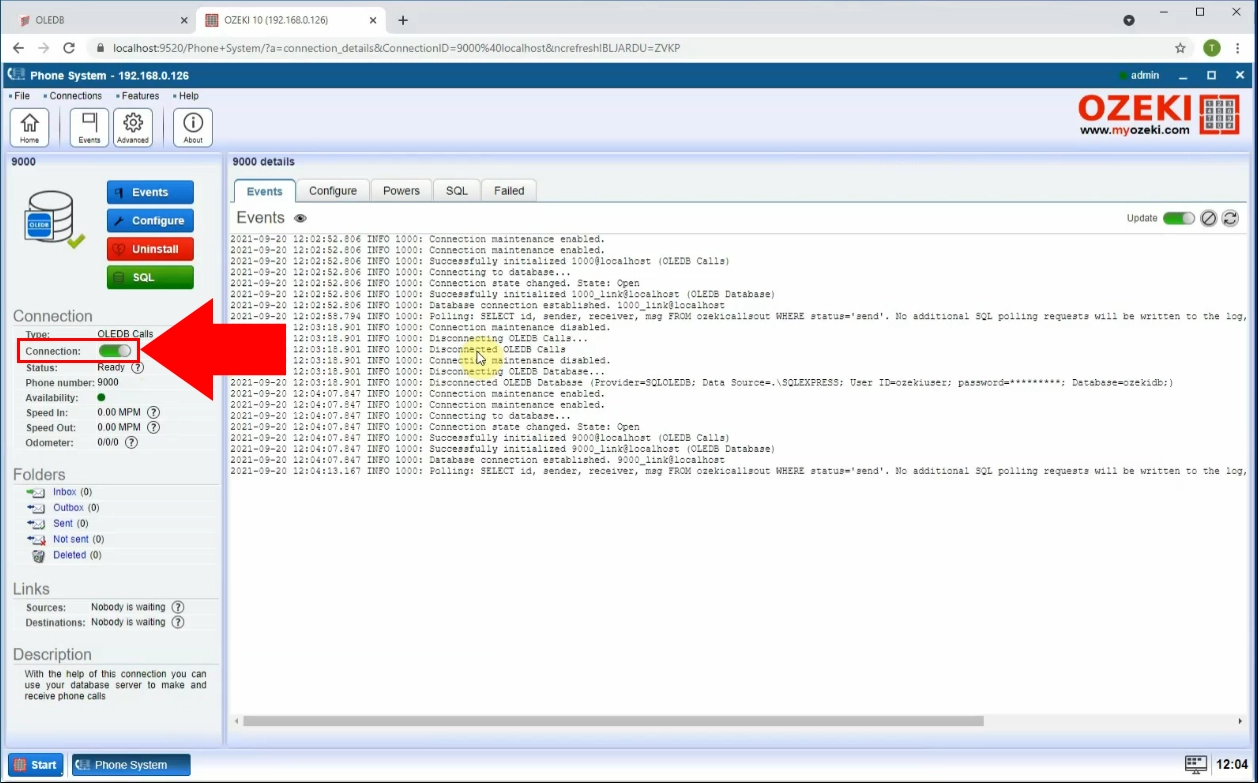
Turn on the connection to the database
In the finished OLEDB extension's detail panel, you will find a switch button (Figure 5). Switching this button will turn on the connection between the Ozeki Phone System and the OLEDB database. If you click the switch button, you will see the connection process in real-time in the Events tab. You can see a database icon located on the upper left side of the screen, under the 'Home button'. If you see a green tick next to the icon, it means that the connection is active.
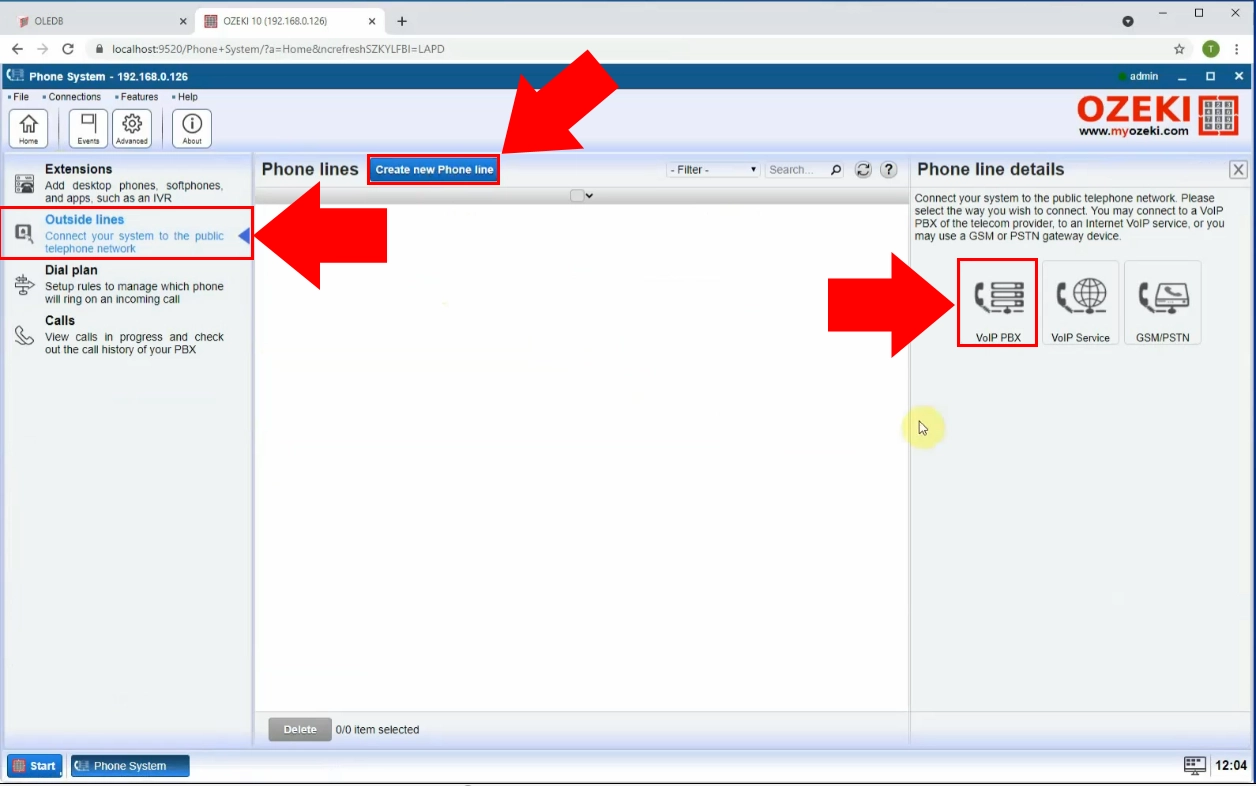
Create outside lines
On the Home Page of the Ozeki Phone System, you can see a panel on the left side (Figure 6). It contains the 'Outside lines' option. Click it the see the list of all your existing outside lines. On the top of the screen next to the 'Phone lines' title, you can see a blue 'Create new Phone line' button. Clicking this button will open the panel on the right side. In this panel, you will see ways of connecting to the public telephone network. The VoIP PBX is a suitable choice in this case, as the VoIP service connects to an Internet VoIP service, and the GSM/PSTN requires a gateway device.
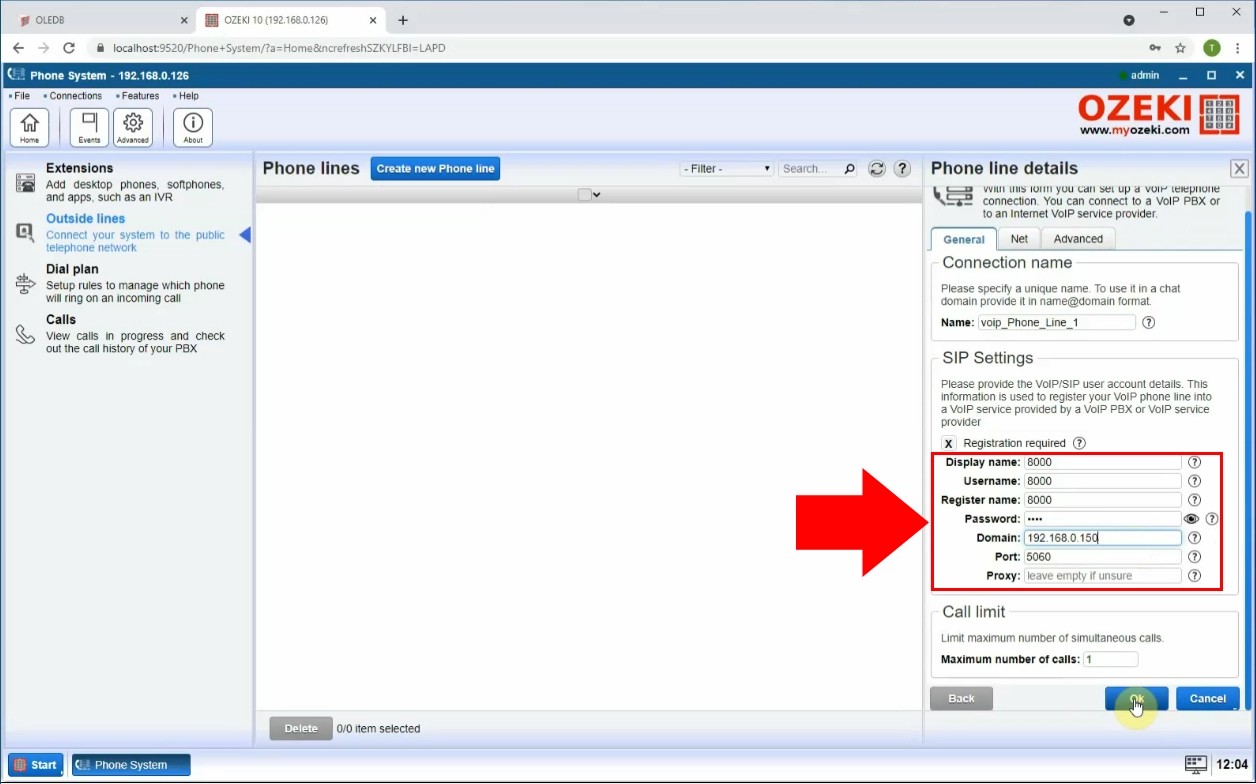
Provide outisde line connection details
In the Phone line details panel on the right side, you can see a groupbox titled SIP settings (Figure 7). In this groupbox, you will find six input fields. Provide the VoIP user account details. Your VoIP phone line will be registered with the VoIP service with this information. Make sure to choose a display name that is distinguishable from other and a password that is easy to remember but hard to guess.
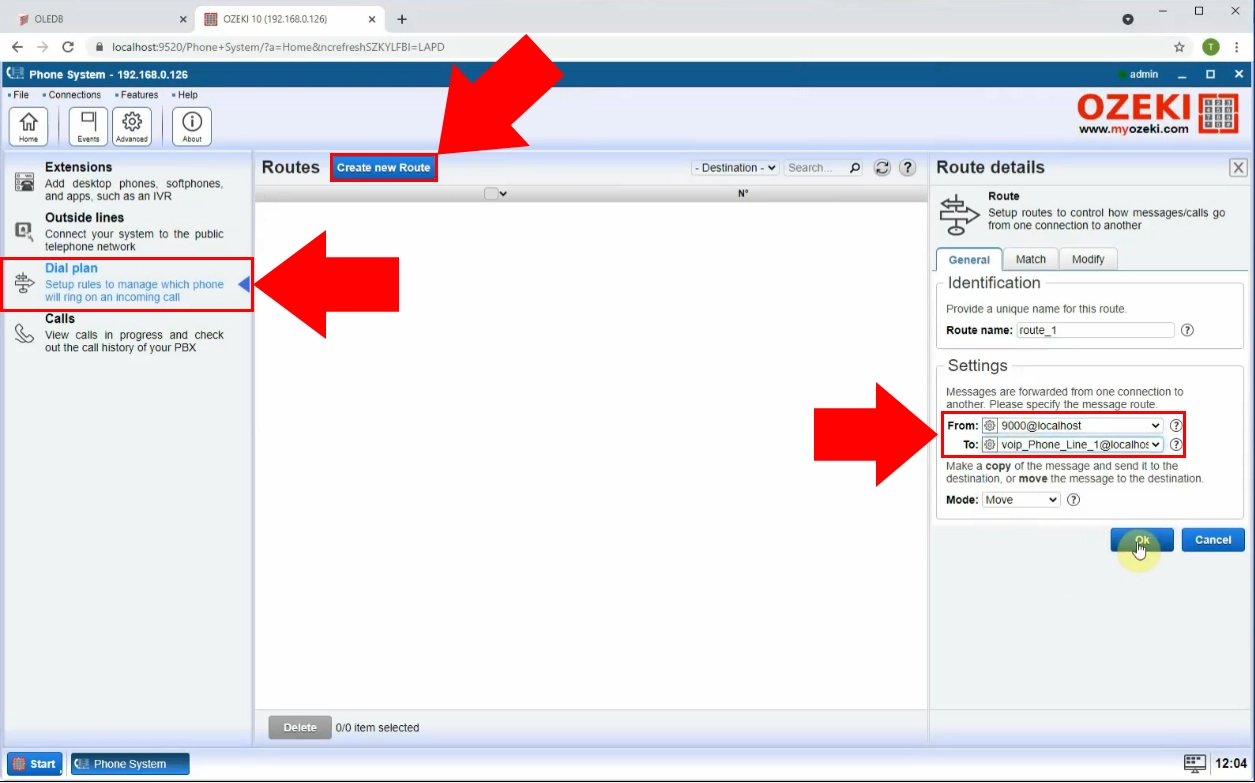
Find the 'Create new Route' button
On the home page of the Ozeki Phone System, you can see a panel on the left side. There you will find all the settings options. Choose the Dial plan option. Find the 'Create a new Route' button. It is located next to the Routes title on the upper side of the middle panel. Clicking it will bring up the Route details settings. Here, you will find a groupbox titled 'Settings'. In the form input field, choose the phone number you provided in the SIP settings groupbox, followed by '@localhost'. From the 'To' drop-down menu, select the previously created phone line. Click 'Ok' if you are ready to proceed to the next step.
Insert a call into the database
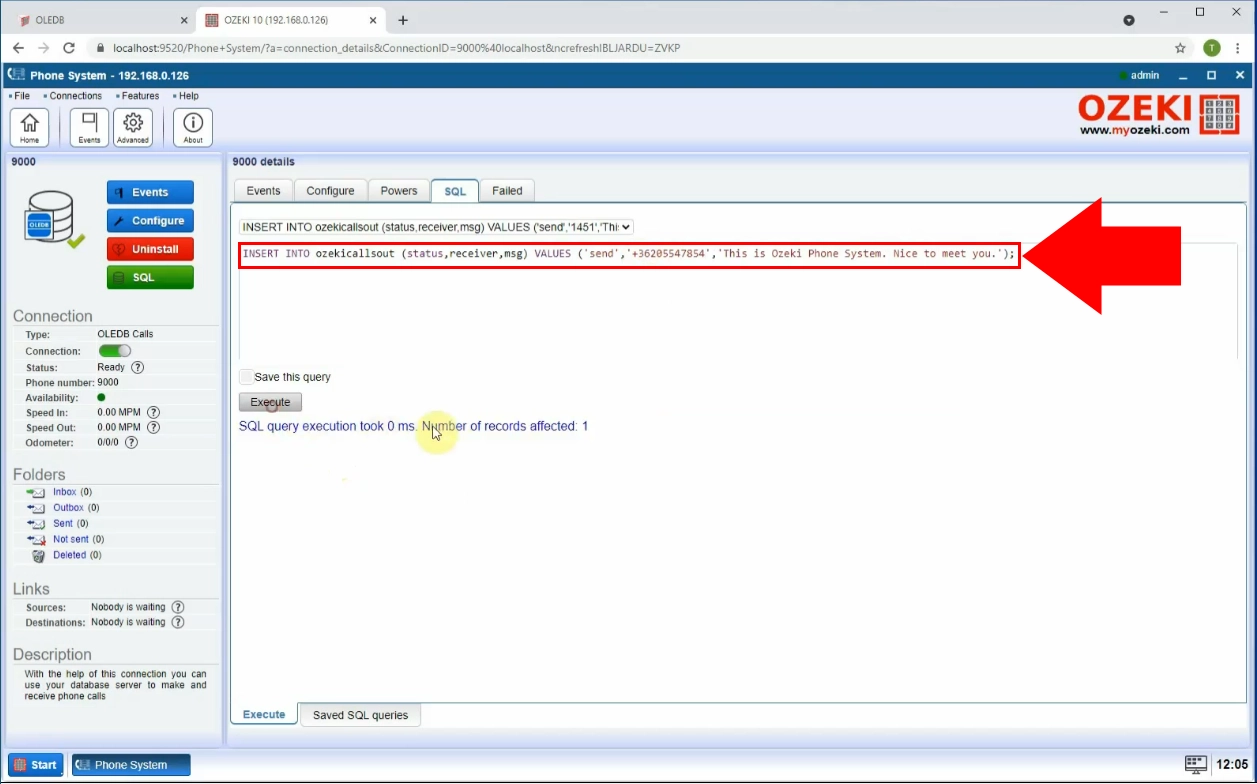
To test your system, you need to insert a call into the database. You can do this in the SQL tab of the OLEDB extension. You can find the code you need to provide above, in the last line of code. Interpret the code in the following way. The first variable in the bracket after 'VALUES' is the action you wish to perform. The second variable is the phone number of the recipient. The third one is the message that you wish to read out to the recipient. If you are finished with modifying the code, click the Execute button. Make sure to provide a phone number that you can easily check for the calling.
Receive the test call
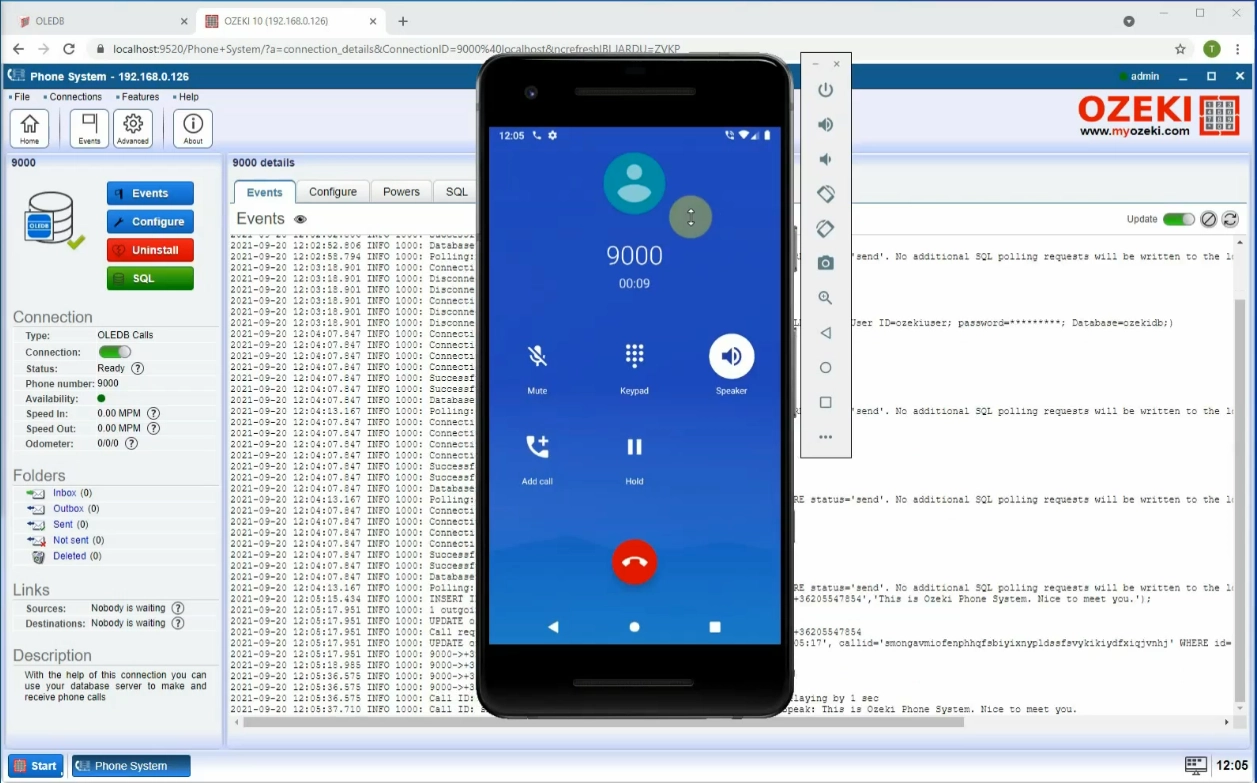
If you insert a call into the OLEDB database, the Ozeki Phone System will call the recipient's phone number. In case of answering the call, the text will be read out loud. The recipient will see the phone number that you provided before as the caller ID. In this example, we called a virtual phone.
Summary
This article explained how to make scripted calls using an OLEDB extension. Storing your call information and building a system that calls the recipients is an excellent way of automation. This system is also supplemented with a text-to-speech system that reads out the message for the recipient. This way, this system will save you a lot in human resources.
You may find out more information about this technology and Ozeki Phone System, so make sure that you don't finish your work here.
Ozeki has other articles about this technology with other SQL database systems, such as Oracle or MySQL
If you need an e-mail to SMS forwarding and you have not already done so, Download Ozeki SMS Gateway now and create this setup!
