How to make scripted calls from MS SQL Express
In this guide, we show you how you can create a system that will make scripted calls from a MS SQL Express database. If you want to have a system that is easy to control and very powerful, you can combine the power of SQL and the performance of the Ozeki SMS Gateway. This will make a reliable and very high-performance system. This tutorial does not require SQL knowledge and it should only take about 15 minutes to perform. The tutorial is very detailed, and it offers a short but very informative video. After you finish the tutorial, you will be able to setup a scripted call system with the help of the Ozeki SMS Gateway and MS SQL Express.
What is MSSQL Express?
MSSQL Express if the free version of MS SQL. Essentially, MS SQL is a database management system that can be used to store and access the information stored in many different databases
How to make scripted calls from MS SQL Express (Video tutorial)
This video is about how you can create a system that can make scripted calls from a MS SQL database. The video starts with downloading MS SQL Express and will take you all the way to your first test call. The video is 5 minutes long but it features all the necessary steps you need to take to have a working scripted call system. In the video, we are working with the Ozeki SMS Gateway. You will see how powerful but easy to use the Ozeki SMS Gateway. One of the most important benefits of it is that it offers a great and easy to use dashboard that lets you reach any of the important functions with only one click. You are going to see how to setup a database that can work with the Ozeki SMS Gateway, how to connect the gateway to MS SQL Express and how to use the system to make scripted call.
// *******************************************
// Create the database
// *******************************************

CREATE DATABASE ozekidb
GO

sp_addLogin 'ozekiuser', 'ozekipass'
GO

sp_addsrvrolemember 'ozekiuser', 'sysadmin'
GO

USE ozekidb
GO

// *******************************************
// Create the database table layout
// *******************************************

CREATE TABLE ozekicallsin (
id int IDENTITY (1,1),
sender varchar(255),
receiver varchar(255),
msg text,
senttime varchar(100),
receivedtime varchar(100),
operator varchar(30),
reference varchar(30),
);

CREATE TABLE ozekicallsout (
id int IDENTITY (1,1),
sender varchar(255),
receiver varchar(255),
msg text,
callid varchar(255),
startime varchar(40),
endtime varchar(40),
status varchar(40),
talkduration varchar(40),
ringduration varchar(40),
operator varchar(100),
errormsg varchar(250)
);

CREATE TABLE ozekicallscripts (
id int IDENTITY (1,1),
msg text,
phonenumber varchar(40)
);

GO

// *******************************************
// How to make a call: example 1
// The script is in the ozekicallsout table
// *******************************************

INSERT INTO ozekicallsout (status,receiver,msg)
VALUES ('send','101','
<?xml version="1.0"?>
<Response>
	<Request>
        <OnAnswered>
            <Speak Party="caller">You will get dtmf keys 123.</Speak>
            <SendDTMF Party="caller" Keys="123"></SendDTMF>
            <Hangup/>
        </OnAnswered>
    </Request>
</Response>
');

// *******************************************
// How to make a call: example 2
// The script is in a file on drive C
// *******************************************

INSERT INTO ozekicallsout (status,receiver,msg) VALUES ('send','101','C:\ozml\script.ozml');

// *******************************************
// How to make a call: example 3
// The script is in the ozekicallscripts table
// *******************************************

SET identity_insert ozekicallscripts ON;

INSERT INTO ozekicallscripts (id,msg)
VALUES ('1','
<?xml version="1.0"?>
<Response>
	<Request>
        <OnAnswered>
            <Speak Party="caller">You are using call script 1. Thank you for calling. </Speak>
            <Hangup/>
        </OnAnswered>
    </Request>
</Response>
');

INSERT INTO ozekicallsout (status,receiver,msg) VALUES ('send','101','1');
Download the installer of MSSQL Express
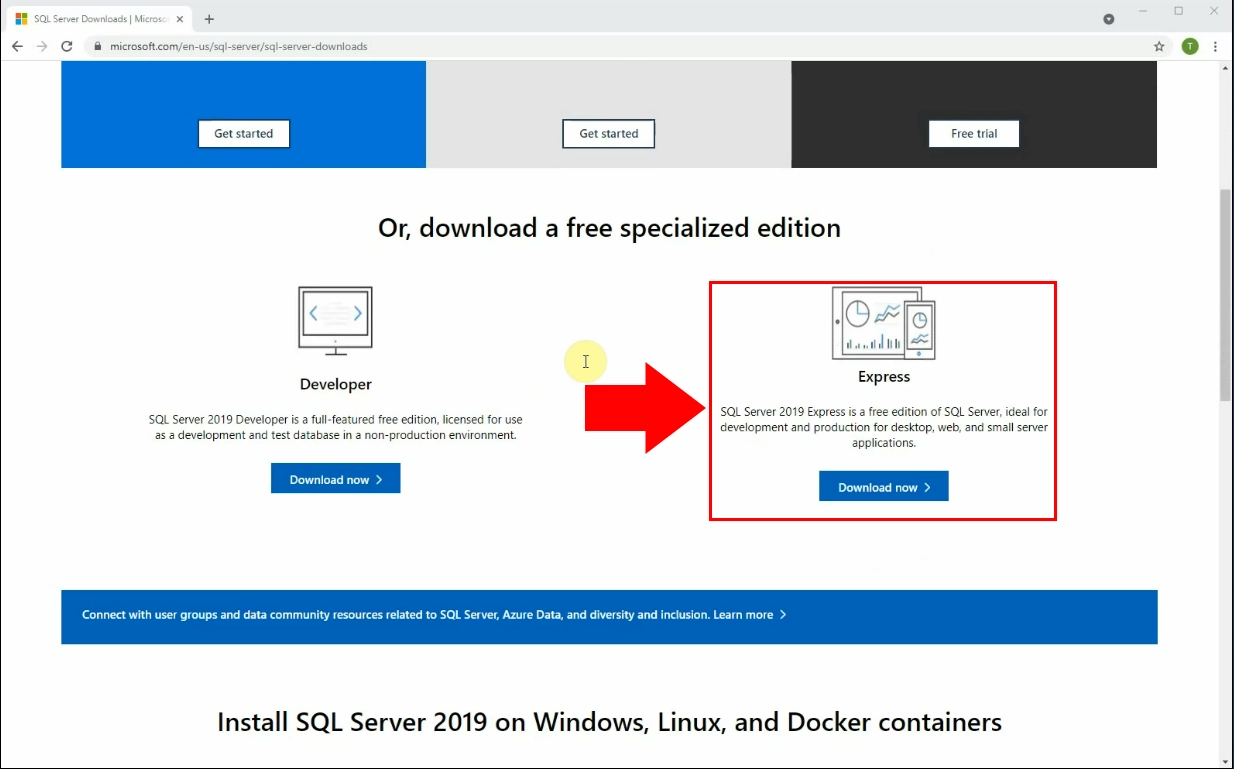
First, you have to visit the download page of the Microsoft SQL Express software. On the download page of MSSQL Express, click the blue Download now button (Figure 1). This will start the downloading process in your browser. Make sure that you download the Express version of MSSQL because we are showing you the steps in that software. You can reach the download page here in this link. Download MSSQL Express.
Choose the installation type
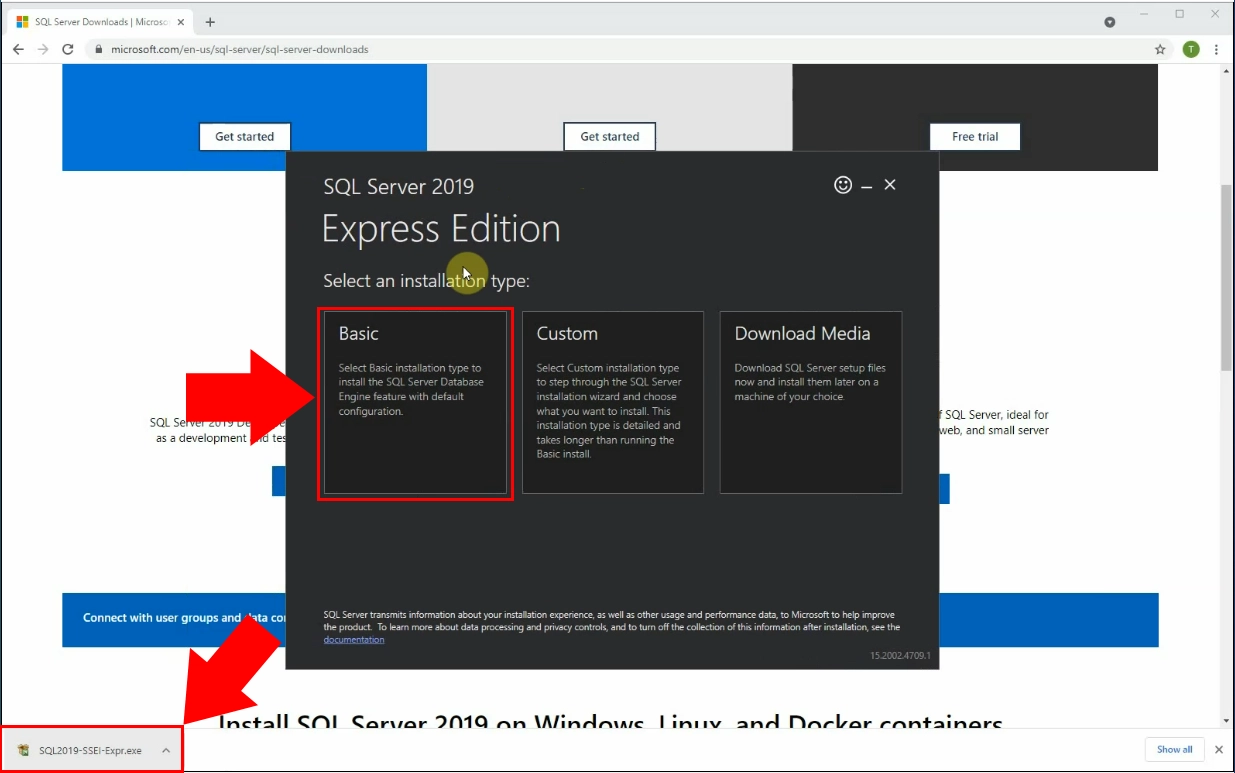
In the next step, you need to choose which type of installation you wish to proceed with. If you want the easiest experience of all installation, choose the basic. If you want the deepest customizability, choose the custom installation type. This way you can choose what you want to install, where you want to install and much more. The last choice is to download media. This one will let you download the installer and use it to install the software later, or on another device. In this tutorial, we are going to go with the default installation type (Figure 2).
Wait for the installation process to finish
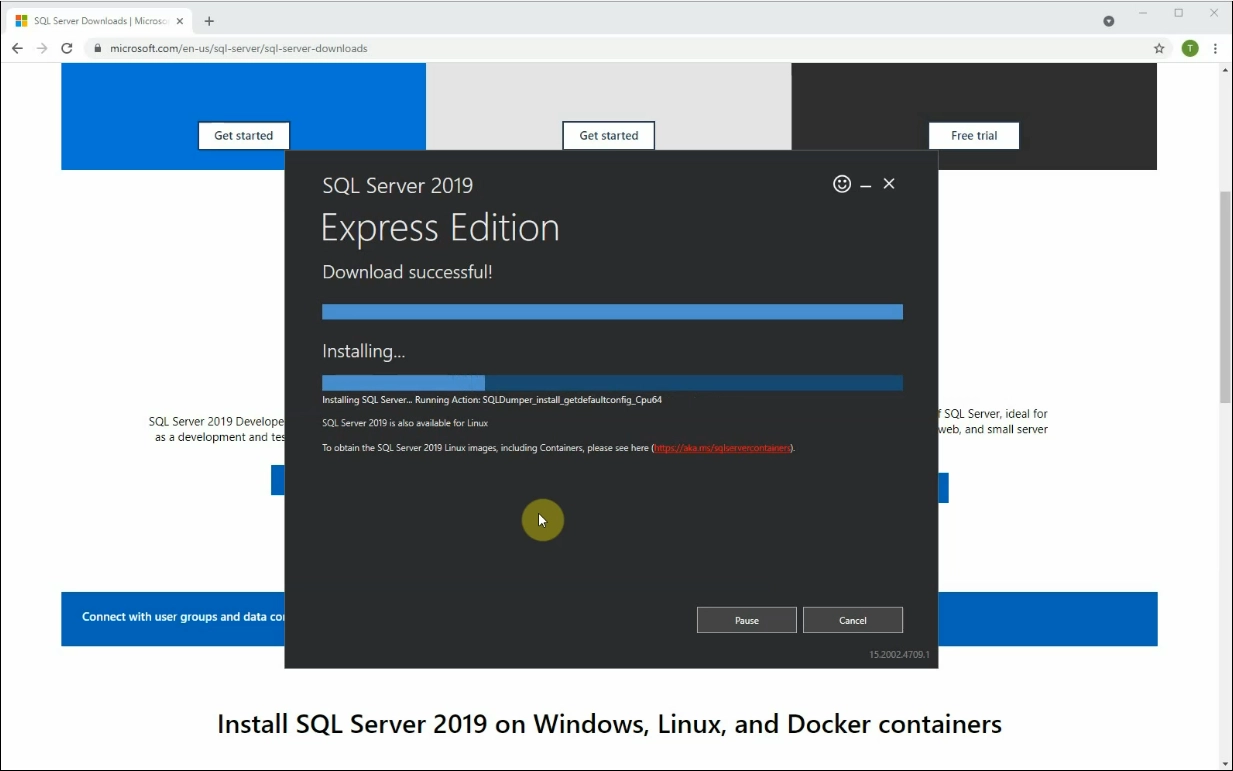
Now you can start the installation process. Launch the installer and wait for the download process to finish. You can supervise the download process with the help of the upper blue process bar (FIgure 3). After you have the software downloaded, the installer will start the installation process. It also have a process bar. After you have done both process, the installer will exit and you will have the working software on your computer.
Connect to the database
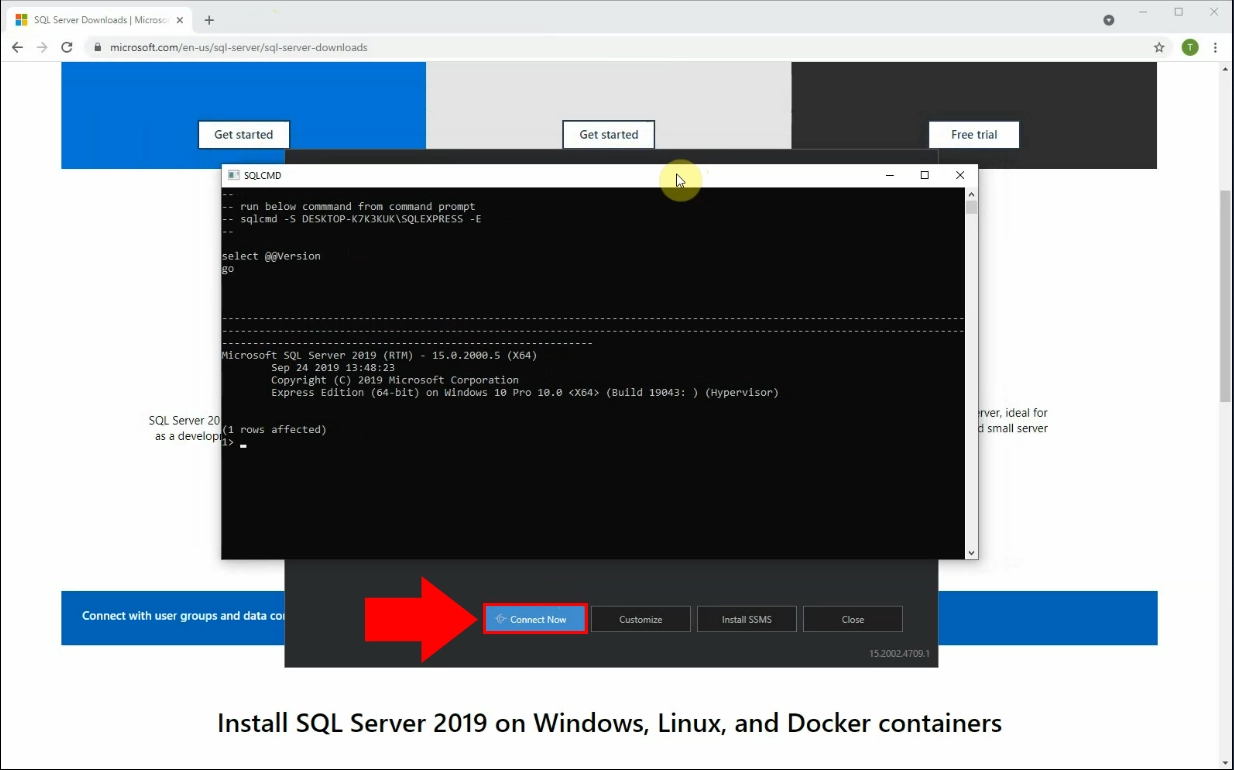
If you have the software installed on your computer, you can start working with databases. To create a new database, click the Connect now button at the end of the installer. This will open an SQLCMD (Figure 4). This is a command prompt the accepts SQL command and control a database with them. Before you write in anything, it will create a table and update one row in it. This command prompt will be the place where you create, update or delete tables. In the next step, we are going to create the two tables that we need.
Create the database and the user
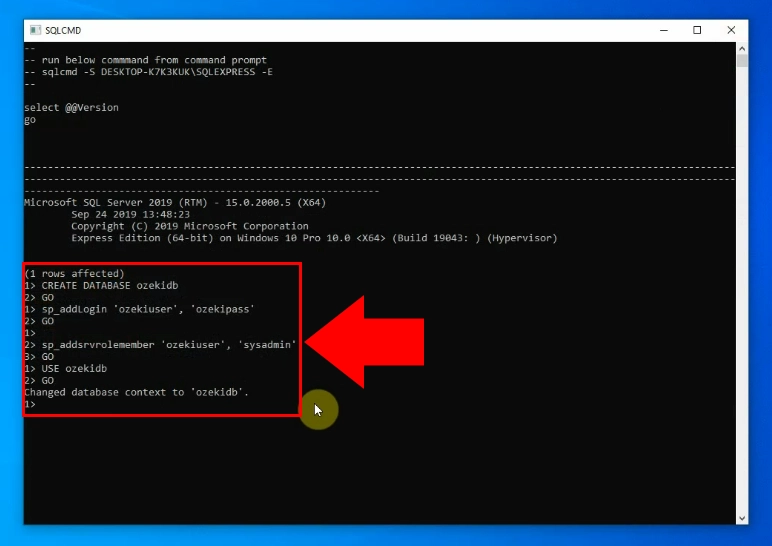
In the SQLCMD you can control your SQL Database with SQL commands. We provided you a code piece that will create a database user and a database. These are necessary if you want to use the Ozeki SMS Gateway with MS SQL Express. Copy the code given above and past it into the SQLCMD (Figure 5). It will first create a database protected with a password and username combination. Then it will create a user too with the correct access to anything. Now all we need is two tables and we are going to be able to control the Ozeki SMS Gateway with MSSQL Express.
Create the two ozekicall tables
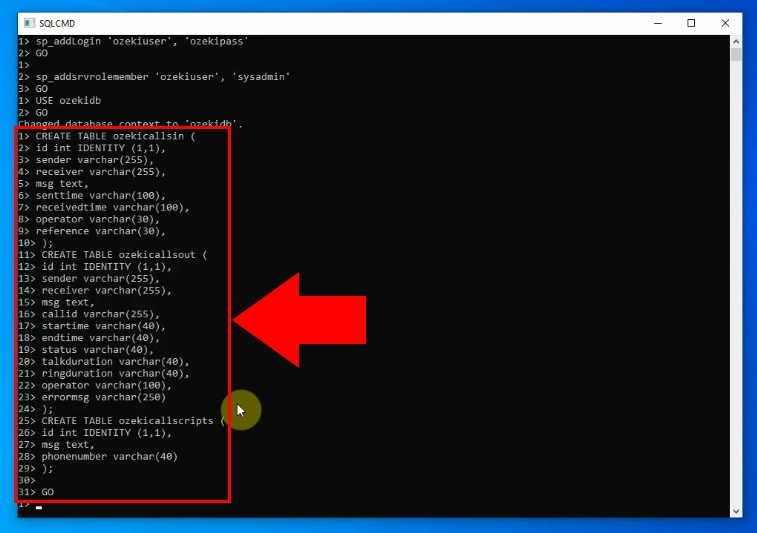
On Figure 6, you can see how to create the two tables for the Ozeki SMS Gateway. The first table that we are going to create is the ‘Ozekicallsin’ table. It will serve as the storage for the data of the incoming calls. The second table that is going to be created is the ‘ozekicallsout’ table. It will be frequently scanned by the Ozeki SMS Gateway for new records. If it find anything, it will make a call according to the data in the record. We provide you with the code that you need for creating these tables. Copy and paste them into the SQLCMD.
Install a service extension
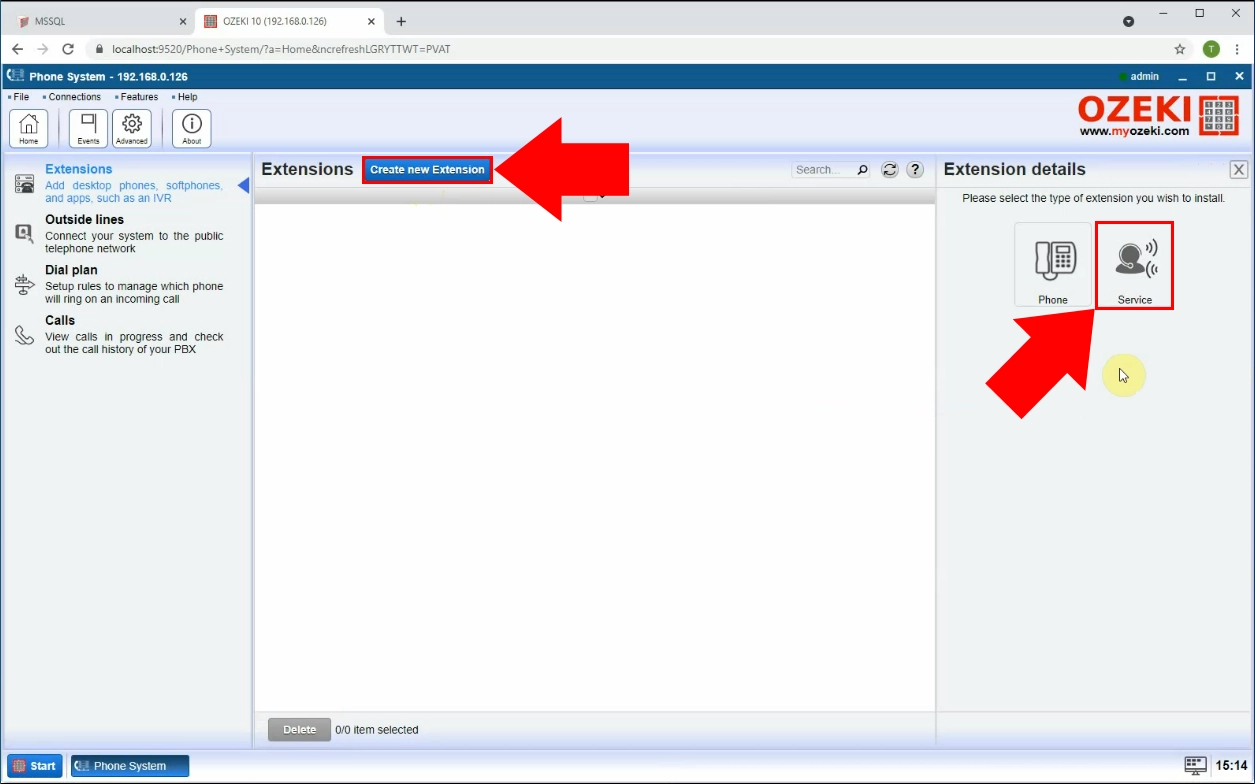
To create your extension, open the Ozeki Phone System application. Open the Extensions tab using the menu on the left side panel. There, find the ‘Create new Extension’ button located next to the ‘Extensions’ title (Figure 7). Click it to see your extension type options on the right side of the screen. We need to create an extension for a scripted call service, so choose the ‘Service’ option. This will open a new menu where you can choose what type of service you wish to use the extension for.
Choose the SQL call as the extension type
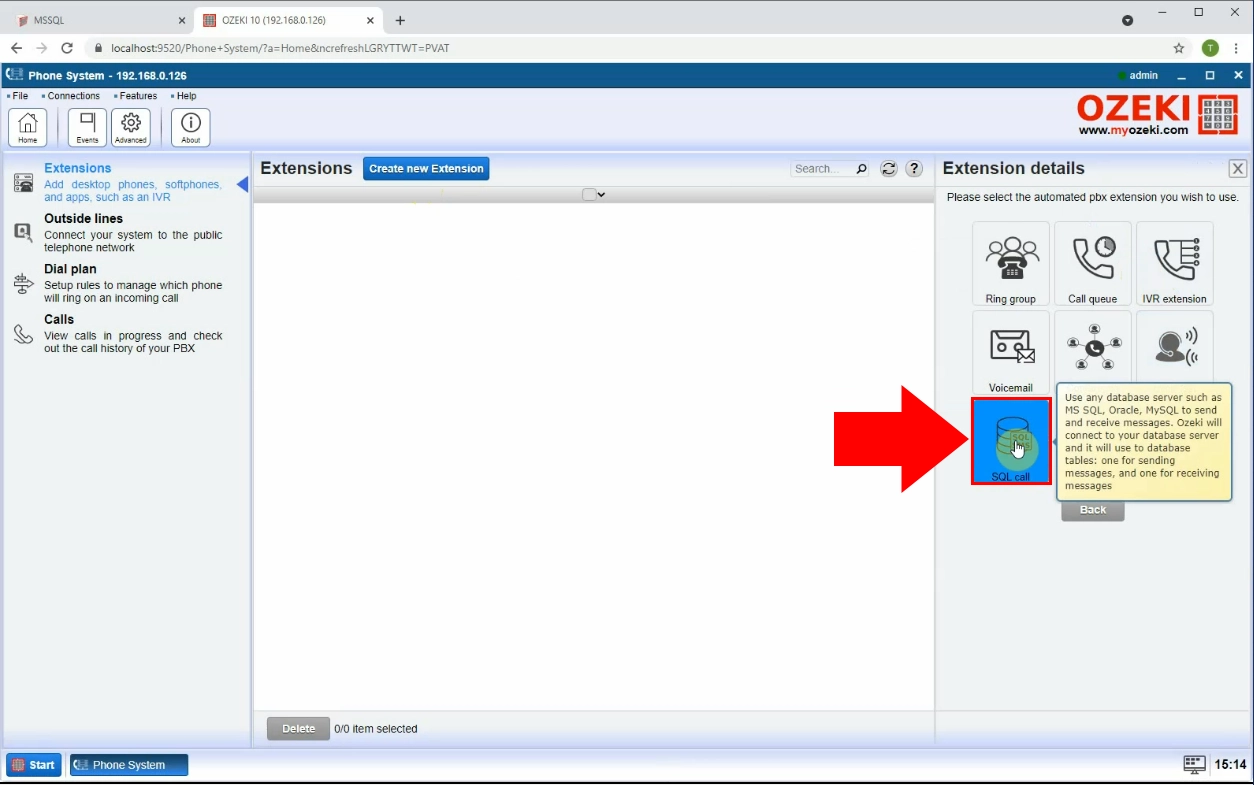
In this next menu (Figure 6), you can see what you can use the extension for. As you can see the Ozeki Phone System will handle all your services in the PBX field. For example, you can build a voicemail system, a call queue system or you can create a ring group using on of these options. In this case, the scripted call service will be built on an SQL database. Choose the 'SQL call' option to open the list of all the SQL Database Management software that can be used with the Ozeki Phone System.
Install MSSQL Server Call
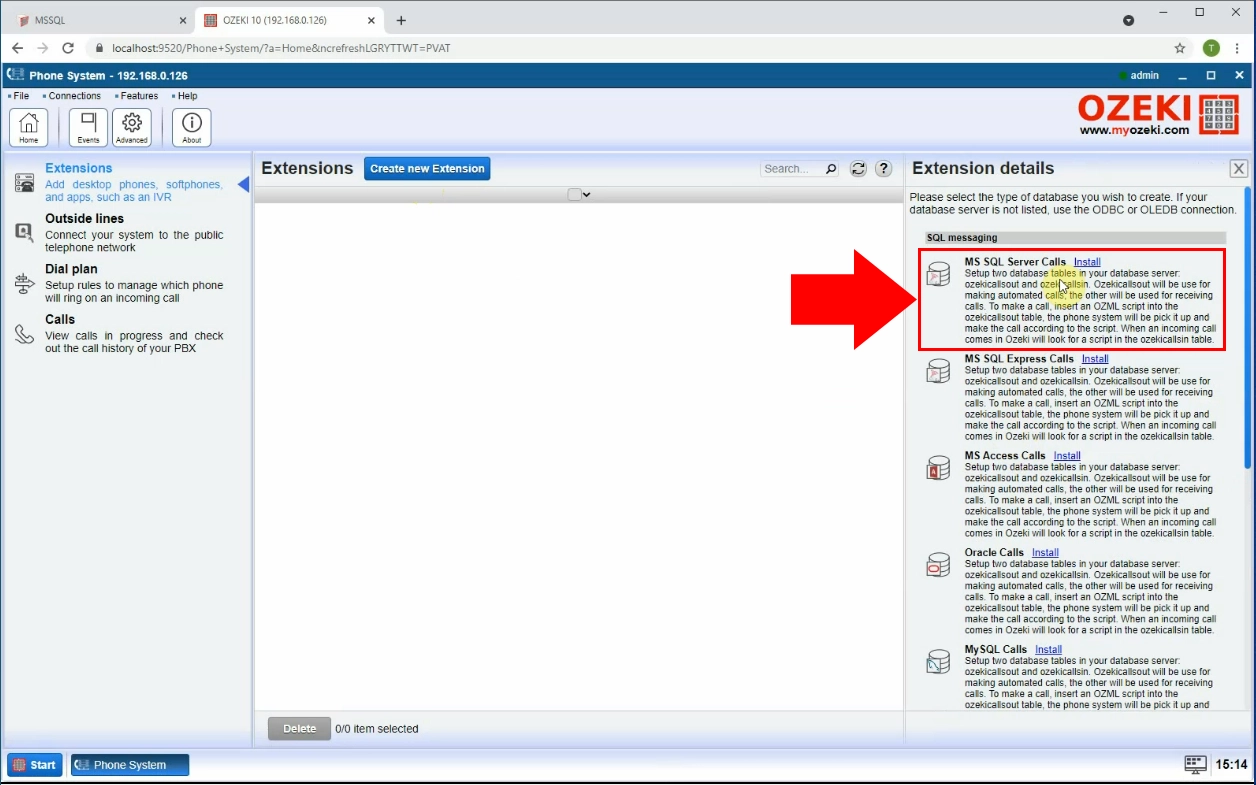
You can see the list of SQL database management tools that can work with the Ozeki Phone System (Figure 9). As you can see, it contains all the widely used SQL database management softwares. In our case, we wish to use the MS SQL Express to handle data for our calls. Search for the ‘MS SQL Server Calls’ option in the right-side menu and click the blue ‘Install’ button to start the installation procedure.
Provide details
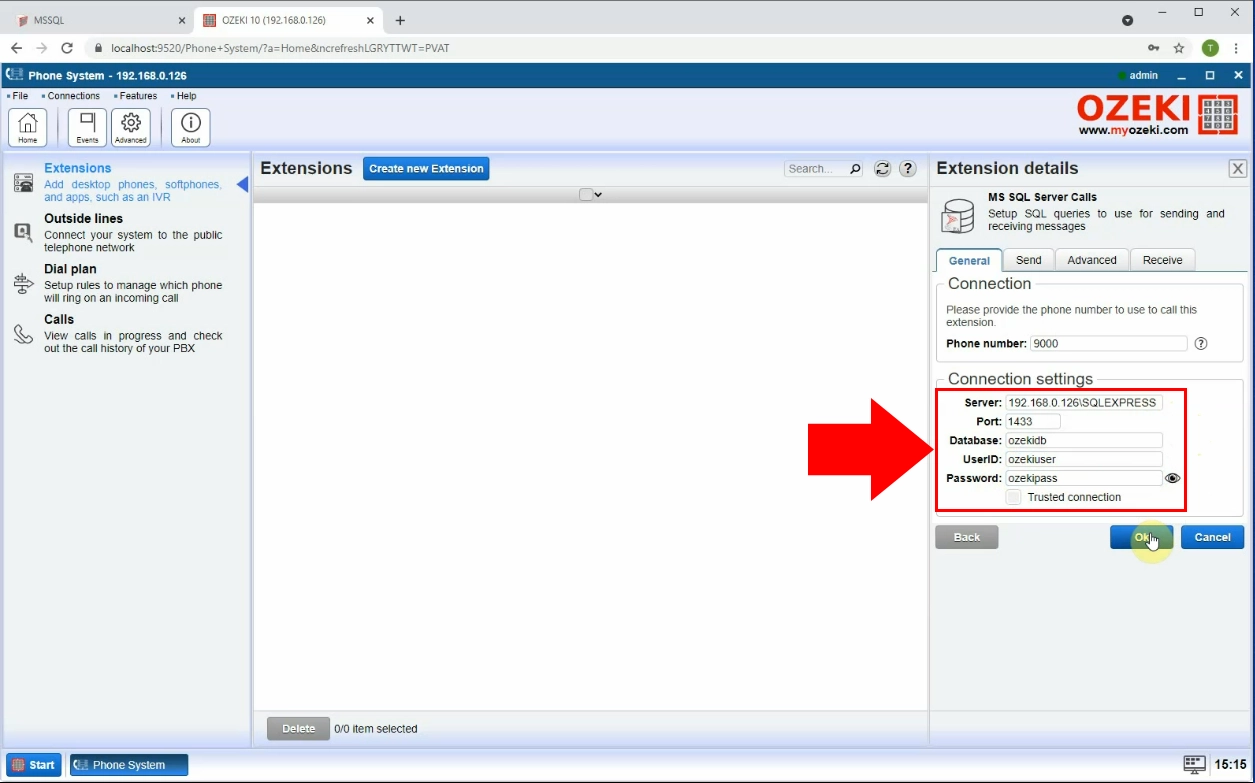
In this next step, you need to provide some key information about some information that will be used to connect to the SQL database (Figure 10). You need to provide the server IP address of the SQL Express, a port number which will be 1433. You will also need the database name, UserID and password. These are all created using the code that you pasted into the SQLCMD at the beginning of the article. If you used our code, the details will be the following:
- Database : ‘ozekidb’
- UserID : ‘ozekiuser’
- Password : ‘ozekipass’
After providing all the necessary details about the connection, press the ‘OK’ button to proceed.
Connect to the database
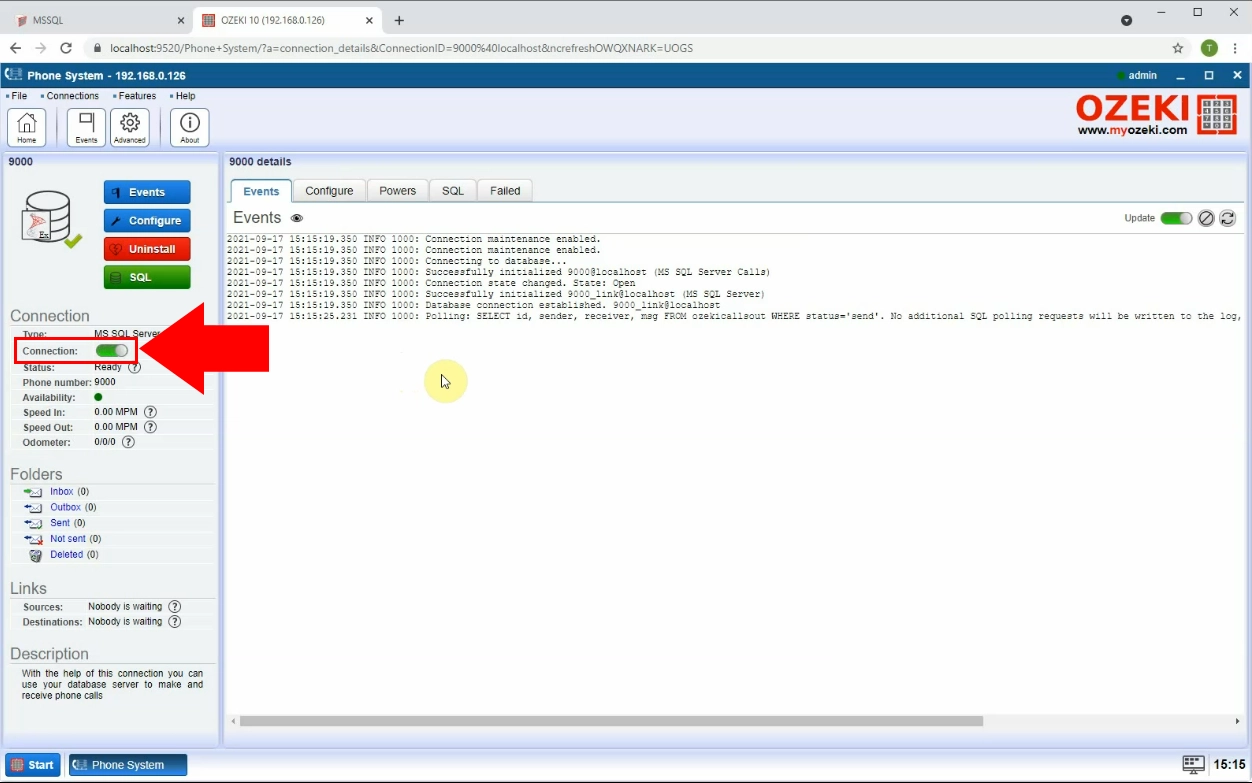
Now you have the connection ready to use. All you need to do is to turn the connection on. You can do this by using the ‘connection’ switch button. It is located under the Connection section of the created extension. If the switch button is green, the connection is live and working. You can supervise the connection process using the ‘Events’ tab, under the extension’s details panel (Figure 11).
Create a new outside line connection
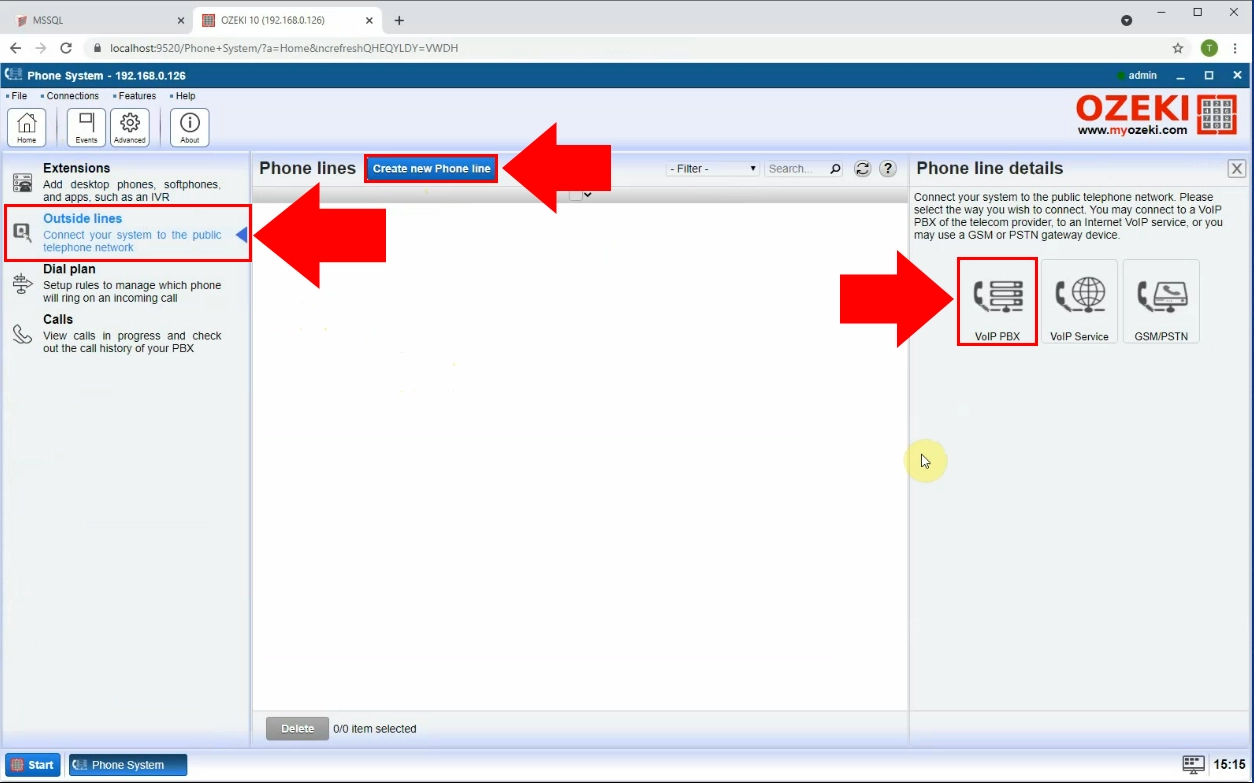
To be able to reach your customers, you need to have a connection between your phone system and the public telephone network. To have this connection, you need to create an outside line connection. To do so, search for the ‘Outside lines’ option in the menu on the left side of the screen (Figure 12). Here you will see all your created phone line. To create a new one, click the ‘Create new Phone line’ button on the top of the screen next to the ‘Phone lines’ title. You will see a panel on the right side of the screen titled ‘Phone line details’. You can choose the way you wish to connect to the public phone line. In this case, choose the ‘VoIP PBX’ option. Click it to proceed to the next step.
Provide details for the outside line connection
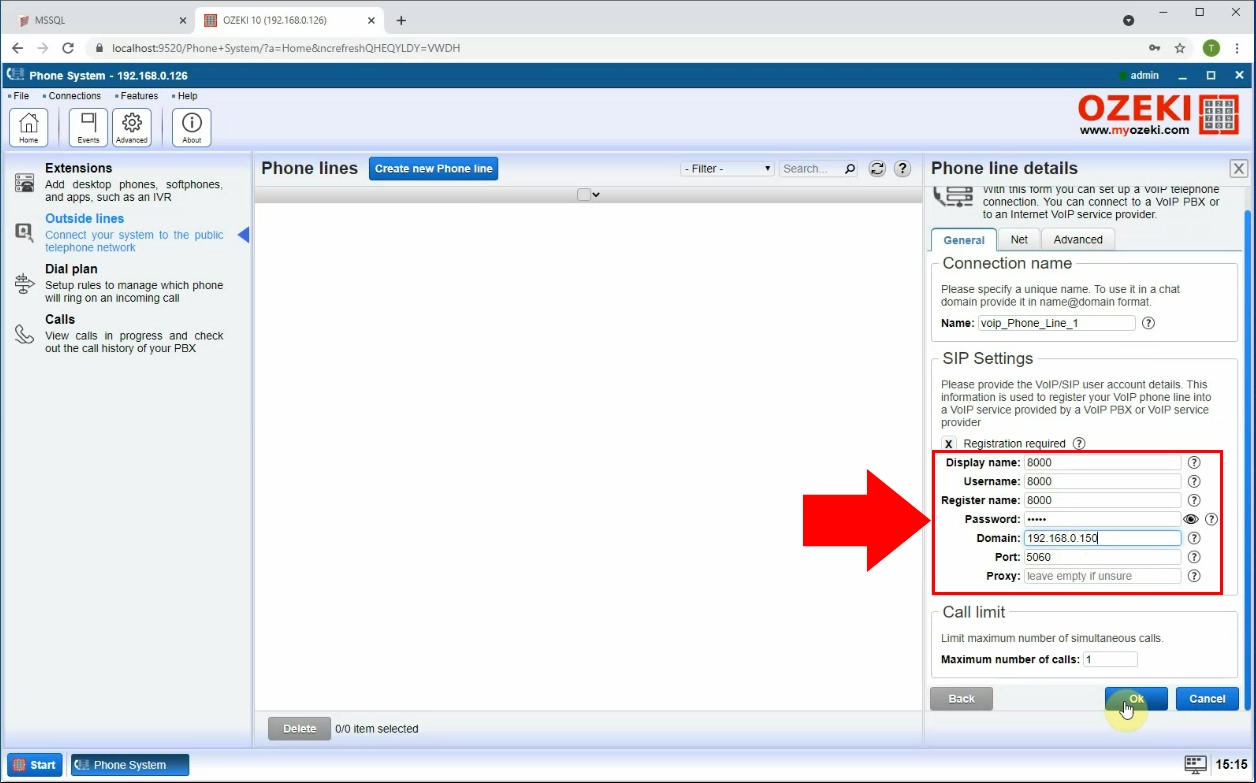
This outside line will need some information to work. First, you need to provide a ‘Display name’. This will be visible on the phone that you are calling. A username, a register name and a password will be used to register your phone line into a VoIP service provider. A Domain and a Port number is also used crucial to have a working phone line connection (Figure 13) . If you have provided all then necessary details, click the ‘OK’ button to proceed to the next step.
Create new routes
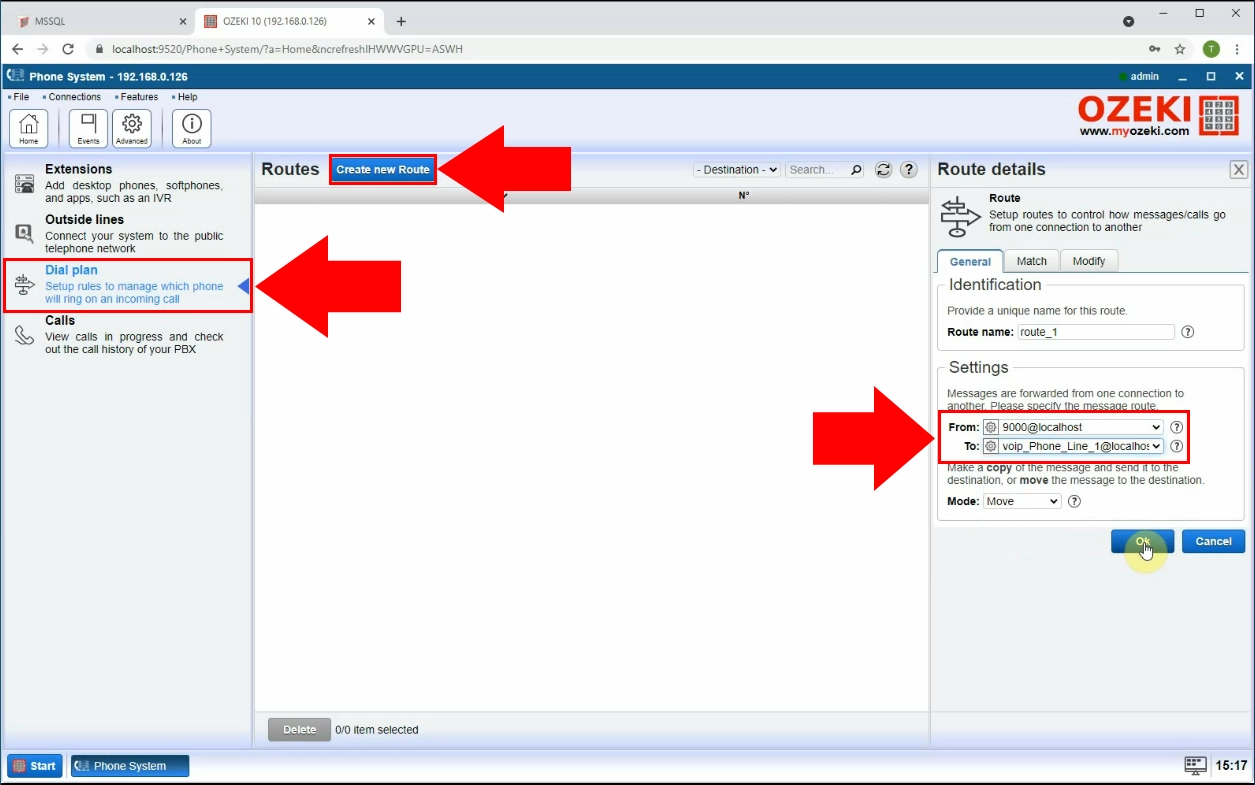
Now you need to have a connection between the extension and the outside line. This connection is called a ‘Route’. You can see you already existing routes when you open the ‘Dial plan’ list using the left side menu. To create a new one, click the ‘Create new Route’ button (Figure 14). You will see a from that you need to complete in order to have a connection between the extension and the phone line. Search for the ‘Settings’ groupbox where you will find two groupboxes. The from groupbox need to contain your extension, the to groupbox need to contain your phone line. Click the ‘Ok’ button to proceed to the next step.
Insert a call into the database
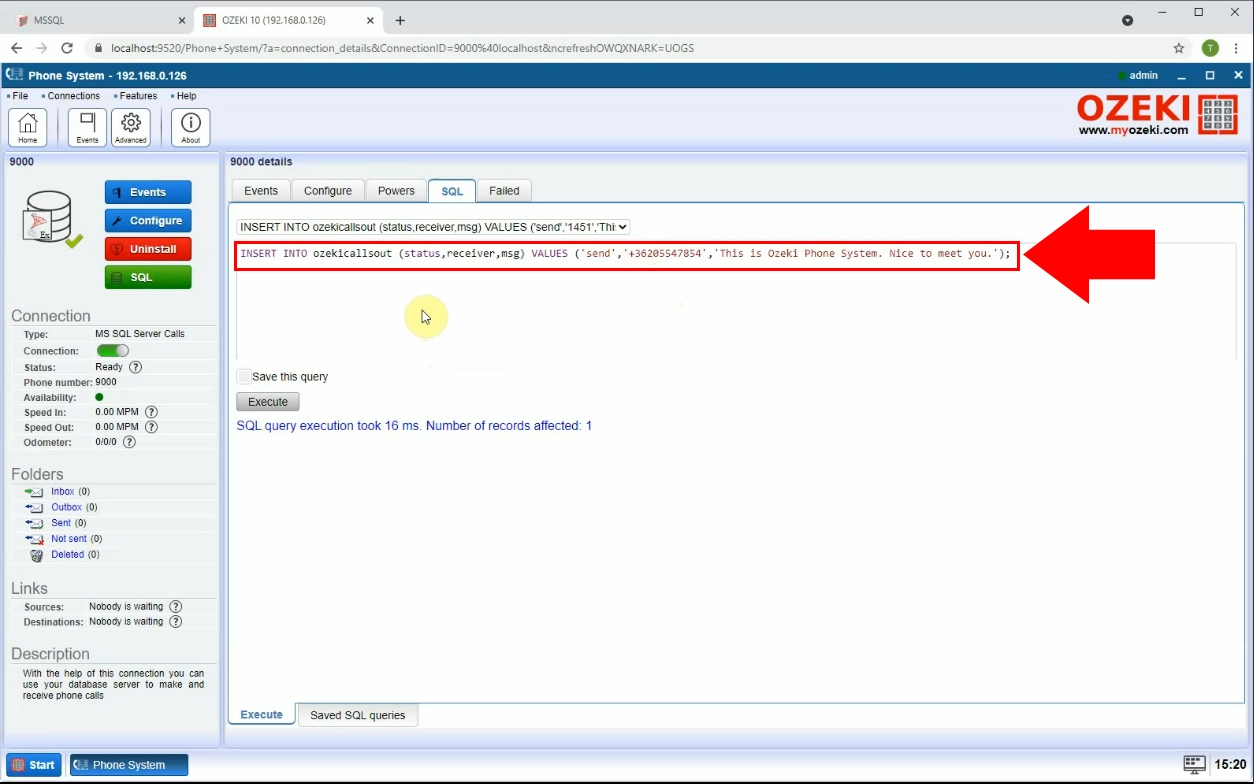
Now you have your scripted call setup ready to use. All you need to do now is to test the system. In the beginning of this article, you can found some code parts. The last one if an SQL statement that will insert a test message into the ‘ozekimessageout’ table (Figure 15). This way the system will find this data and will call the provided phone number. Feel free to change the phone number to one that is accessible to you or change the script text to your liking. To execute the SQL statement, you need to navigate to the SQL tab of the extension and paste in your code. Click the 'Execute' button to start the calling process.
Test the system
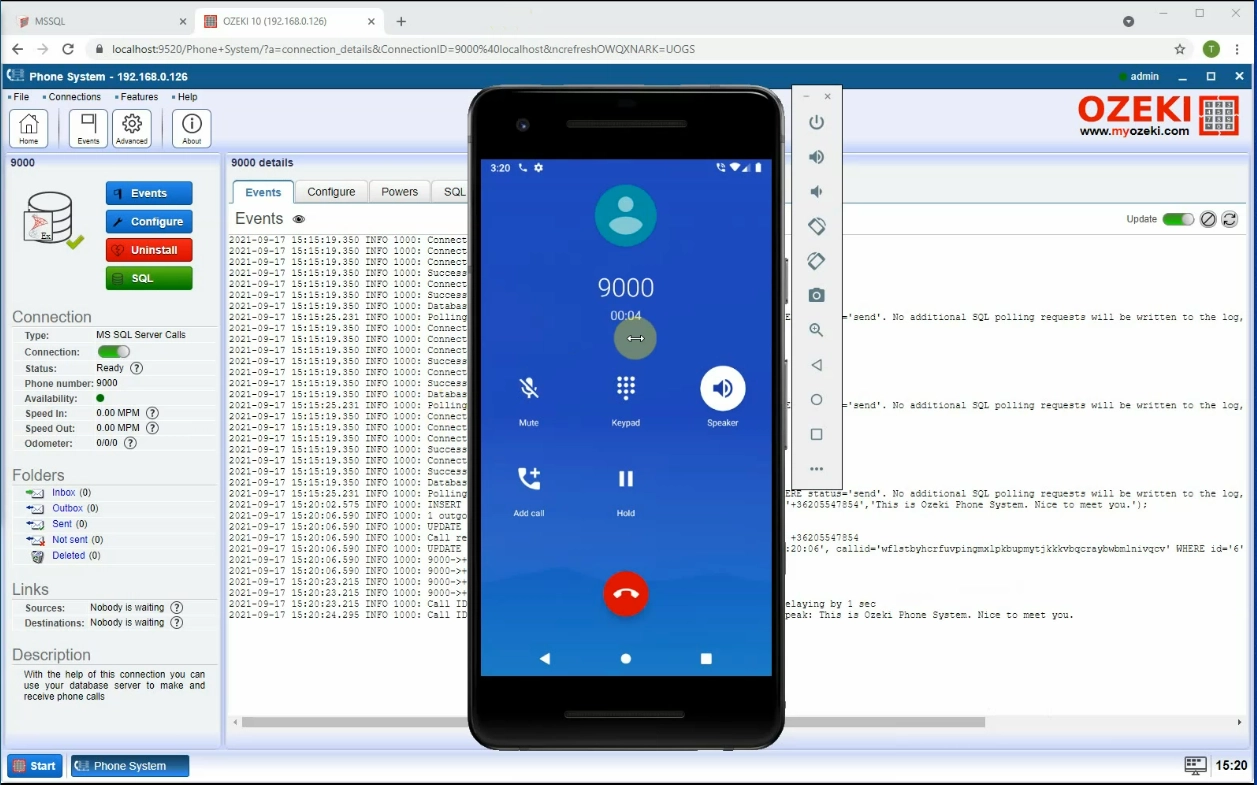
As you can see on Figure 16, the test phone call was received. You can use a virtual phone to test your system, or even your own phone. As you can see the caller ID will be the Display name that you have provided earlier. If you received the test call, it means that all the elements of your system is working correctly.
Summary
By reading this article, you have learned how you can use an SQL database to make scripted phone calls from. This solution is a way to save on human and device resources. It makes your bulk calling marketing campaign faster and more efficient. You will be able to provide your customers with more data in significantly less time.
Make sure you don’t stop learning here. The Ozeki Phone System offers you much more solutions in the field of telecommunication. For example start with reading the article about using MS Access or MySQL to make phone calls from.
Now that you have finished with the tutorial, all you need to do is to download the Ozeki Phone System and start learning now!
