How to create a dialer extension
This tutorial will explain how easy you can create a call campaign with the aid of the Ozeki Phone System dialer extension. These extensions can be used to setup automated call campaigns by using prerecorded resources or by routing the created calls to live agent.
Installation
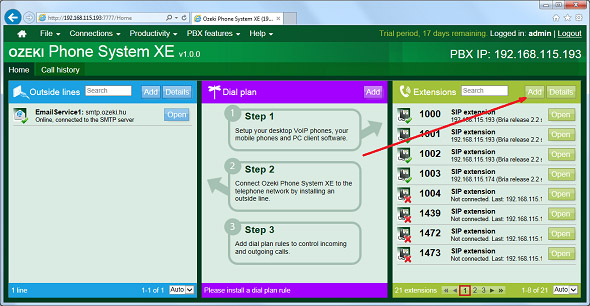
You need to add a new extension to the Ozeki Phone System, as shown in Figure 1.
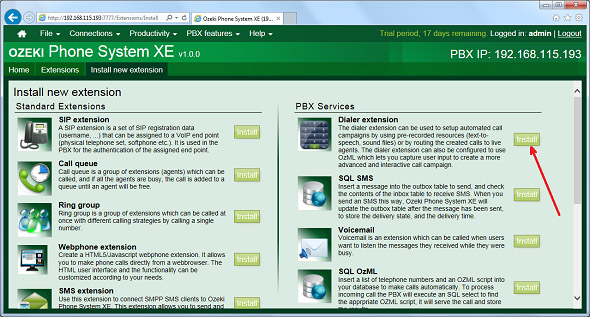
Pick up the Dialer extension from the upcoming list, and click on Install (Figure 2).
Now, you are ready to configure the extension.
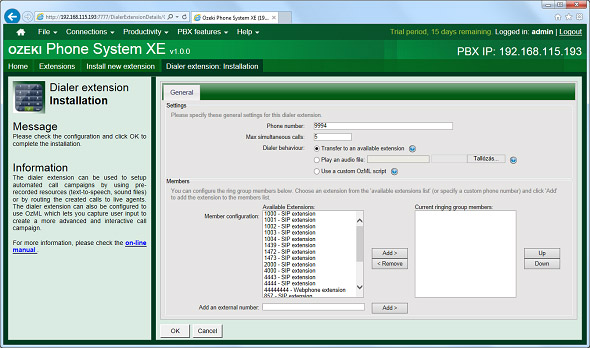
You could set the number of simultaneous calls. The maximum number of simultaneous calls may have been restricted by the VoIP providers. These VoIP providers are able to make calls to PSTN and GSM networks. Here you can find more information about ISDN. If you want to transfer the calls to agents, you should set this value to the number of the agents. Under this option, you can select those extensions that will receive the calls. Those extensions will represent the agents.
Finally, you could set how this dialer would behave. If you have agents, you should select the first option, to transfer the calls to the available extensions. You also have the possibility to play an audio file for the called party.
The most effective way of usage is that you use an OzML script. In the OzML script you can create IVR menu, record the call, or the inputs of the dialed user. If you use an OzML script with a csv format job list, you can make references to the columns in the csv. For example, if you have a column named Username, you are able to execute a command in your OzML script like this:
<Speak>Hello $Username</Speak>
Let me explain the 2nd code example line by line:
Each OzML script should start with the OzML tag.
In the 2nd line a call is started to the target of the $phonenumber, which will
be replaced with the actual phone number.
From the 3rd to the 5th line there is a
Speak command, which will read out loud the message between the
<Speak> and </Speak> tags.
6th - 8th: Commented lines (These won't have any effect.), if you uncomment the line
(remove the "<!-- Blind transfer to an available agent" and the "-->" elements)
it will transfer the call to an available agent. You don't need to add a column to
your job list file with this name, because it's a built-in constant.
9th - 11th: Commented lines (These won't have any effect.), if you uncomment the line
(remove the "<!-- Play in an audio file (from an URL or filepath)" and the "-->" elements)
this command will play an audio file to the called party.
The rest of the example contains a comment and two closing tags, which aren't important.
<OzML>
 <Call dialed="$phonenumber">
  <Speak>
   This is an automated call from a dialer extension.
  </Speak>
  <!-- Blind transfer to an available agent
  <BlindTransfer>$agent</BlindTransfer>
  -->
  <!-- Play in an audio file (from an URL or filepath)
  <Play>c:\AudioFiles\test.mp3</Play>
  -->
  <!-- Check out http://ozekiphone.com/ozml-reference-book-254.html for more OzML commands -->
 </Call>
</OzML>
Usage
After you have installed the dialer extension, you could import jobs. This means, you have to provide a list of phone numbers. You have two possiblities for this.
You could provide a text file, or a csv file. If you provide a text file, each line should contain nothing just a phone number, but if you use csv, you have to define some columns. The only duty that you should do is to provide a column with the name of phonenumber, this will be the target of the call.
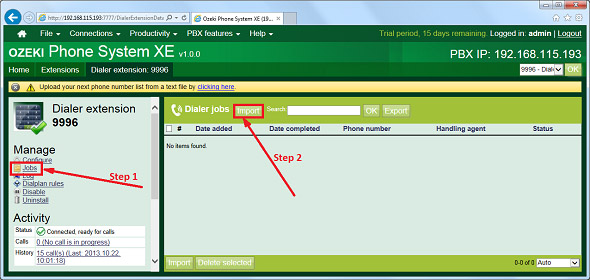
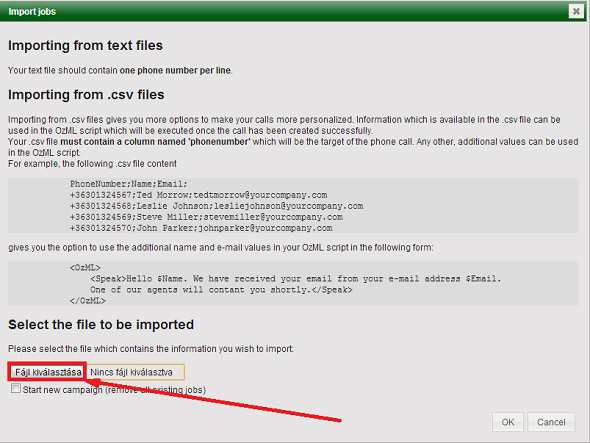
If your job list file is ready, you can import it to the dialer, and the dialer will call the provided phone numers.
