How to create an alarm system with Ozeki Phone System
The purpose of this guide is to show you, how you can create an application, which can complement your security system with Ozeki Phone System. As result you will get a security system, which in case of alarm sends text messages and makes calls to those people whose phone numbers can be set in the application. I would recommend this application for companys, who have a period of time, when nobody is inside the building and if during this time an alarm occures it is critical to let the concerned people be notified.
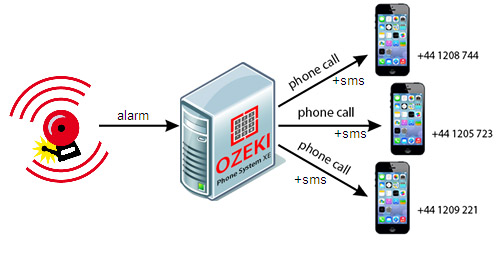
Required programs for the application:
- Ozeki Phone System
- A softphone (Bria)
- Wampserver
- Notepad++
I am assuming that you have these programs installed on your PC, so I won't specify the installation processes.
We are going to use Bria as Softphone for the application.
1. Run Bria and click on File menu then select Account Settings
2. Click on Add near the right top corner of the window then select
New SIP Account...
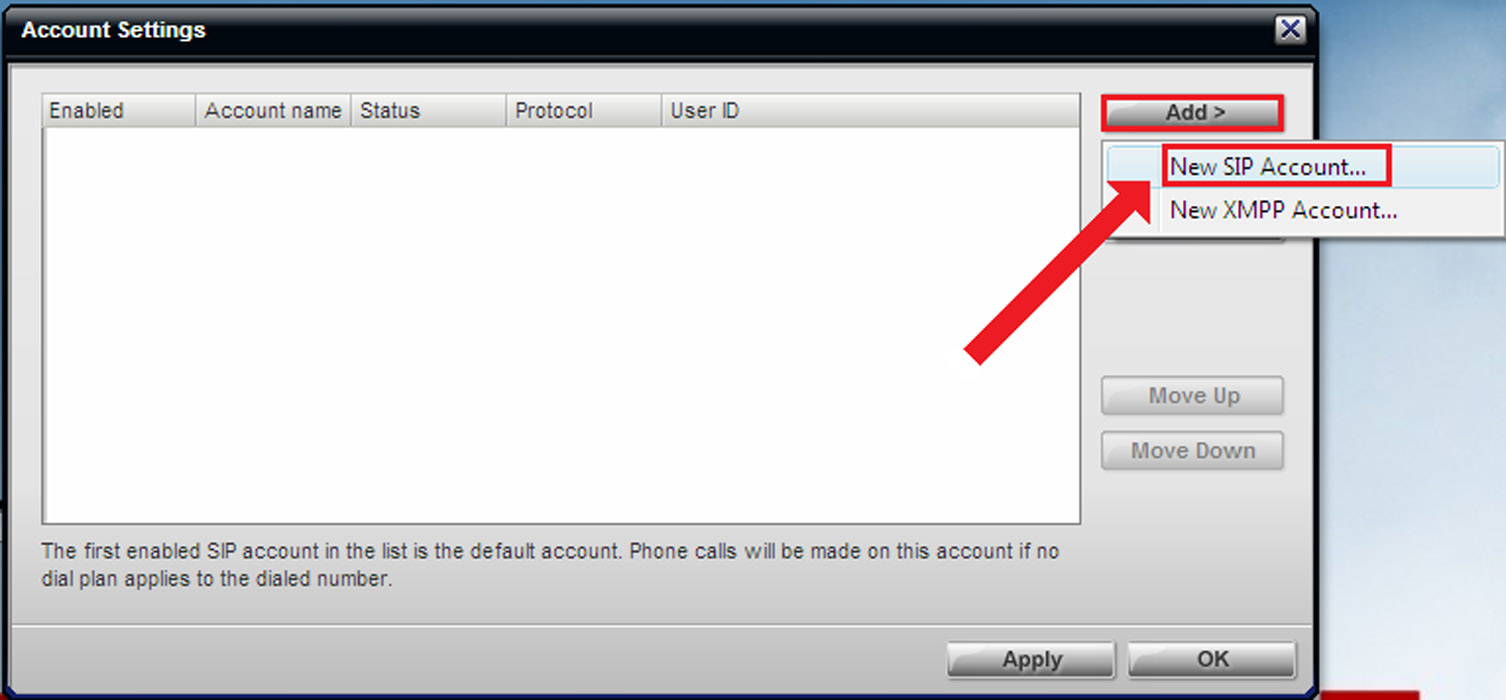
3. Enter the User Details:
- User ID:
- 500 is the SIP ID
- After the @ you have to write your own IP address
- Password, Display name, Authorization name are all
500
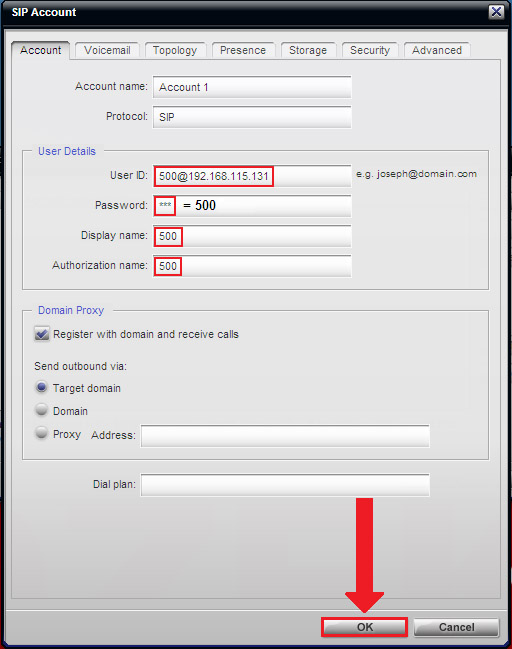
4. Press OK!
5. Create SIP 501 and 502 by step 2, 3 and 4!
6. Mark them checked and click on Apply then click on OK.
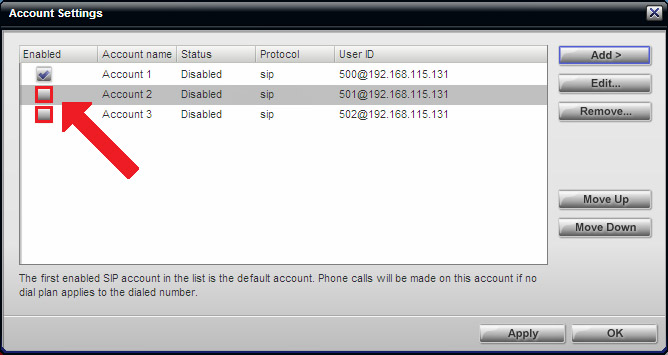
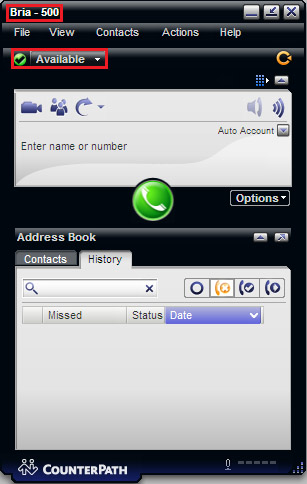
You should see the following in Bria if you followed the steps correctly:
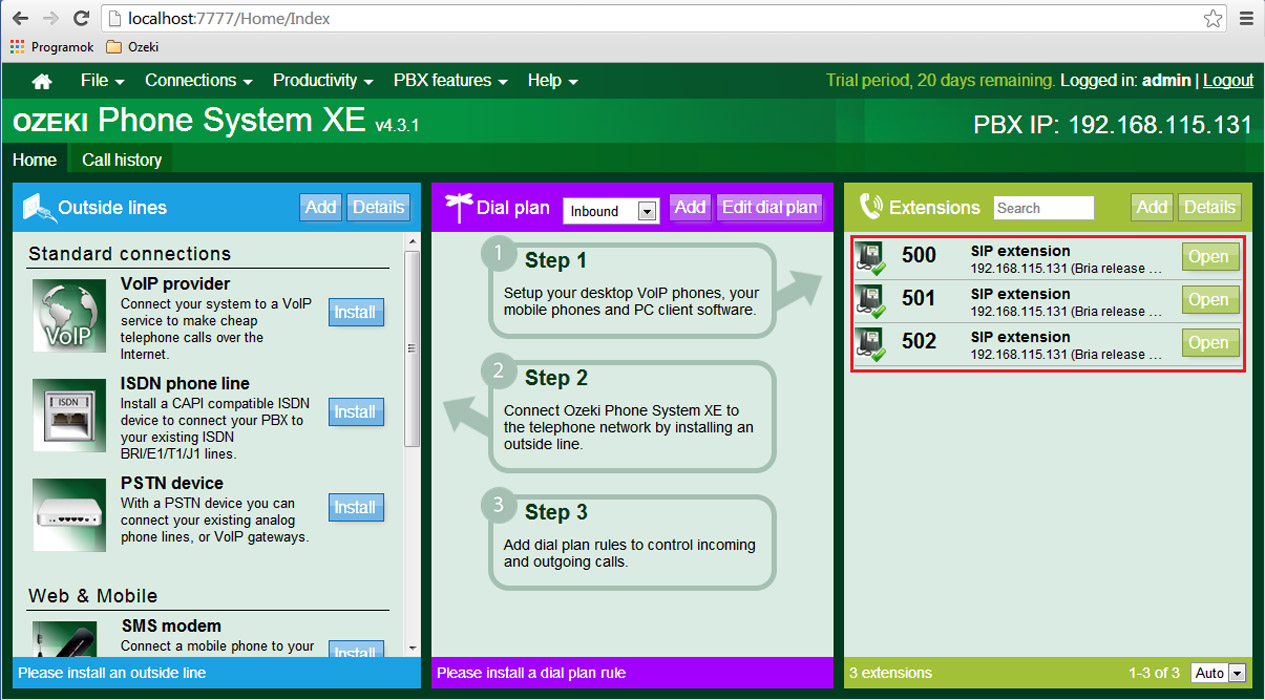
The three softphones we have created, should also appear in the Extensions tab
of the PBX,
just like on Figure 6.
Step 2: HTTP API installation and configuration
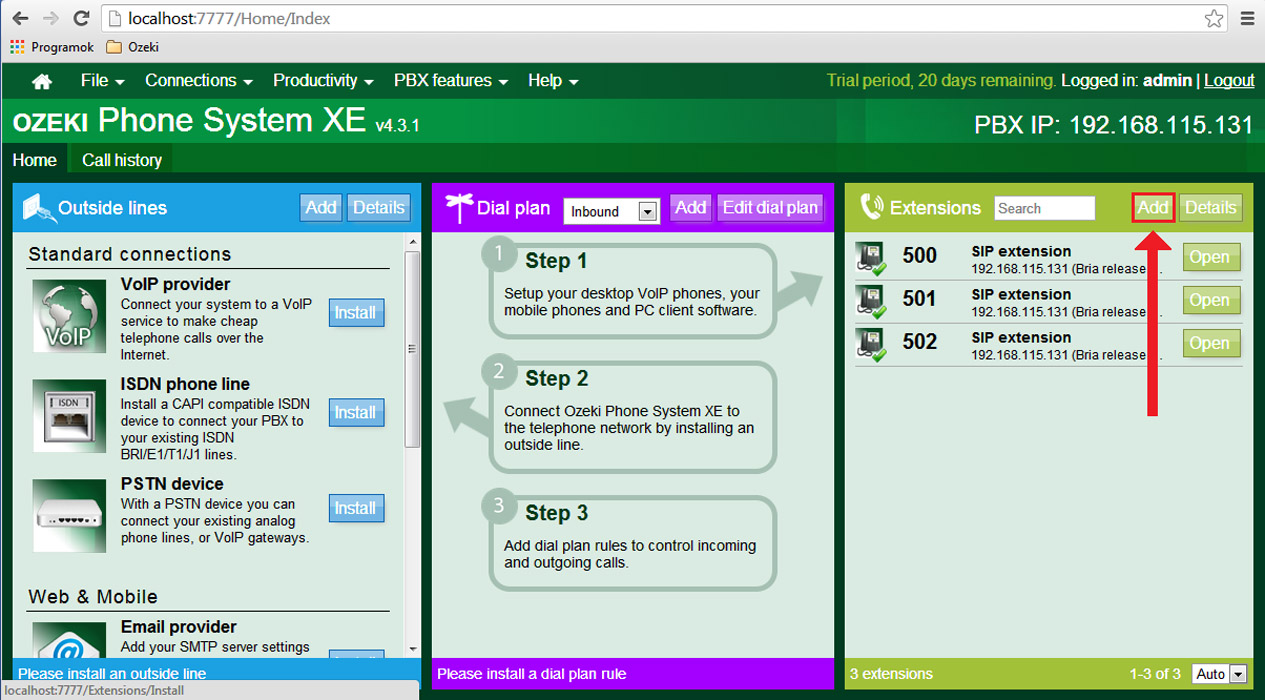
For the application we need to install a HTTP API, which will accept the alarm signal, that in this example application is going to be symbolized by a call from the softphone with SIP 502. To install the HTTP API firstly we have to Add a new API extension in the PBX. To do so we have to click on the Add button in the Extensions tab, as on Figure 7 below.
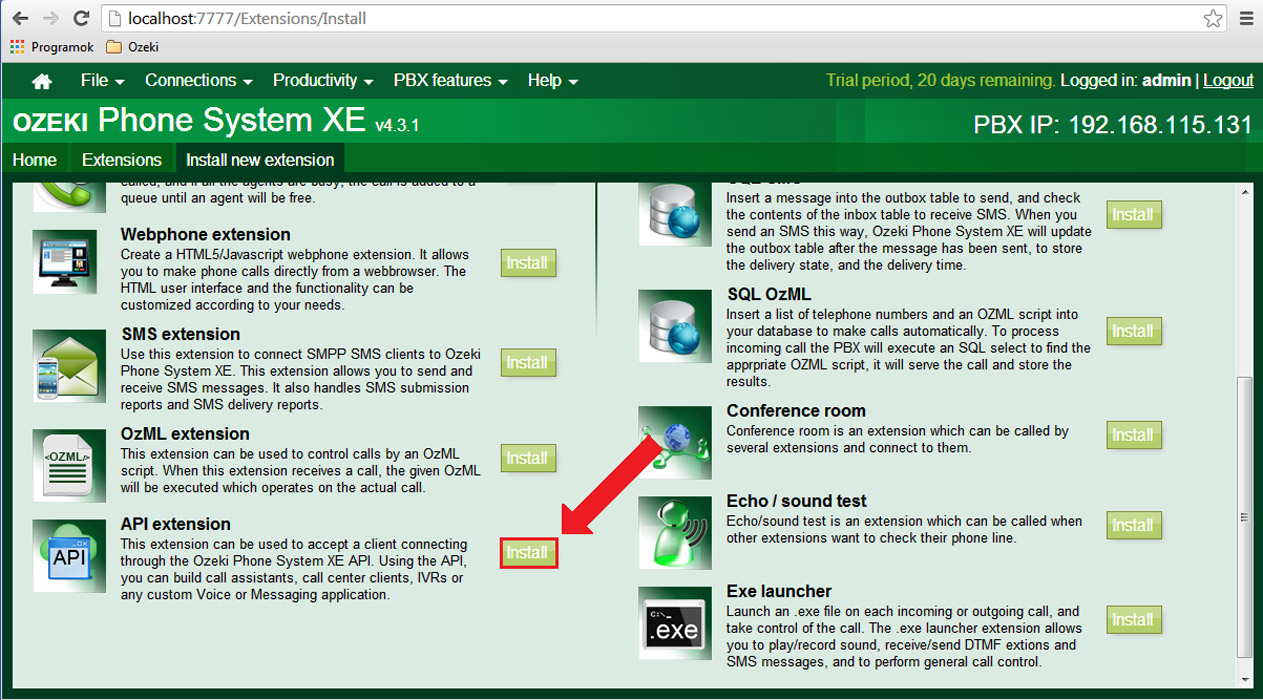
On the next page we have to install a new API extension, just like on Figure 8.
Next we have to set up the Extension phone number to 9995 and press OK. With this the API extension is installed.
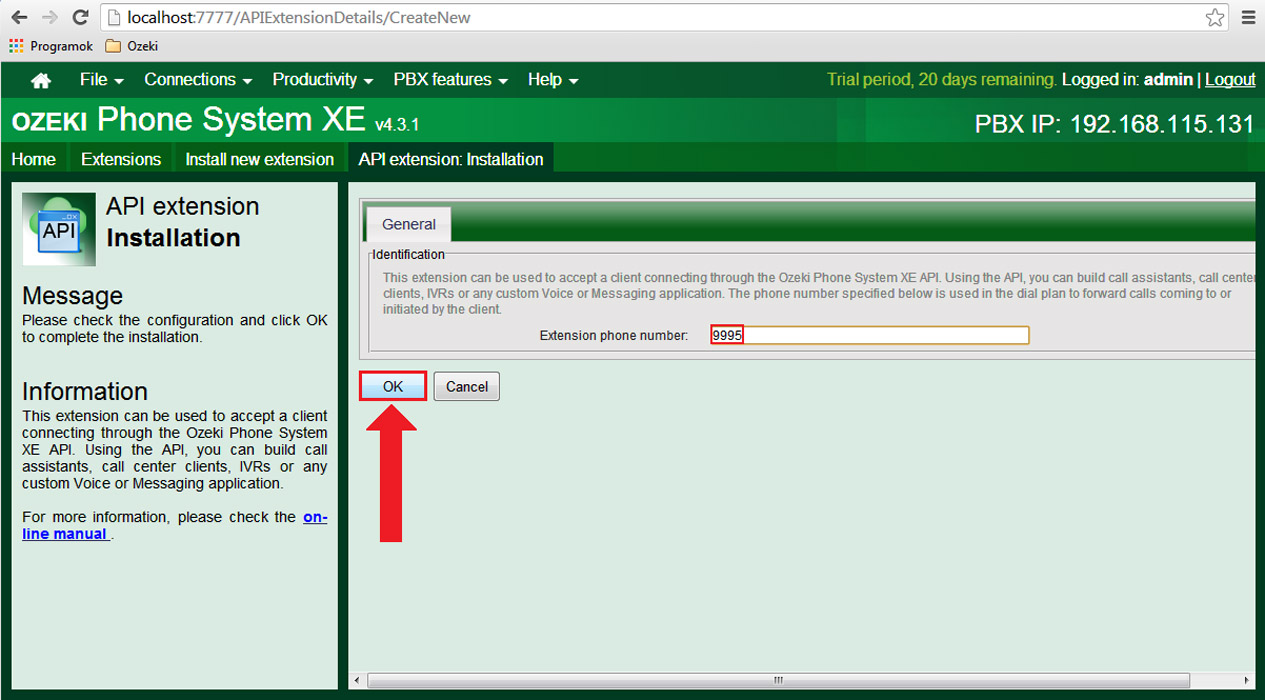
This way we have created an API extension, but what we need is a HTTP API, to create one we have to open the PBX and select Productivity and HTTP API in it, like on Figure 10 below.
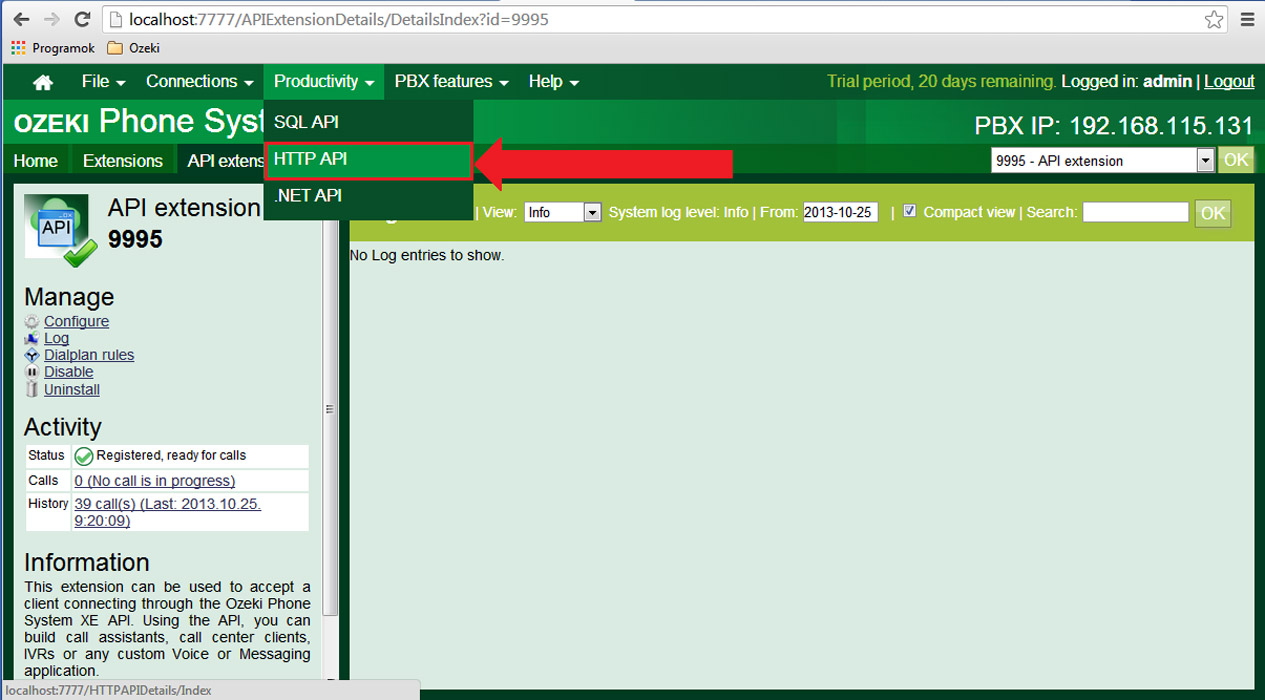
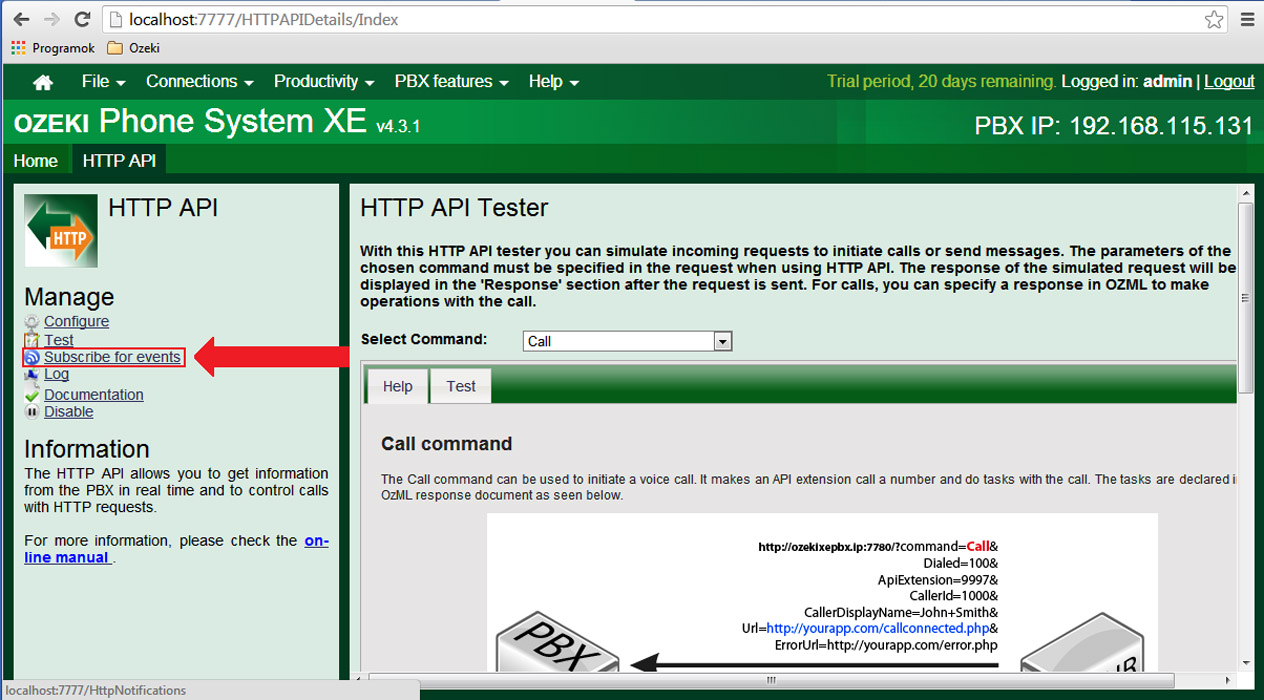
We have to select Subscribe for events in the next page.
Then click on Subscribe!
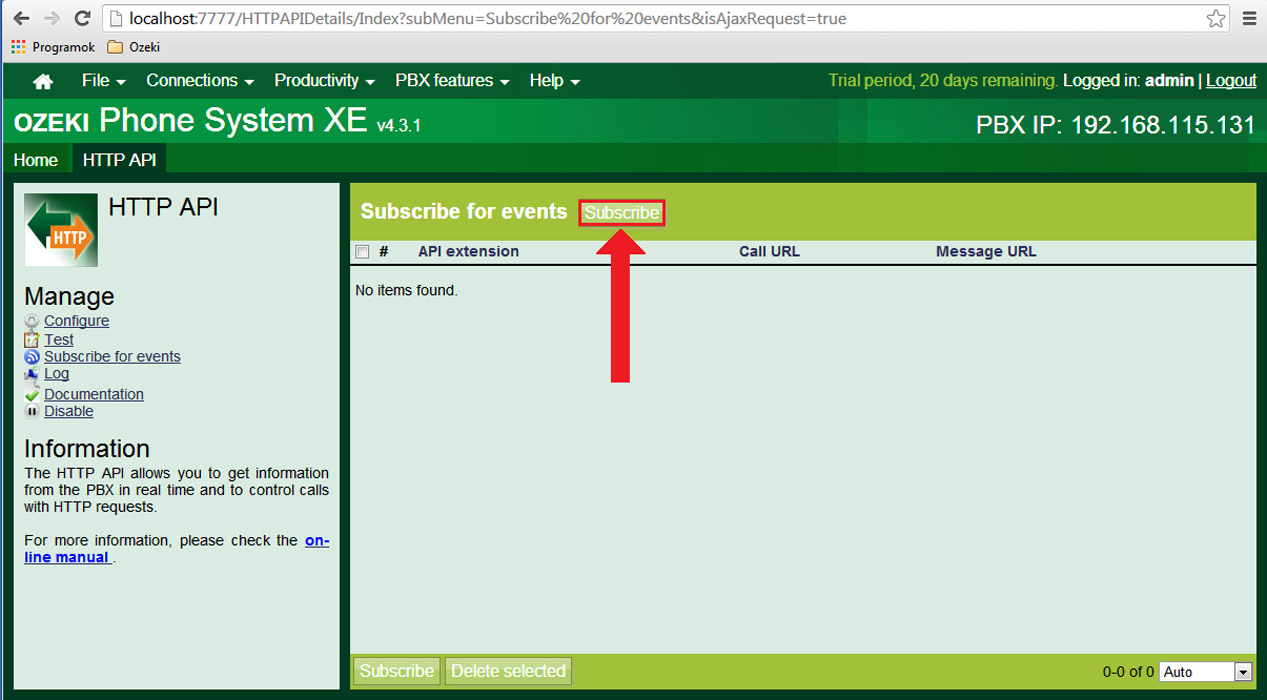
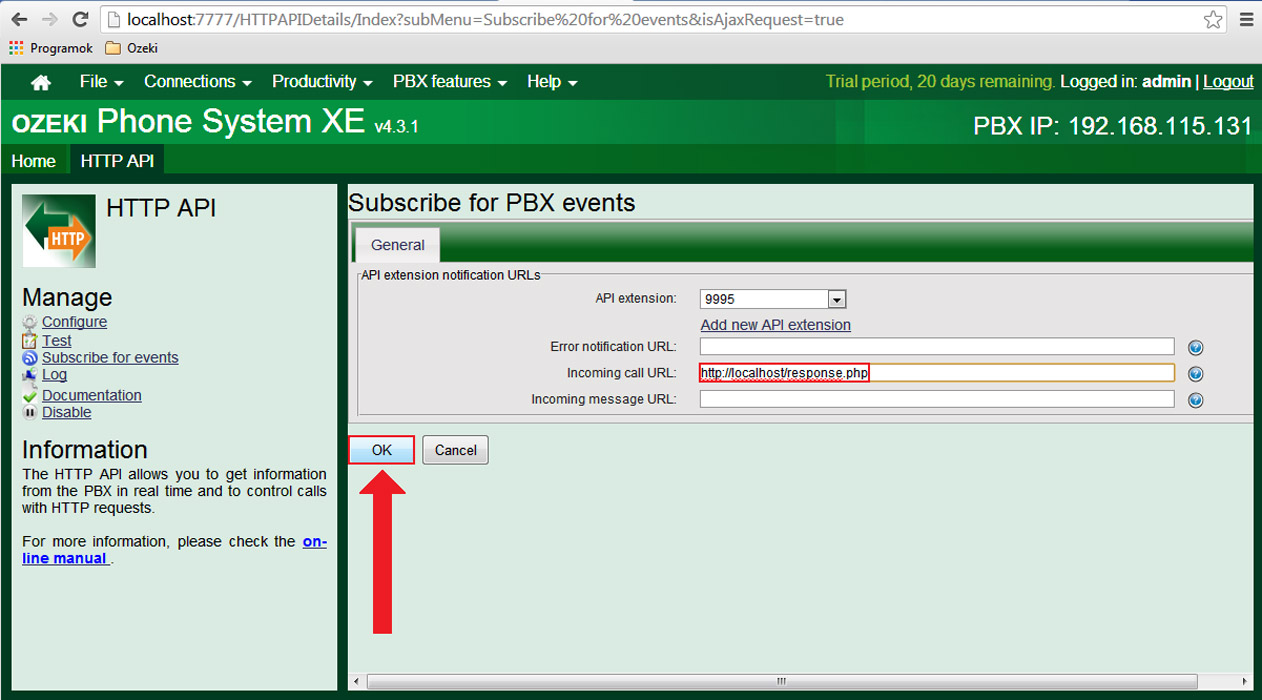
Then we have to type in http://”Your webserver address”/response.php, that in our case is „http://localhost/repsonse.php” into Incoming call URL and select OK.
Step 3: Setup inbound routing rule
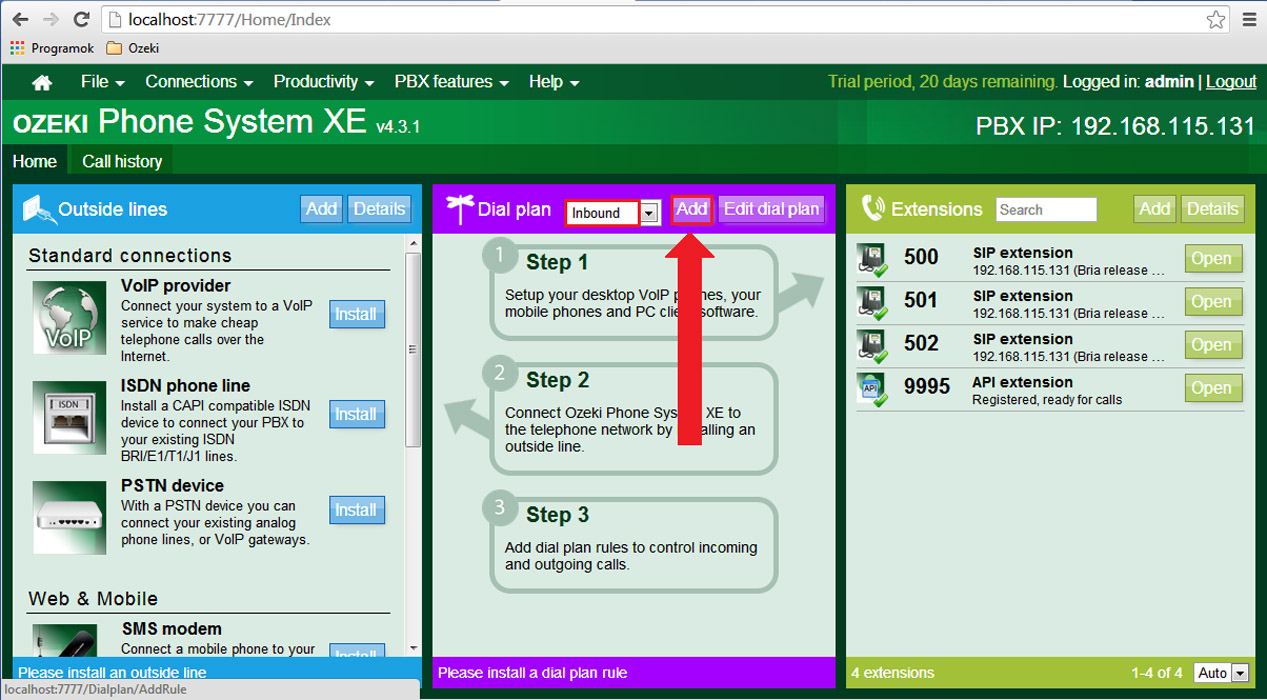
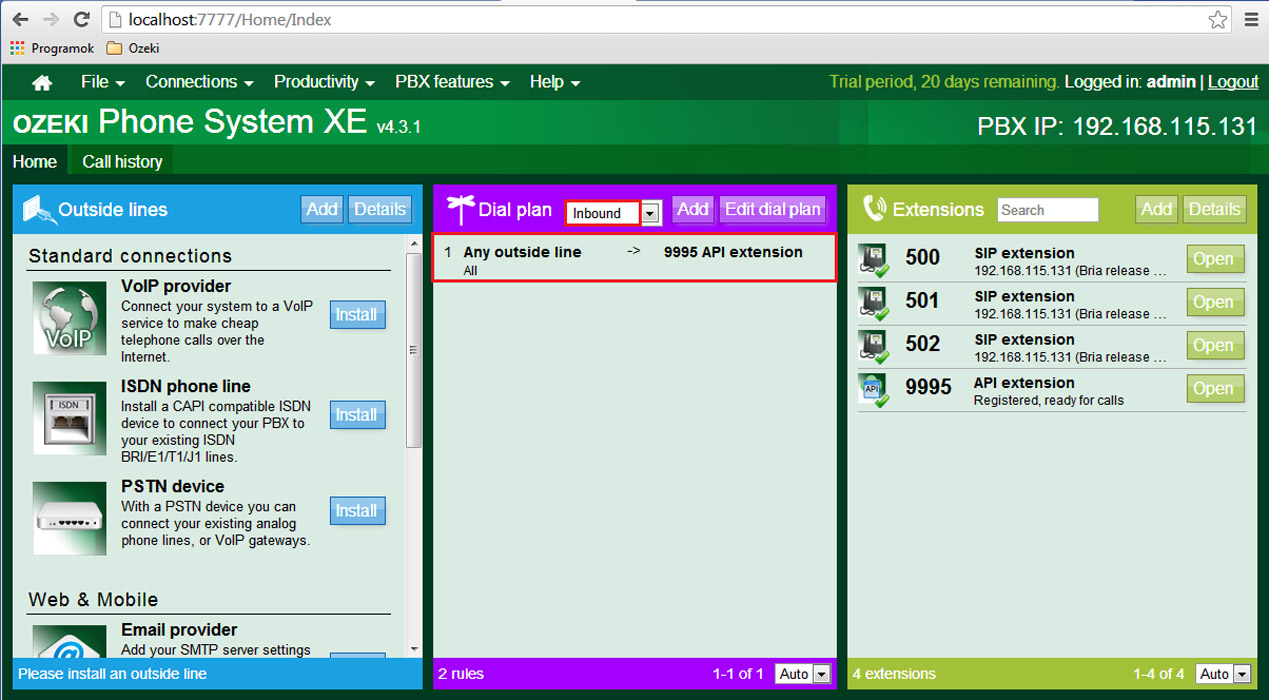
In this step we have to add an inbound dial plan, that will forward any incoming signals to the API extension we have created previously. To do so open PBX, select Inbound in the Dial plan tab and click on Add.
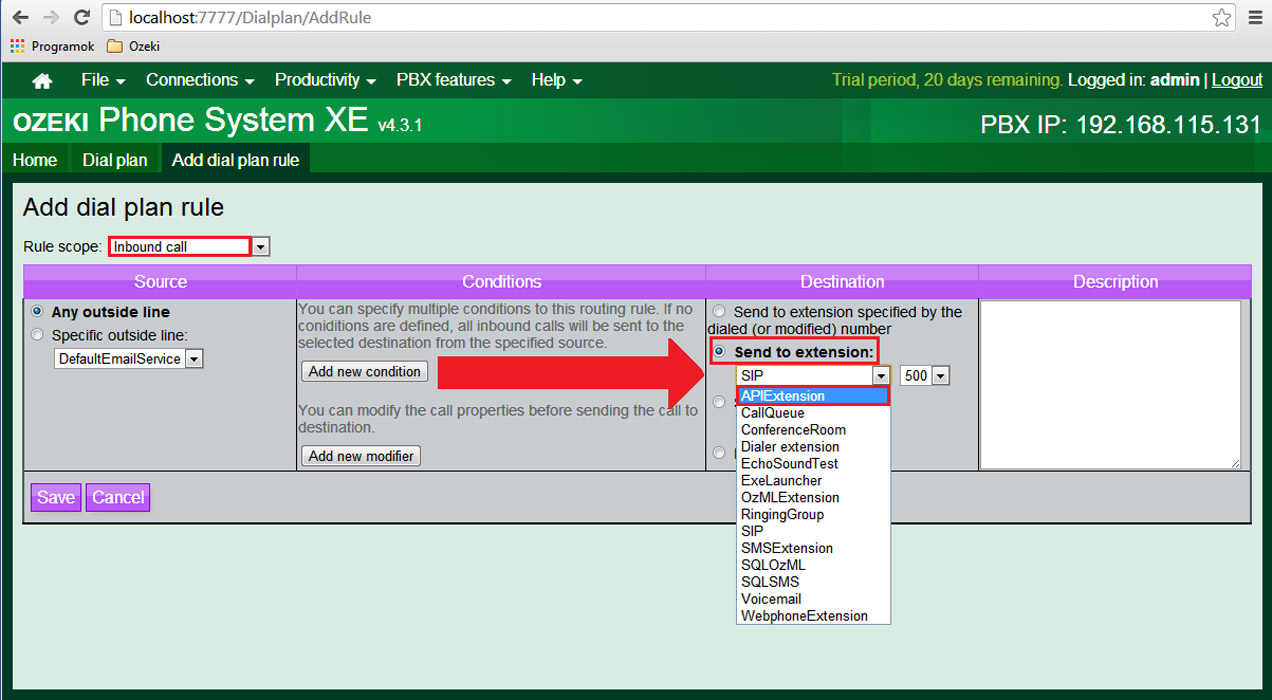
In the next window we have to select the APIExtension as Destination.
Then clik on Save!
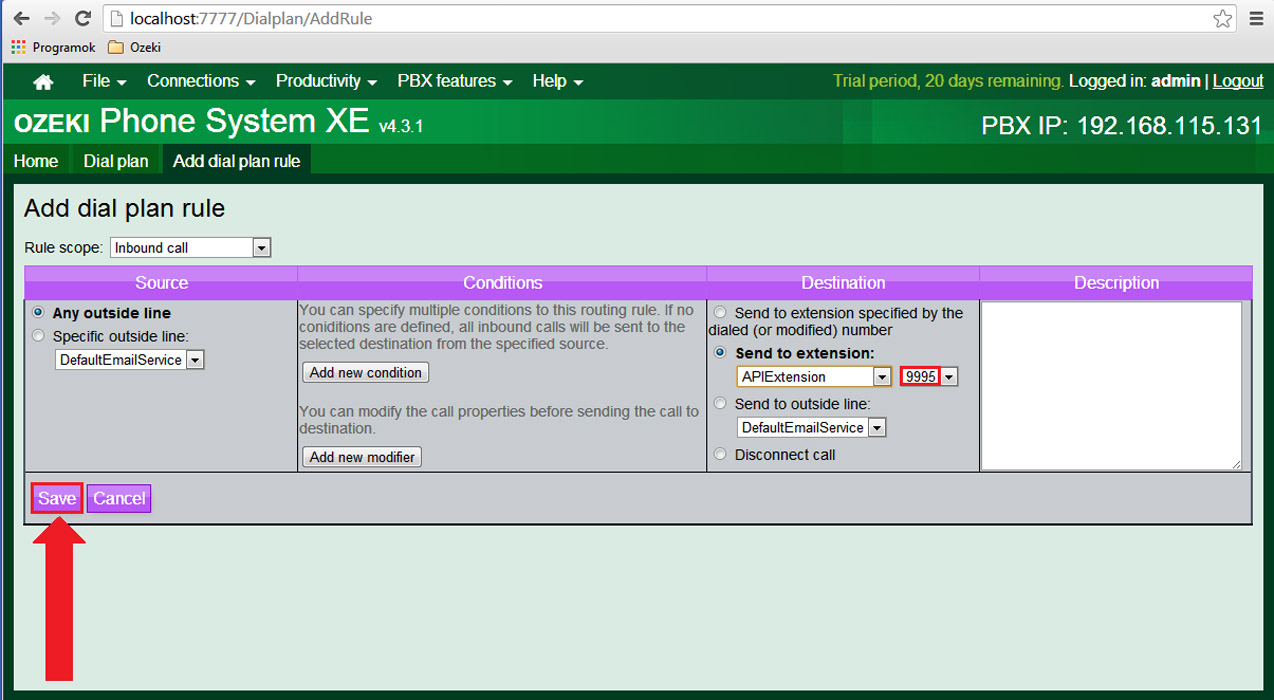
We have created the Inbound routing rule, so it should appear in the Dial plan tab like on figure 17 below.
Step 4: Creating the neccessary PHP file
For the application to do what its meant to, it needs a .PHP file, which will
include the commands executed when the alarm signal comes in. To create this
.PHP file:
1. Run Notepad++!
2. Paste in the code you see below!
<?php
header ("Content-Type:text/xml");
?>

<?xml version="1.0" encoding="UTF-8"?>
<Response>
<Call dialed="500">
<!-- The SMS sending works only when you have a working SMS modem
connected to PBX -->
<!--<SendSms Recipient="+062554670"> --> <!-- The number here is
an example, you can change it to the numbers you need. -->
<!--        An alarm has occurred in your company's security system. Please head
to the company to investigate it.
</SendSms>  -->
<Speak> An alarm has occurred in your company's security system.
Please head to the company to investigate it.</Speak>
<Exit />
</Call>
<Call dialed="501">
<!-- The SMS sending works only when you have a working SMS modem
connected to PBX -->
<!--<SendSms Recipient="+062554670"> --> <!-- The number here is
an example, you can change it to the numbers you need. -->
<!--        An alarm has occurred in your company's security system. Please head
to the company to investigate it.
</SendSms>  -->
<Speak> An alarm has occurred in your company's security system.
Please head to the company to investigate it.</Speak>
<Exit />
</Call>
</Response>
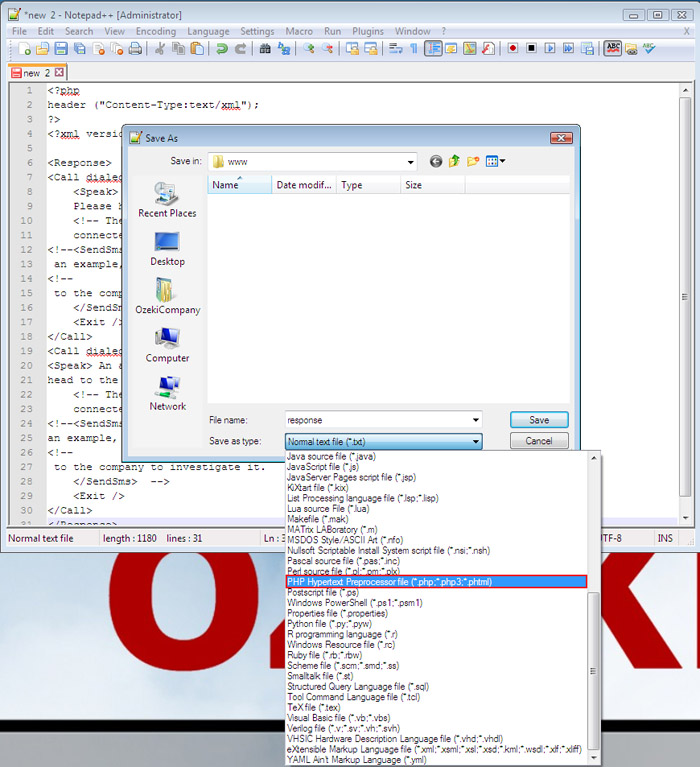
3. Click on File menu and select Save As..., then name the file response and select PHP Hypertext Preprocessor file for Save as type like on the picture below:
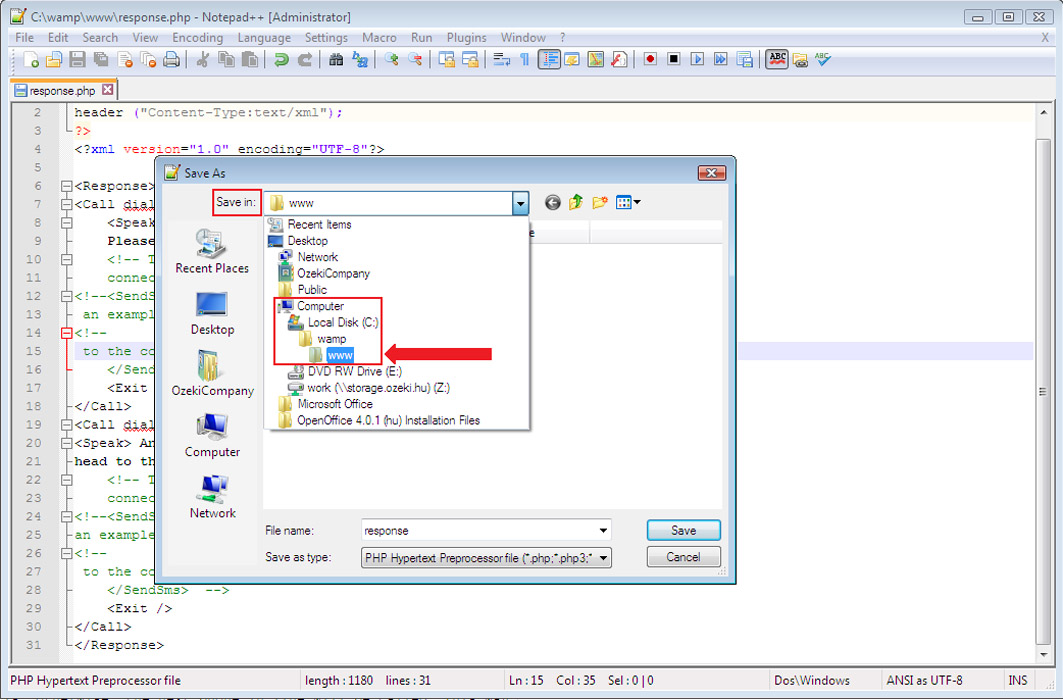
4. Select the www folder inside the Wamp folder, to save the response.php file there. Because that is the webserver on your localhost, and we have given it's link in the HTTP API for the Incoming call URL.
Step 5: Response.php explanation and SMS modem configuration
What the response.php file does is that it will send a SMS to the people, whom numbers we have set in the code. But the SMS sending will only work, when you have a working SMS Modem connected to PBX, which at the moment I do not have , that is why the SMS sending parts of the code are between comment tags. Otherwise if you have a working SMS Modem open the PBX and Add a new Outside line.
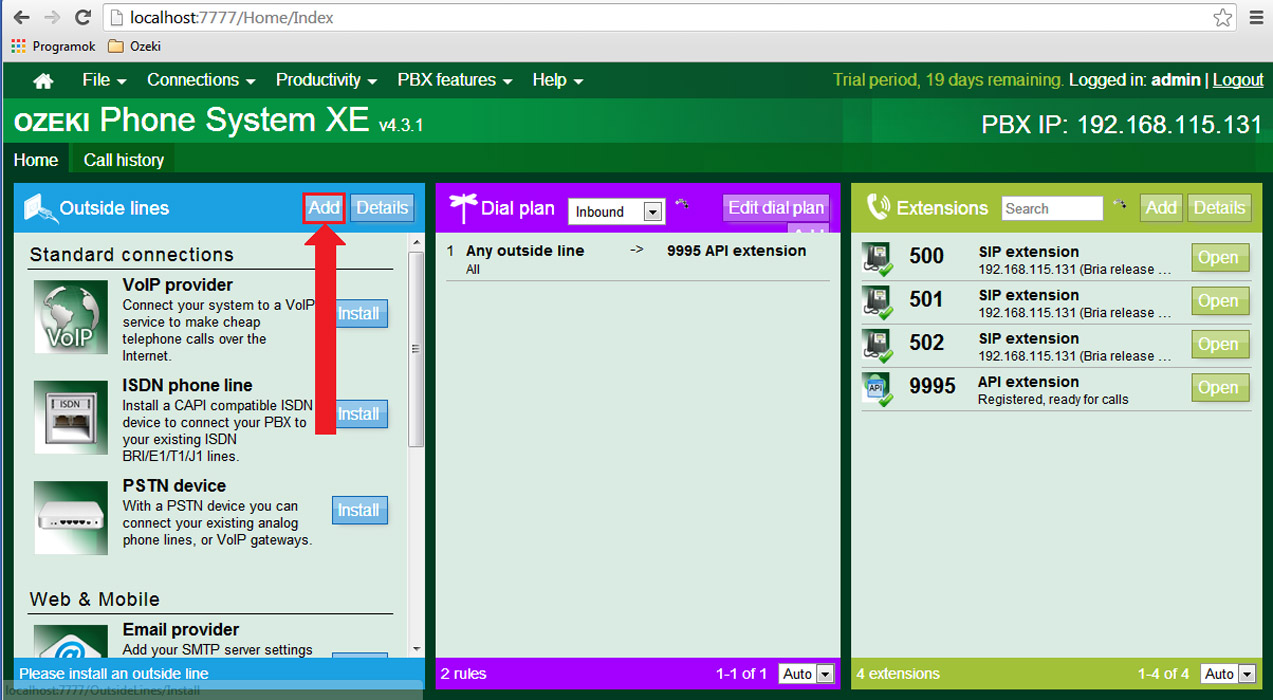
In the next window click on install next to the SMS modem.
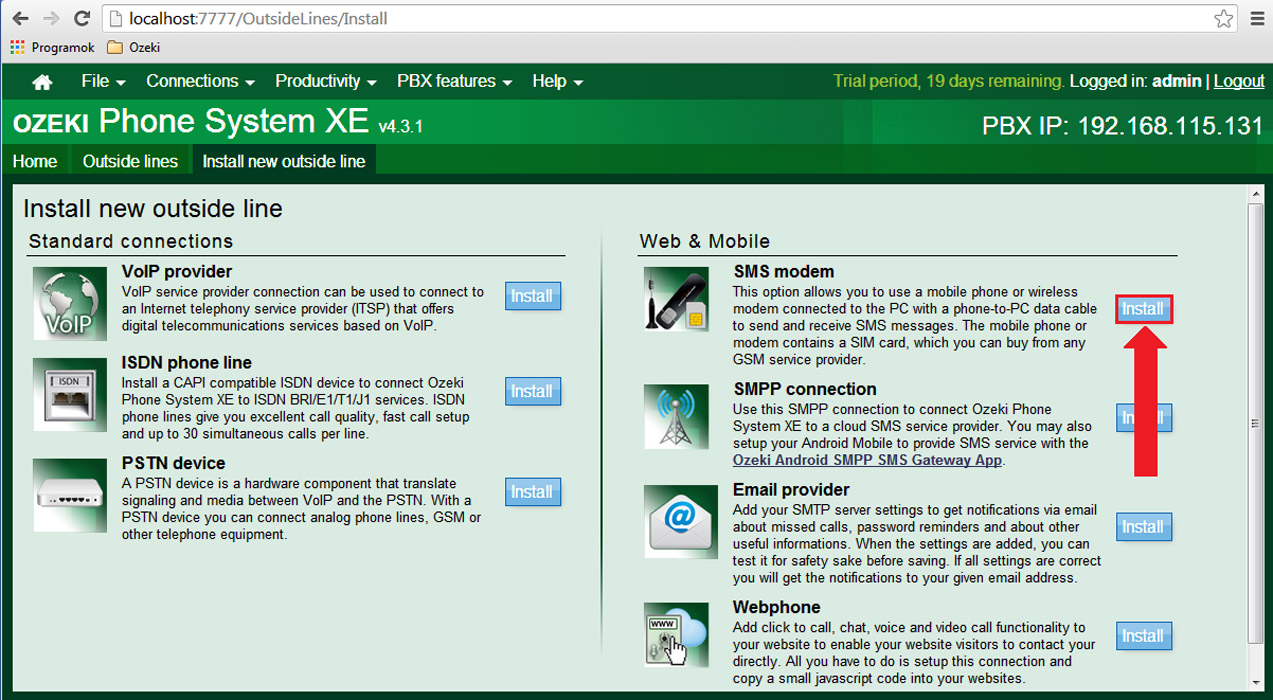
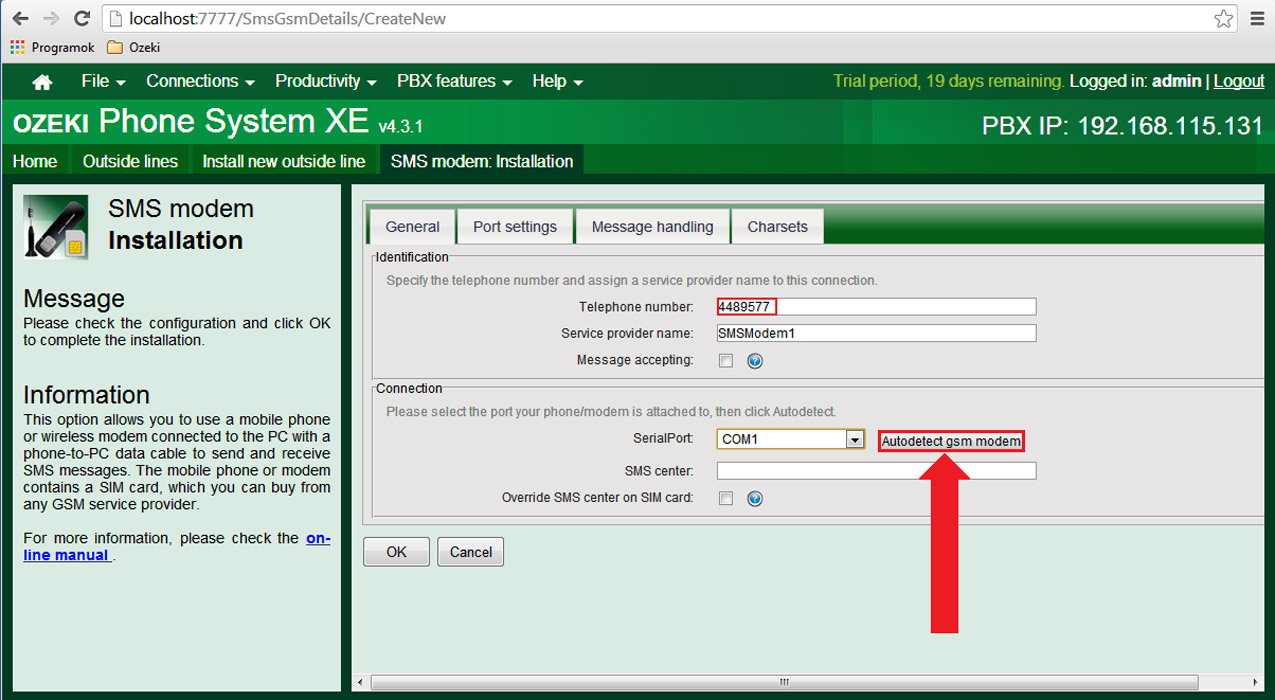
If the SMS modem is connected to your PC properly the PBX is able to detect it automatically and do the neccessary setup by clicking on the Autodetect gsm modem. The only thing you have to configure manually is the Telephone number. If everything is set clik on OK.
So to continue the explanation of the response.php after sending a SMS it will call up the phones, which numbers you have given in the <Call dialed= ”Phone number”> tags and say the message between the <Speak> </Speak> tags.If one of the calls is answered and the message is told then the application will stop the chain call, otherwise, the next phone in line will be called. This way someone will surely get notified of the alarm.
Step 6: Testing the application
To test the application we have to call up the HTTP API (SIP 9995) from the Bria softphone, this will work as the alarm signal. To do so enter number 9995 and click on the Green call icon in the middle of Bria.
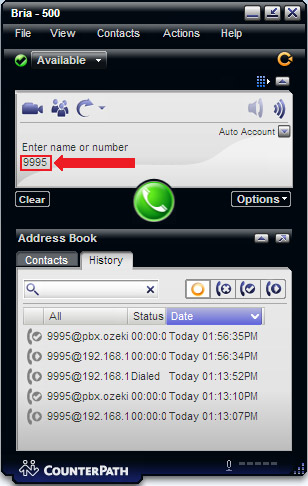
After the signal is detected by the PBX it will call up the first number in the code, which in our case is SIP 500. The phone will ring and if its answered the previously set text will be read out.
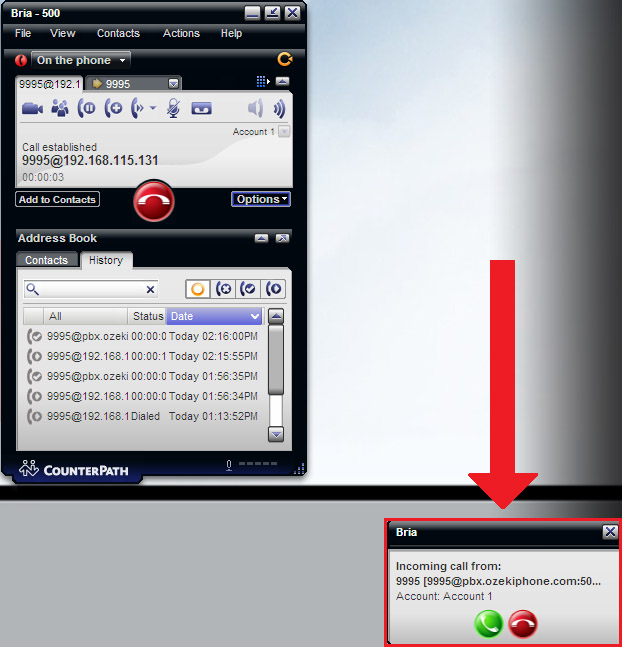
If you hang up the phone before the message ends the next number will be called , the same will happen is the called phone isn’t picked up.
As you can see we have created a security application with the help of Ozeki Phone Systems XE. The application detects the alarm signal, and reacting to it, it sends text messages and calls up the people whose numbers we have set up. This way even if nobody is inside the company, the concerned people will be notified of the alarm and can take the neccessary measurements.
