ASP.NET VoIP developers 101
The following guide explains how to do basic tasks in the Ozeki Phone System by using your ASP.NET application. Get to know how to receive/make voice calls, how to receive/send SMS messages and get started to build more advanced communication projects.
- Download source: ozeki-voip-asp-example-source-basic.zip
- Reference manual: ASP.NET API Online Manual
Part 2: ASP.NET example on recording VoIP calls, call routing
1. What you need
- Ozeki Phone System installed on your PC (Download now)
- A connected softphone
- A connected SMS service
- Visual Studio 2010 or newer
2. Get started
- Create an API extension in the Ozeki Phone System
- Create an ASP.NET project in your Visual Studio
Overview
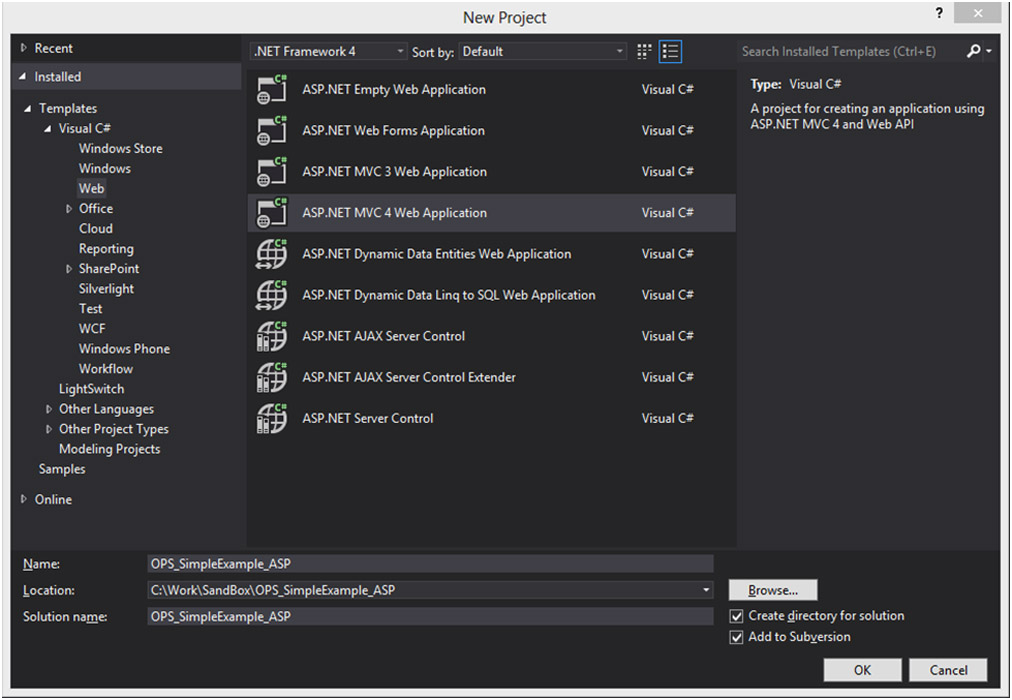
Now, let us learn how to manage your calls and messages with an ASP.NET application. For that, create a new ASP.NET project in your Visual Studio (Figure 1).

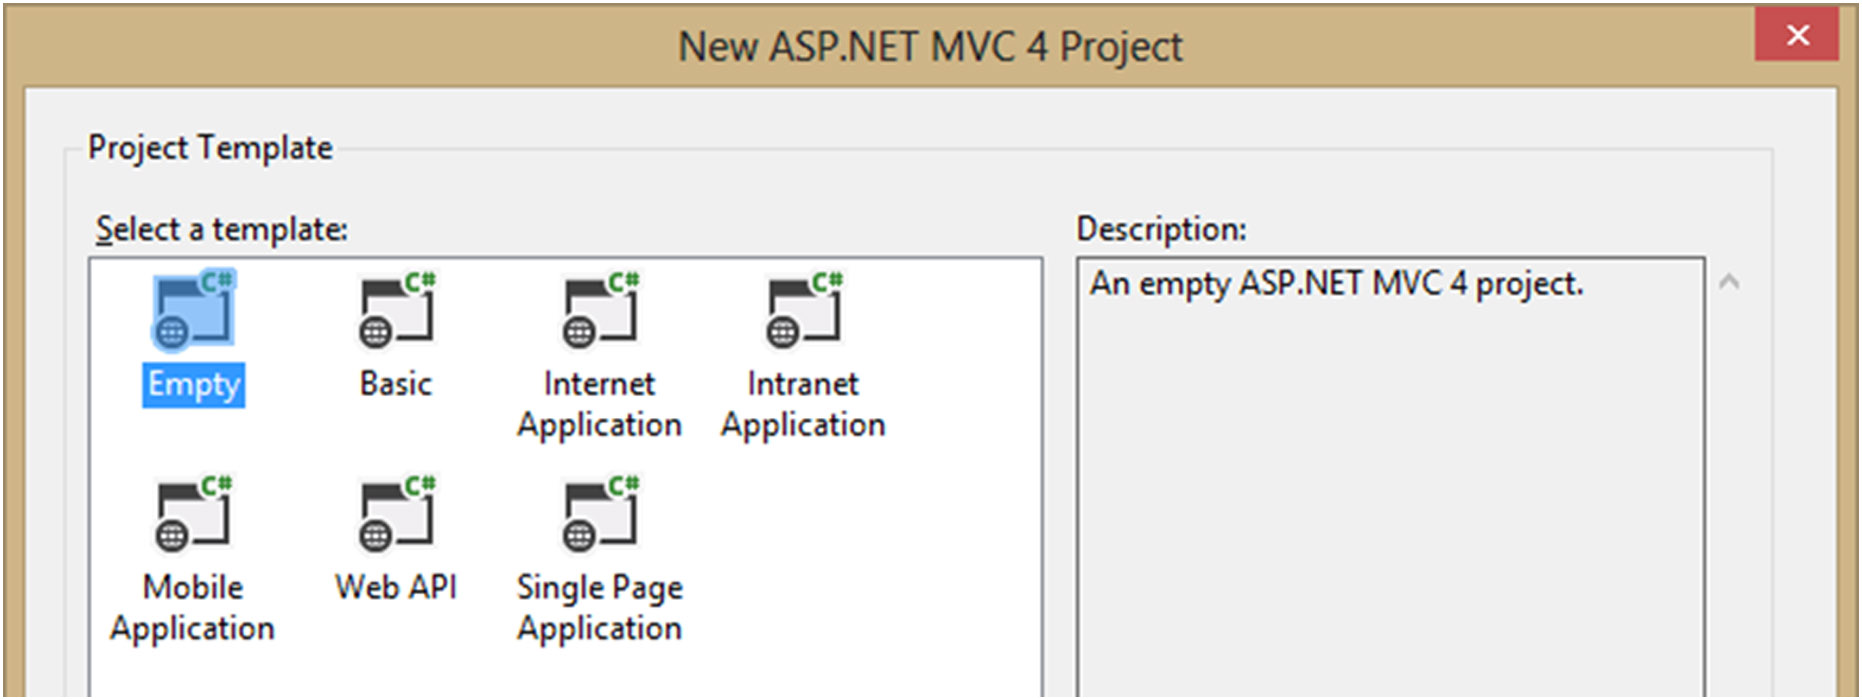
After that, use an Empty project template (Figure 2):

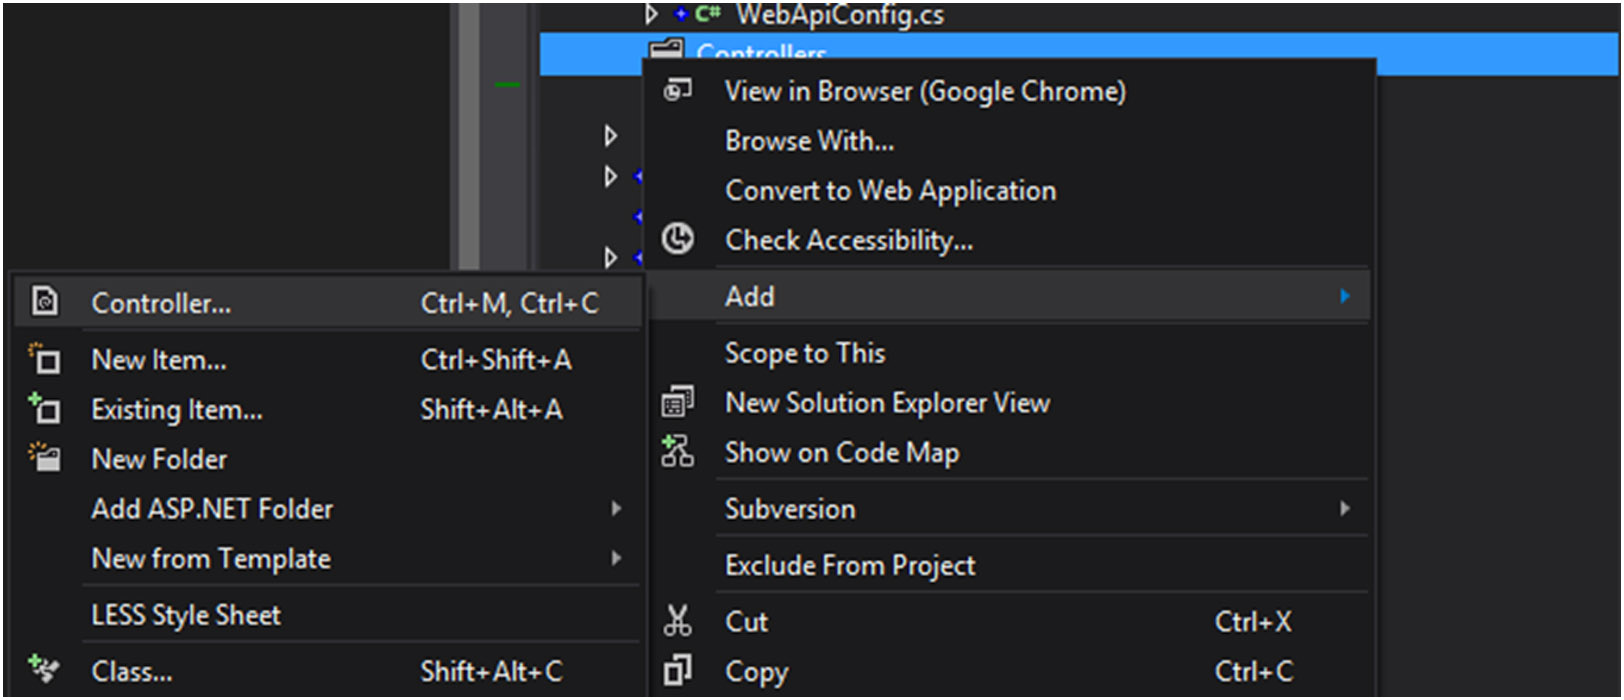
When you are ready with the steps above add a controller (e.g. HomeController) to your application and make a View for that (Figure 3).

Now, if you have made everything right, press F5 for start your project. You will see the empty page in your browser with an “Index” text.
You have finished the basic initials steps with your application.
Now, you need to install an API extension in Ozeki Phone System in order to receive calls and SMS messages. Find out how to install a new API extension.
3. Receive incoming voice calls
First of all, add API Extension notification to your Ozeki Phone System by HTTP API. With that, subscribe to the incoming call event, and here, it is possible to handle your incoming calls. You have the possibility to add customized responses for each call. The easiest way for this, is to define a method in your application (in the HomeController) what will handle the incoming requests and send back the OzML response. So, when the HTTP API Extension receives a call, that Extension will forward the call to your subscribed application. Your application will get the request and it will send back the customised OzML Response (e.g. a text what will read to the caller). In the incoming request you will get information about the call, which information can be found in your parameters of your subscribed method. Read more about these parameters at the following page. See the example method below, which receives the request and sends back the OzML response.
[HttpPost]
public ActionResult ReceiveCall(string notificationName, string callLegID, string caller, string apiExtension)
{
    var content = Content(
    "<?xml version=\"1.0\" encoding=\"UTF-8\"?>"+
    "<Response>" +
        "<Speak>Hello " + caller + "!</Speak>" +
    "</Response>"
    );
    content.ContentType = "text/xml";
    return content;
}
Speak tag shows which text will be read. Read more about the applicable OzML commands at the following link.
4. Make outgoing voice calls
Making an outgoing call is simple too. First of all you need to create a method what will send HTTP request to your Ozeki Phone System through a configured HTTP API Extension. Look at the example method below, what is responsible for sending HTTP requests:
public class SendHttpRequest
{
    public void SendRequest(String uri, string queryString)
    {
        ASCIIEncoding encoding = new ASCIIEncoding();
        string postData = queryString;
        byte[] data = encoding.GetBytes(postData);

        // Prepare web request...
        HttpWebRequest request = (HttpWebRequest)WebRequest.Create(uri);
        request.Method = "POST";
        request.ContentType = "application/x-www-form-urlencoded";
        request.ContentLength = data.Length;
        Stream newStream = request.GetRequestStream();

        // Send the data.
        newStream.Write(data, 0, data.Length);
        newStream.Close();


        //Read the response of the HTTP API
        using (var response = (HttpWebResponse)request.GetResponse())
        using (var sr = new StreamReader(response.GetResponseStream()))
        {
            Debug.WriteLine(sr.ReadToEnd());
        }
    }
}
Call the SendRequest method with the address of your PBX and the command with the parameters what you would like to execute with HTTP API. Please change the ozekixepbx.ip text to that ip address where the Ozeki Phone System XE is installed. On the yoursite.com the address should be that where the sample applications are running.
After that, create another method what will compose the parameters of the command, and instantiate the SendHttpRequest class and call the SendRequest method. See the example below:
[HttpPost]
public ActionResult MakeCall(string apiExtensionId, string dialed, string callerId, string callerDisplayName, string url, string errorUrl)
{
    sendHttpRequest = new SendHttpRequest();
    sendHttpRequest.SendRequest(
		"http://ozekixepbx.ip:7780/", "?Command=Call" +
	    "&Dialed=" + dialed +
	    "&ApiExtension=" + apiExtensionId +
	    "&CallerId=" + callerId +
	    "&CallerDisplayName=" + callerDisplayName +
	    "&Url=" + url +
	    "&ErrorUrl=" + errorUrl);
    return View("Index");
}
Read more about the commands and its parameters at the following page. Use your own address of PBX as the first parameter of SendRequest.
If you are ready with the examples above, execute the MakeCall method with the right parameters for instance as in the example below:
public class HomeController : Controller
{
	public ActionResult Index()
	{
		MakeCall("9000", "1001", "777", "Joe", "http://yoursite.com/Main/OutGoingCallResponse", "http://yoursite.com/Main/HandleError")
		return View();
	}

    …
}
With these steps you have done the basics of the call creating in ASP.NET.
5. Receive SMS message
Receiving SMS messages, like receiving voice calls, is possible with API Extension notification. At the URL of API Extension Notification, Incoming Message URL shows the method what will be called, when the API Extension receives an SMS. This method can be look like as the following method:
[HttpPost]
public void ReceiveSMS(string notificationName, string sender, string recipient, string iD, string apiExtension, string message)
    {
        using (var fs = new FileStream("c:\\IncomingMessages.txt", FileMode.Append, FileAccess.Write, FileShare.Read))
        {
            using (var writer = new StreamWriter(fs))
            {
                writer.Write(
                     "NotificationName:" + notificationName +
                     ";Sender:" + sender +
                     ";Recipient:" + recipient +
                     ";ID:" + iD +
                     ";ApiExtension:" + apiExtension +
                     "Message:" + message + "\n");

                writer.Flush();
                writer.Close();
            }
            fs.Close();
        }
    }
Every time when the API Extension will send a request to the ReceiveSMS method, the parameters of the request (e.g. the message itself) will be written into a file.
6. Send SMS message
Sending SMS message is similar to making a call. With the SendSMS HTTP Command it is possible to send a request (with the parameters of the SMS) to the configured HTTP API Extension. This Extension will forward your message to the Recipient. After the recipient has got the messages, your Service Provider will send back a delivery report (some Service Provider does not support that feature) to you, verifying the successful SMS sending. See the example method below, what will compose the SendSMS command, and call the SendRequest method:
[HttpPost]
public ActionResult SendSMS(string apiExtensionId, string sender, string recipient, string message, string deliveryReportURL)
    {
        sendHttpRequest = new SendHttpRequest();
        sendHttpRequest.SendRequest(
    					  "http://ozekixepbx.ip:7780/", "?Command=SendSms" +
                          "&ApiExtension=" + apiExtensionId +
                          "&Sender=" + sender +
                          "&Recipient=" + recipient +
                          "&Message=" + message +
                          "&DeliveryReportURL=" + deliveryReportURL);
        return View("Index");
    }
The method above can be used this way, too:
public class HomeController : Controller
{
	public ActionResult Index()
	{
		SendSMS("9000", "+987654321", "+123456789", "This is a test message", "http://yoursite.com/Main/DeliveryReport");
		return View();
	}

	…
}
Read more about the SendSMS command and its parameters at the following page Meanwhile studying this guide, it is remarkable, that the deliveryReport parameter is an URL, in this case another method in your application. This method will be called by HTTP API, when a delivery report is arrived from your Service Provider. This method can be very simple for example writes all of the parameters into a file.
Part 2: ASP.NET example on recording VoIP calls, call routing
If you have any questions or need assistance, please contact us at info@ozekiphone.com
