Ruby VoIP developers 101
Part 1: Ruby example on sending SMS, making VoIP calls
If you like clean, easy to read guides, take a look at the Ozeki Phone System guide for Ruby developers. Would you like to know how to send/receive messages and make/answer voice calls? This page has these answers, and even more information about the dominant phone system.
- Download example project: ozeki-voip-ruby-example-source.zip
- Reference manual: HTTP API Online Manual
Part 2: Ruby example on recording VoIP calls, call routing
Part 3: Ruby connection with gem library (SMS)
Part 4: Ruby connection with gem library (Calls)
Part 5: Ruby SDK Commands
1. What you need
- A text editor (for example Notepad++ or Aptana Studio 3)
- Ozeki Phone System installed on your PC (Download now)
- A connected VoIP or softphone
- A connected SMS service
2. Get started
- Installing MySQL service
- Installing RailsInstaller-Windows 3.0.0-alpha2 with Ruby 2.0.0
- Configure RailsInstaller
- Add API extension to the system
Overview
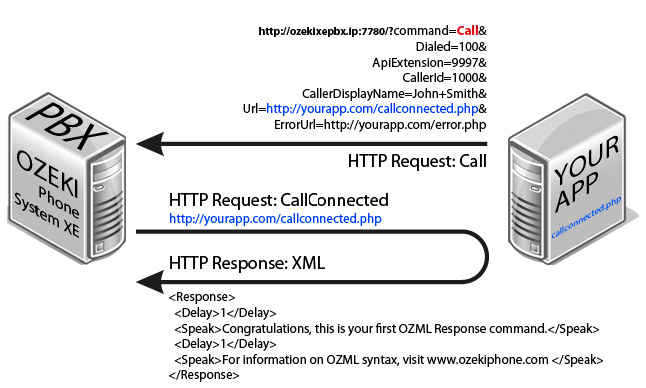
HTTP API enables you to get information from the PBX in real time and to control calls with HTTP requests. Take a look at how it works through the example of Call command. Call command can be used to initiate a voice call. It makes an API extension call a number and do tasks with the call. The tasks are declared in an OzML response document as seen in Figure 1.

Step 1: Create a call using a HTTP request, for example:
|
http://ozekixepbx.ip:7780/?command=Call&Dialed=100&ApiExtension=9997&Url=>?echo urlencode('http://yoursite.com/callconnected.php'); ?>
|
Please change the ozekixepbx.ip text to the ip address where the Ozeki Phone System XE is installed. On yoursite.com the address should be that where the sample applications are running.
Step 2: Accept the CallConnected request from the Ozeki Phone System on your webserver and return an XML to handle the call. Example request sent by Ozeki Phone System PBX to your webserver: http://yoursite.com/callconnected.php
OzML example response returned by callconnected.php:
|
<Response> <Delay>1</Delay> <Speak>Congratulations, this is your first OzML Response command.</Speak> <Delay>2</Delay> <Speak>Have a nice day!</Speak> </Response> |
To send a test response to a call connected request in a simple manner using the tester, fill out the Response OzML field. You can choose from Example OzMLs or write your own one.
Installation guide
From the RailsInstaller.org download and install railsinstaller-windows 3.0.0-alpha2 with Ruby 2.0.0.
From WampServer.com download and install the WampServer 2. This will be needed, because the MySQL database manager is used to store the received SMS messages. (You also need to install Microsoft Visual C++ 2008 SP1 Redistributable Package in order to run WampServer)
From MySQL Connectors you need to download the proper version of Connector/C 6.1.1. After un-packing the file you need to copy the libmysql.dll file from the mysql-connector-c\lib directory to the RailsInstaller\Ruby\bin directory (By default it's in C:\RailsInstaller\Ruby2.0.0\bin). This is needed when you get the 'no such file to load - mysql2' message when testing.
You can find help installing Ozeki Phone System on the following sites:
- How to install and configure Ozeki Phone System.
- Download Ozeki Phone System.
- You will also need an API extension which you need to install in Ozeki Phone System. Read how to install an API extension.
Implementation
If you would like a more serious IDE, then it is a good idea to install Apanta Studio 3. It has a built in terminal, so it is needless to run the Git Bash application or a Command Prompt when using it.
If you still decide to use the Git Bash application, then you can start it with the C:\RailsInstaller\Git\bin\sh.exe --login –i command. Most of the commands known from Unix can be used through the terminal thanks to the DevKit package which is part of the RailsInstaller.
First, you create the application to be made with the rails ops_example command. After this enter the directory created for the application with the cd ops_example command.
A few Rails versions requires to use the gem install mysql2 --platform=ruby -- --with-mysql-dir="C:\mysql-connector-c-6.1.1-win32" --with-mysql-lib="C:\mysql-connector-c-6.1.1-win32\lib\opt" command as an explicit operation. (This command assumes that you have extracted the Connector/C 6.1.1 to the C:\mysql-connector-c-6.1.1-win32 folder).
You need to indicate in the Gemfile found in the ops_example directory, that you would like to use the mysql2 package. To do this you need to type in the following line: gem 'mysql2'. After this the bundle install command will install the package for you which you need to execute in the terminal.
In the config/database.yml file you need to modify the accessibility of the database, which is by default set to http://localhost:3306 and you can connect to it with the root user.
|
development: adapter: mysql2 host: localhost port: 3306 username: root password: |
You need to generate two controllers, which can be done with the rails generate controller call (rails g controller call) and the rails g controller sms commands.
The rails server command, in a shorter form the rails s command is used for testing. This will start the server, which runs default on the http://localhost:3000 address.
3. Receive incoming voice calls
Do not forget to configure the routing system in /config/routes.rb. To receive incoming calls the API extension notifications need to be set. Learn more about notifications here.
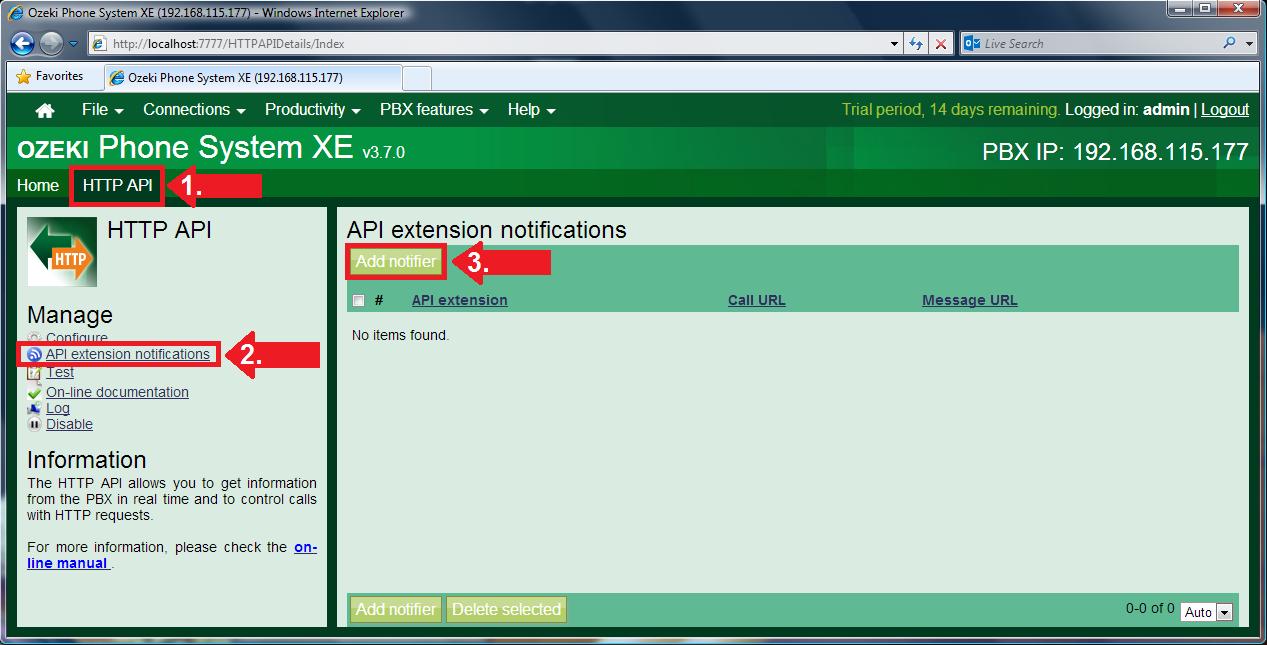
On the following figure you can see how to add an API extension notifier on Ozeki Phone System (Figure 2).

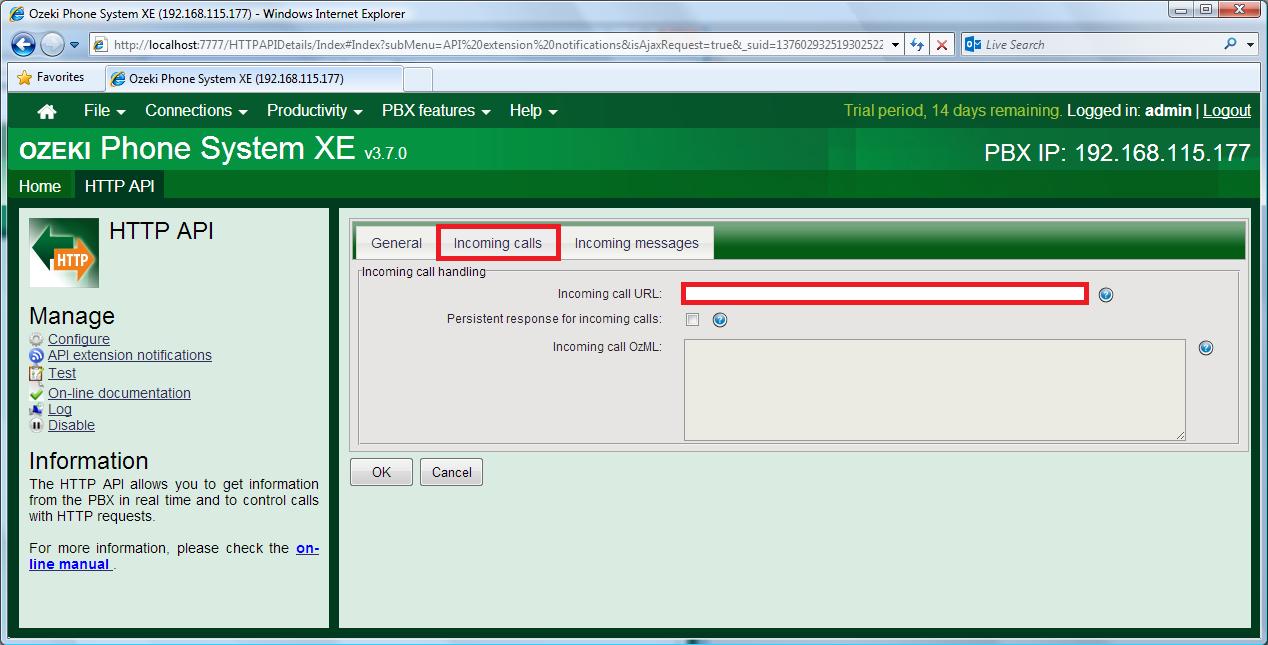
On the Incoming calls tab type in the Incoming Call URL for example this: http://yoursite.com/test_2.xml (Figure 3). This is the URL where the IncomingCall notifications are sent.

The test_2.xml is written in OzML language (Code example 2). The code below waits 1 second, then the voice engine speaks the sentence in row 7. Then it waits 1 more second and speaks the sentence in row 9.
|
protect_from_forgery except: :incoming_call # http://yoursite.com/call/incoming_call def incoming_call render :xml => '<?xml version="1.0" encoding="UTF-8"?> <Response> <Delay>1</Delay> <Speak>Congratulations, this is your first OZML Response command.</Speak> <Delay>1</Delay> <Speak>For more information on OZML syntax, visit www.ozekiphone.com </Speak> </Response>' end |
4. Make outgoing voice calls
To make a call, you need to make a CallManager class with a call method, this method needs three parameters. The dialled parameter is the number you want to call. The API extension parameter is the API extension added to Ozeki Phone System. The last parameter is an URL which points to an XML file. This XML file needs to be built using the syntax rules of the OzML language and can be generated dinamically. Find out more about the OzML language here. Copying the xml file to the C:\wamp\www directory the code segment below calls extension number 2000, using the 9999 API extension (Code example 3).
# http://yousite.com:3000/call/make_call?ops_ip_address=ozekixepbx.ip&api_extension=9999&dialed=2000
def make_call
ops_ip_address = params[:ops_ip_address]
dialed = params[:dialed]
api_extension = params[:api_extension]
url = "http://yoursite.com/test.xml"
redirect_to "http://#{ops_ip_address}:7780/?Command=Call&Dialed=#{dialed}&ApiExtension=#{api_extension}&Url=#{url}"
end
5. Receive SMS message
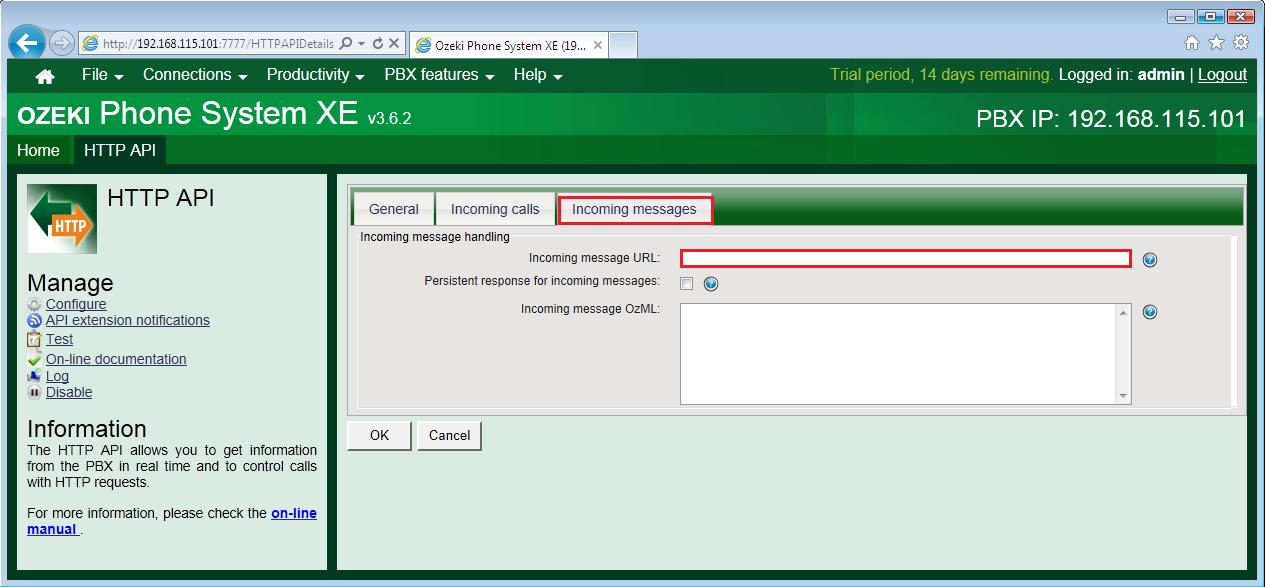
To receive an SMS you need to set an API extension notification, you can read about notifications here. The initiation of the notification is the same that is written in the 'Receive incoming voice calls' section. After initiating the notification, on the Incoming messages tab, Incoming message URL you provide a PHP file, which will handle the received messages (Figure 4).

protect_from_forgery except: :receive
require 'mysql2'
# http://yoursite.com/sms/receive
def receive
begin
config = YAML::load_file("config/database.yml")["development"]
config["host"] = config["hostname"]
con = Mysql2::Client.new(config)
con.query("CREATE DATABASE IF NOT EXISTS Ozeki_Received_SMS_Messages;")
con.query("CREATE TABLE IF NOT EXISTS Ozeki_Received_SMS_Messages.Received_Messages (sender VARCHAR(30), recipient VARCHAR(30), message VARCHAR(160));")
if ((params[:Recipient] != nil) && (params[:Message] != nil))
sender = params[:Sender] == nil ? "" : params[:Sender]
con.query("INSERT INTO Ozeki_Received_SMS_Messages.Received_Messages (sender, recipient, message) VALUES ('" + sender + "', '" + params[:Recipient] + "', '" + params[:Message] + "');")
end
rescue Mysql2::Error => e
puts e.errno
puts e.error
ensure
con.close if con
end
end
6. Send SMS message
To send an SMS you need to add an SMPP connection or add an SMS modem connection to Ozeki Phone System.
#http://yoursite.com/sms/send_sms?ops_ip_address=ozekixepbx.ip&api_extension=9994
&recipient=2000&message="Hello+World!"
def send_sms
sender = params[:sender] == nil ? "" : URI::encode(params[:sender])
delivery_report_url = params[:delivery_report_url] == nil ? "" : URI::encode(params[:delivery_report_url])
message = URI::encode(params[:message]);
recipient = URI::encode(params[:recipient])
redirect_to "http://#{params[:ops_ip_address]}:7780/?Command=SendSms&ApiExtension=#{params[:api_extension]}&Sender=#{sender}&Recipient=#{recipient}&Message=#{message}&DeliveryReportURL=#{delivery_report_url}"
end
7. Create a more advanced project
The Ozeki Phone System offers a lot more options for Ruby developers. You can interact
with existing calls, control and configure the PBX, you can introduce new communication
techniques and media formats.
For more infromation check out:
HTTP API Online Manual
Part 2: Ruby example on recording VoIP calls, call routing
If you have any questions or need assistance, please do not hesitate to contact us at info@ozekiphone.com
