Call Recorder
For developer
Introduction
The basic task of the Call Recorder sample program, connected to Ozeki Phone
System XE, is to record calls, which are made through the PBX. There is an
opportunity to record more than one calls simultaneously. The purpose of this
documentation is to show step-by-step how an application like this can be
developed.
The system will be developed under Windows Operating System and with the
help of Visual Studio.
Software requirements
- Microsoft Windows
- Microsoft Visual Studio
- Ozeki Phone System
Installation and Configuration of Ozeki Phone System
In order to connect to the server, Ozeki Phone System has to be installed. A Setup Guide can be found here: How to install and configurate your Ozeki Phone System, the installation package can be downloaded from the following page: Download. After the installation, the main page of the PBX can be accessed on the http://localhost:7777/Home address.
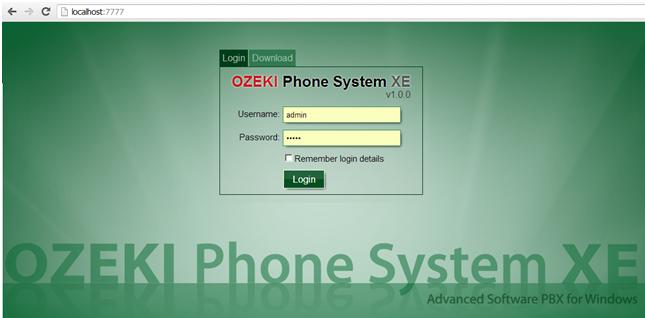
For the first login attempt, use the username and password, which was provided during the installation process.
New user can be added to the system with the Add user button. It can be found under the Office users menu item in the Connections menu.
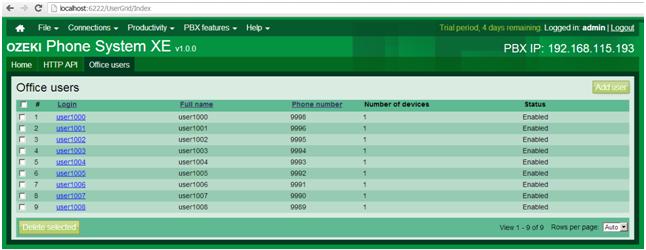
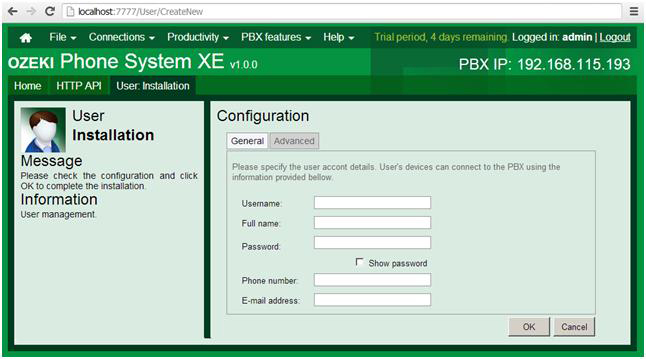
The username and password specified here can be used to connect to the system, in the OPSClient LoginAsync method.
Project development
- Let us create a new Windows Forms Application project with the help of File/New/Project menu item.
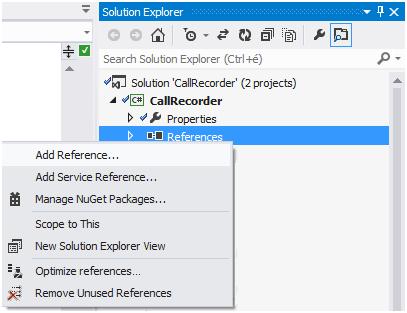
- Let us add the OPSSDK.dll file to the project references in the Solution Explorer by clicking on Add Reference… menu item. This will ensure the connection interface to Ozeki Phone System.
Implementation
During the development of the application, we followed the Model-View-Presenter software designing pattern. This is useful because the display interface can be easily changed.
1. Model
The files that include the application logics were added into the Model namespace.
-
RealClient
With the help of the Login method, we can connect to Ozeki Phone System XE and try to login with the default username and password in an asynchronous way.
	public void Login(stringserver_address, string username, string password)
	{
		ops_client = newOpsClient();
		ops_client.ErrorOccured += OPSClientOnErrorOccured;

		ops_client.LoginAsync(server_address, username, password, Completed);
	}
In case of successful connection, we subscribe to the below events of the OpsClient:
	ops_client.SessionCreated += OPSClientOnSessionCreated;
	ops_client.SessionCompleted += OPSClientOnSessionCompleted;
In case of unsuccessful connection attempt the taskmanager of the OpsClient ErrorOccured runs.
The SessionCreated event signals if there is a new incoming call in the system. The status changes of the new call can be handled in the SessionStateChanged event. In our sample program the RealClient only forwards the event towards the MainWindowPresenter. This class will query the Extensions and Outside lines, which can be located in the system. We can execute the Extensions and Outside lines both in a synchronous and asynchronous way. In the sample, we use the asynchronous way and here is how the call looks like:
ops_client.GetExtensionInfosAsync(completed);
After the call is made, we can divide the ExtensionInfos according to the ExtensionType property. The ExtensionInfo can be either an extension or an outside line.
When a call is ended, the event of the OpsClientSessionCompleted runs, which activates the RealClientSessionComleted event, on which the presenter will subscribe.
-
Programsettings
The program settings are stored in this class.
- Recordable extensions (RecordableExtensions)
- Recordable outside lines (RecordableOutsideLines)
- Saving place of the recordable files(RecordingPath)
- File format of the recording (RecordingFileFormat)
-
SettingsHelper
This class is closely related to ProgramSettings. It fetches a settingsmanager via the IoC container. Through the settings manager it gets or sets the provided settings. If there are no settings then it creates them with default values.
-
ConnectorContext
This is a Help Class, which will be used in the RecordingContext. It is for reaching the MediaConnector and AudioMixerMediaHandler that have to be disposed.
-
RecordingContext
We create a RecordingContext object to each call, which will have the following dependencies: the recordable session, the file format of the record, the name of the recorded subdirectory that will be the same as the phone number of the recordable entity. According to the file format, we instantiate either the MP3StreamRecorder or the WaveStreamRecorder. The record can be started with the StartRecording method, for which you need to specify the subdirectory as a paramter where the recorded file should be made. After the record has started, this code snippet will ensure the connection to the recorder:
	var media_connector = new MediaConnector();
	var mixer = new AudioMixerMediaHandler();

	lock (sync)
	{
		Connectors.Add(session, new ConnectorContext(media_connector, mixer));
	}

	media_connector.Connect(mixer, receiver);

	session.ConnectAudioReceiver(CallParty.Callee, mixer);
	session.ConnectAudioReceiver(CallParty.Caller, mixer);
The AudioMixerMeidaHandler is required to avoid cracking sounds on the recording. The Mixer that is created here and the MediaConnector have to be disposed later on.
	ConnectorContext connector_context;
	lock (sync)
	{
		connector_context = Connectors[session];
		Connectors.Remove(session);
	}

	session.DisconnectAudioReceiver(CallParty.Callee, connector_context.Mixer);
	session.DisconnectAudioReceiver(CallParty.Caller, connector_context.Mixer);

	connector_context.Connector.Disconnect(connector_context.Mixer, receiver);
	connector_context.Connector.Dispose();
	connector_context.Mixer.Dispose();
This is what the code snippet, which is invited by the StopRecording, is used for.
2. View
The graphical interfaces and a unique controller were placed in this namespace. The ExtendedListView has to be introduced otherwise the display would flicker in the list view and for creating a better looking display as well.
-
AboutBox
This is the about of the application.
-
BaseWindow
BaseWindow is the parent of ConnectToServerWindow and MainWindow. This interface implements basic features like error message, information message display, window closing or waiting.
-
ConnectToServerWindow
This windows makes it possible to connect to Ozeki Phone System. In order to connect, the followings have to be provided: the IP address of the computer (ex.: 192.168.115.193:8802) on which Ozeki Phone System runs, username (OPS office user) and password. When starting the Call Recorder, this window appears automatically but the opportunity is given to connect to a provider later on.
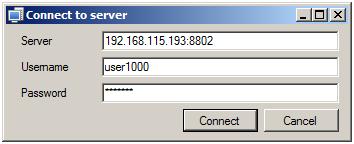
Figure 5 - Connect to server window -
MainWindow
This is the main window of the application. Here, on the left side, the Extensions and Outside lines that are in the system can be seen in a list view. Under the Recording details tab there are the following things: the selected entity is under recording or not, are there any files that belong to it, how long does all the calls last altogether, how big is the file size. Moreover, there is the type of the entity, to which directory will the saves be placed and in what file format. On the Recorded files tab, the recorded files can be retraced. We can play or delete the recorded files if there is no need for them.
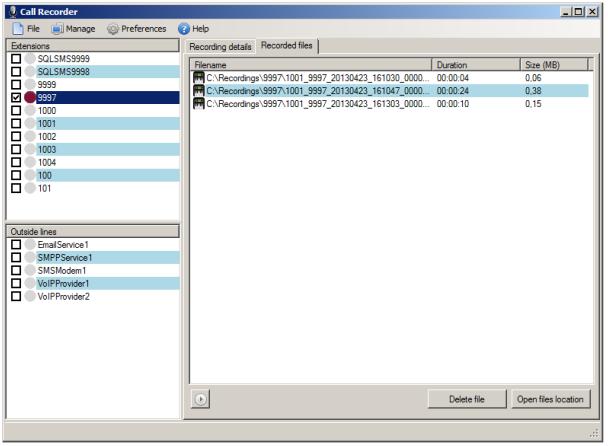
Figure 6 - Call Recorder main window OptionsWindow
Here, the recording place and format of the file can be modified.
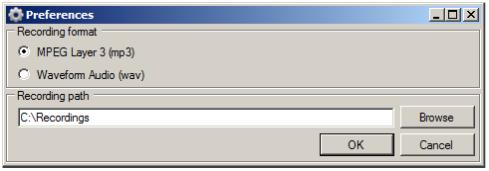
Figure 7 - Call Recorder options window
3. Presenter
These files are responsible for connecting the model and the view.
-
ConnectToServerPresenter
One dependency of the ConnectToServerPresenter is an IConnectToServer interface, which is implemented by the ConnectToServerWindow. We connect to the server with this view. The other dependency is the IOPSClient, which is implemented by the RealClient class. The connection is done via the client interface (IOPSClient) and also the user interface is notified about the connection process. In case of unsuccessful connection attempt an error message appears, anyway we close the GUI.
-
OptionsWindowPresenter
It’s only dependency is the IOptionsWindow interface, through which an error message can be displayed if it is required. We have access to the settings container via the IoC container.
-
MainWindowPresenter
The MainWindowPresenter also has two dependencies, from which the IOPSClient is completely the same as the object being used by the ConnectToServerPresenter. Since, the IOPSClient is added to the IoC container as a singleton class. We will talk about the IoC container later on. The other dependency is the IMainWindow interface, which is implemented by the MainWindow. Here, the IMainWindow interface also notifies the user interface (UI) if any change needs to be done in the display.
The build up of the selected file names to be recorded include the caller, calle, when the call started and the call duration. However, when the file list is displayed, the time of the file modification and creation is used to display the start and duration of the call.This presenter will subscribe for the SessionCreated and the SessionCompleted, which are the two events of the IOPSClient.
	client.SessionCreated += ClientOnSessionCreated;
	client.SessionCompleted += ClientOnSessionCompleted;
If a call arrives to the system then regarding the entities, which are selected for recording, a recording process will start. After the call ends, the recording ends as well.
4. Util
In this namespace, the dialogue windows that are responsible for displaying the messages, constants, delegates and the IoC container can be found.
-
SimpleIOCContainer
The IoC (inversion of control) container is a singleton class, which is suitable for storing dependencies:
SimpleIOCContainer.Instance.AddDependency<IOPSClient>(() => new RealClient());
The following code is for dependency resolving:
SimpleIOCContainer.Instance.Resolve<IOPSClient>();
It makes dependency replacement available at the same place so changing to the usage of test classes will be easier.
