How to broadcast 3D Video to a website
Ozeki Phone System gives a standalone possibility to display 3D video calls on your website. With this outstanding feature you can revolutionize the communication of your company with streaming any event in 3D on your website. Among others this can be a fantastic way to give a lecture for your audience, even though you cannot be present there.
Find out more: How to make a 3D video call between two Ozeki XD Phones
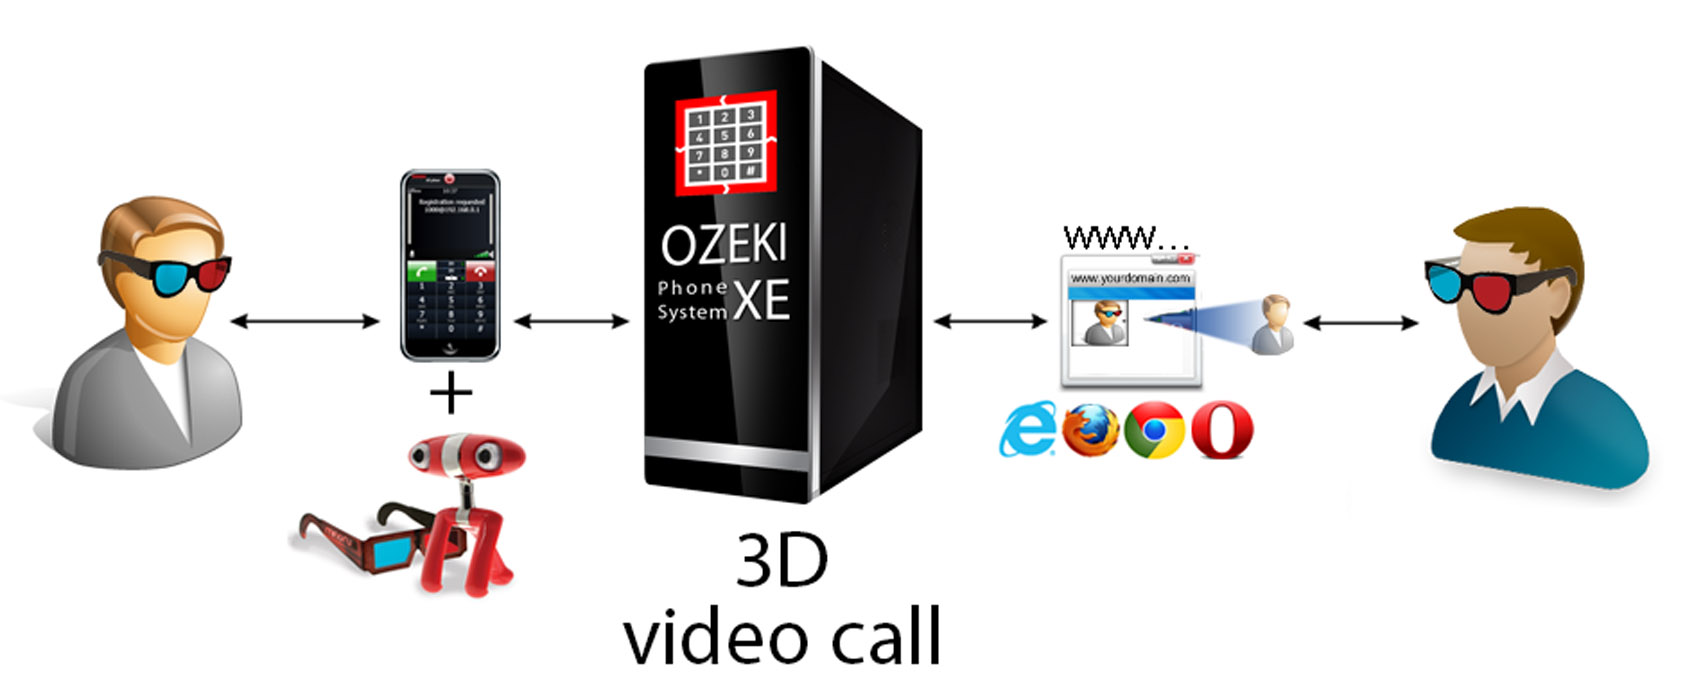
You only need to install the Ozeki Phone System on your computer, the Ozeki XD Softphone and develop a simple website that will receive the incoming 3D video and dislpay it for the website audience.
Prerequisites
- Ozeki Phone System
- Ozeki XD Phone
- A 3D compatible webcamera or 2 single webcameras
- Cyan-red 3D glasses
- Microphone
- Speaker
- A webserver
Download: Download example on how to broadcast 3D Video call on your website
In this site you can see detailed installation guide about how to configure your Ozeki Phone System and develop a web page using the Javascript API of the PBX for making a 3D call between the Ozeki XD Phone and your website.
Step 1: Install a new Webphone Outside Line
Step 2: Install a new SIP Extension
Step 3: Download and configure Ozeki XD Phone
Step 4: Create an HTML file on your webserver
Step 5: Make a test 3D call between your Ozeki XD Phone and your website
Step 1: Install a new Webphone Outside Line
In order to make 3D video call between a web browser and a VoIP phone, a Webphone outside line needs to be installed on your Ozeki Phone System. In this step you can see how to install and configure it.
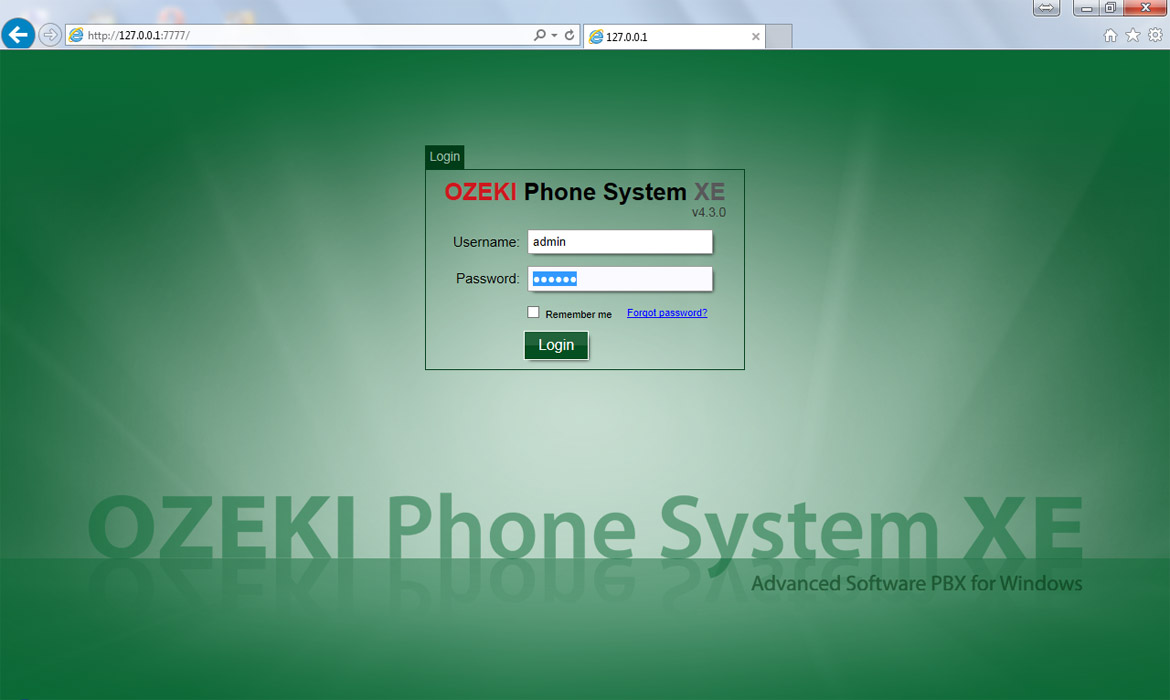
After you have installed Ozeki Phone System XE to your computer, login with username and password that was given during installation.
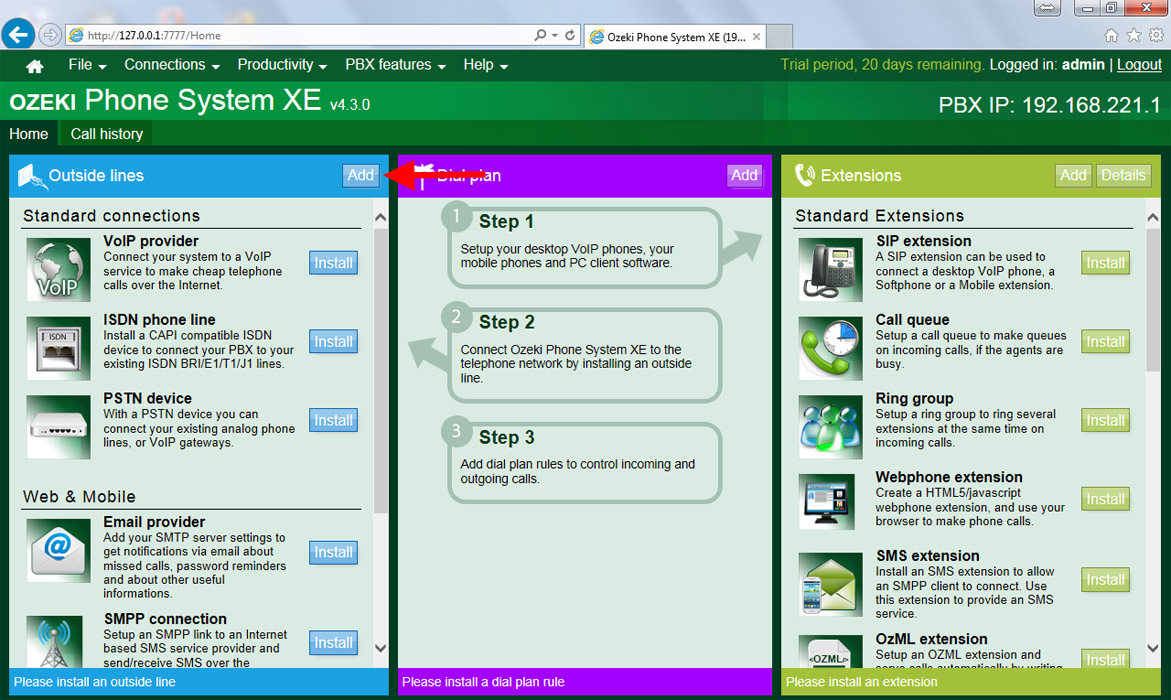
On the main screen, click on Add button in the Outside section to install a new Outside line.
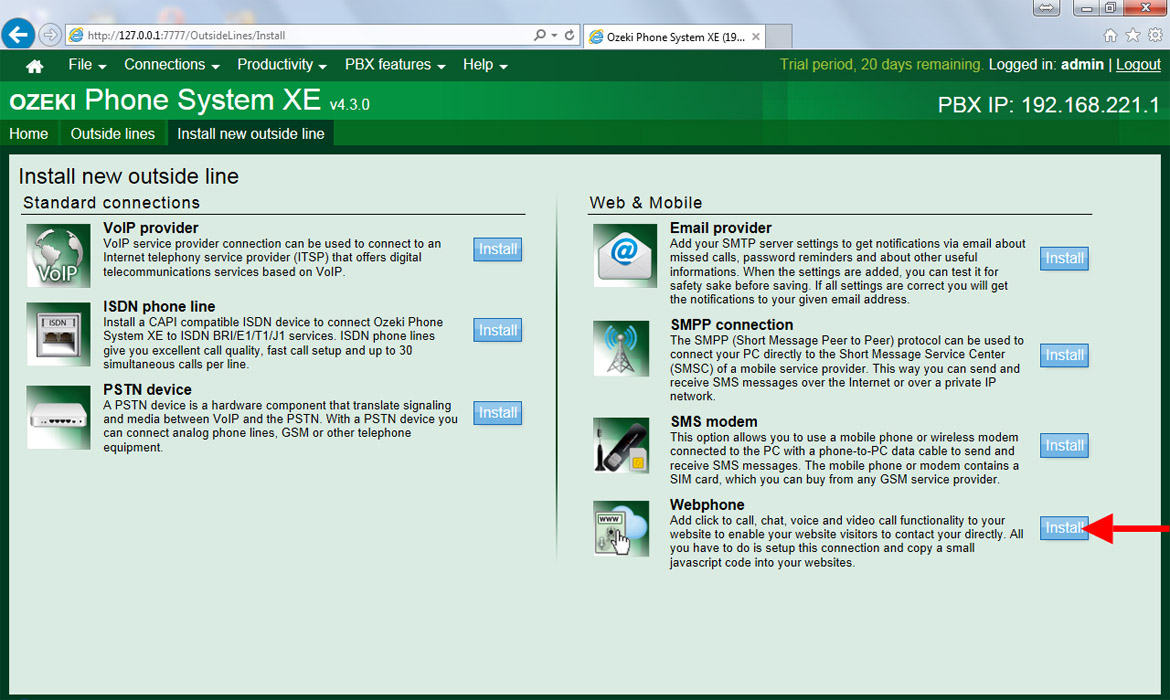
On the next page find the Webphone outside line, and click on Install button to install a new one.
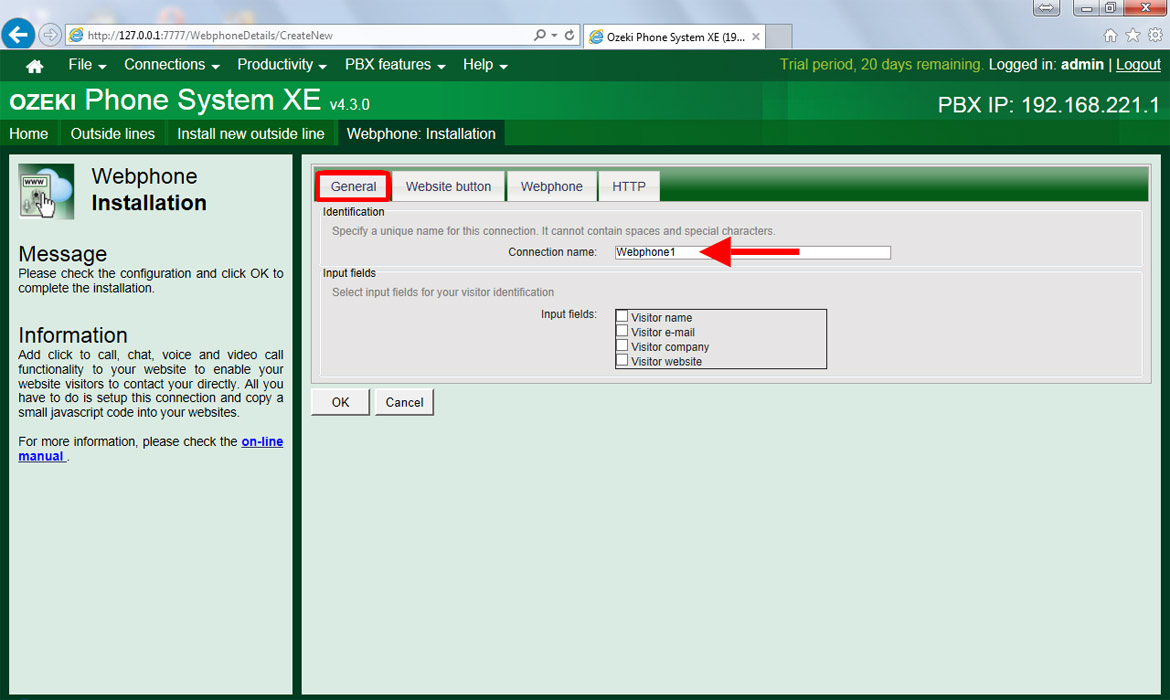
During the webphone installation you need to do the configuration of the o utside line. Under the General tab, you need to specify a unique name for this connection. It cannot contain spaces and special characters.
Then select the Webphone tab, where you need to select the Developer friendly webphone type that allows you to fully customize your webphone.
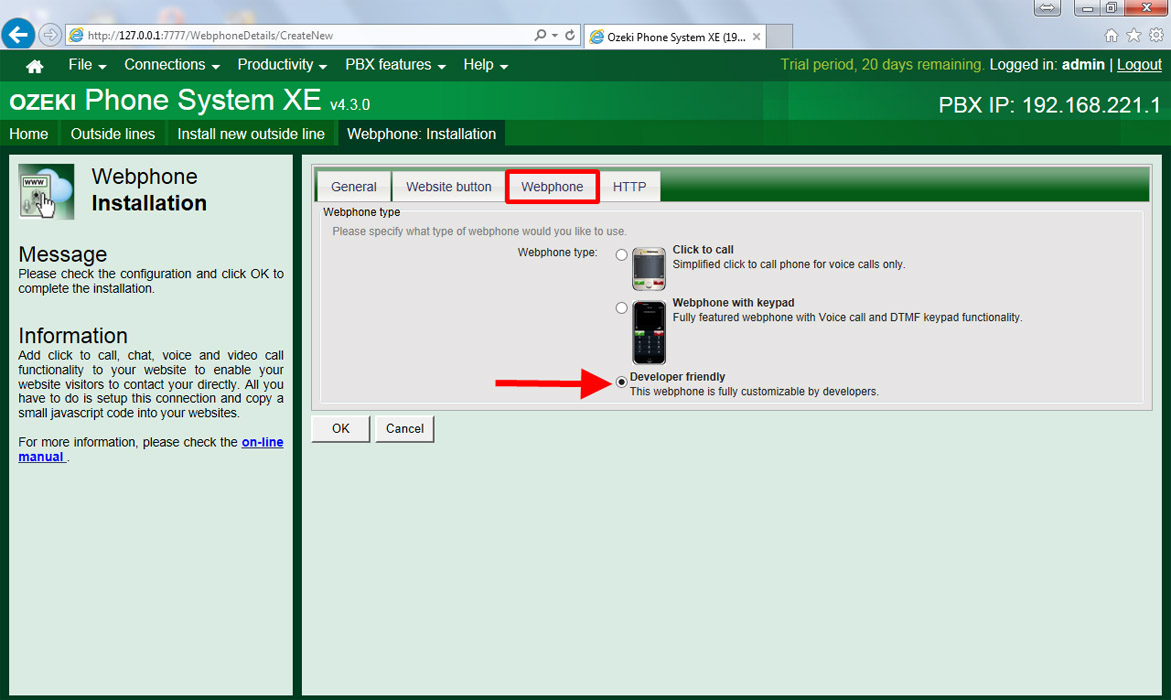
After you have done the configuration, click on OK button to save your configuration.
Step 2: Install a new SIP Extension
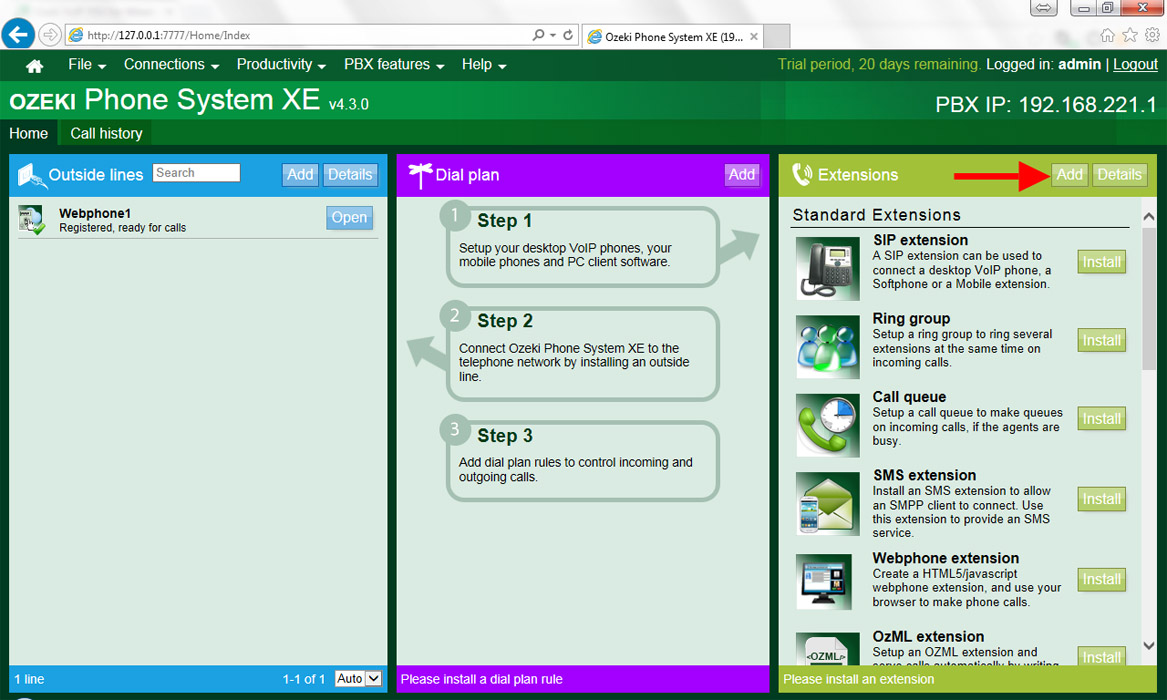
To connect your Ozeki XD Phone to Ozeki Phone System, you need to install a new SIP Extension. On the Home screen, click on Add button that belongs to the Extensions section of the web page.
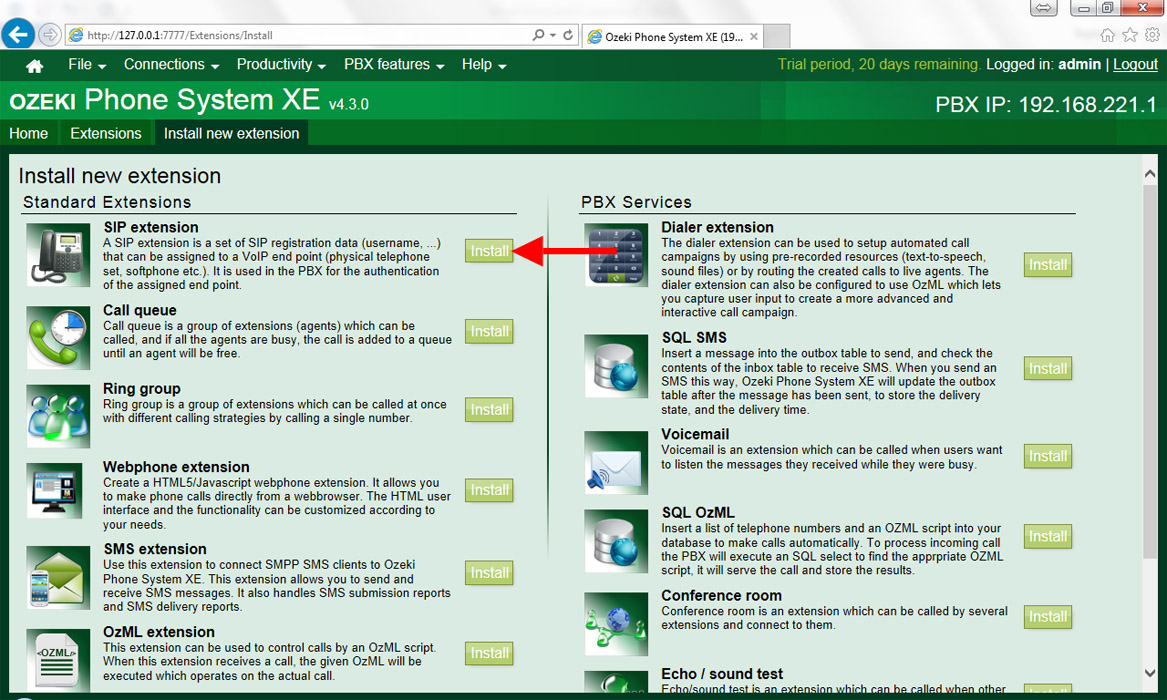
On the next page, find SIP Extension and click on Install button.
Then, please specify the SIP account details that will be used by the 3D phone. You need to provide a phone number, an authentication name and a password.
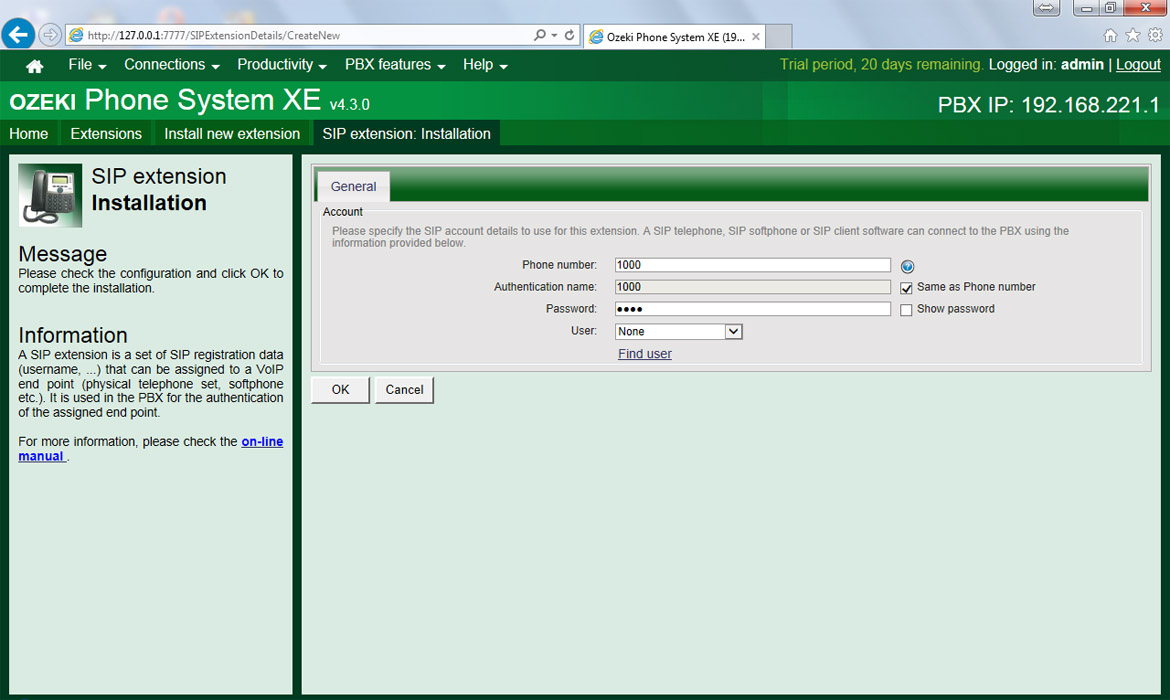
After you have given the SIP account data, click on OK button to confirm your settings.
Step 3: Download and configure Ozeki XD Phone
After you have downloaded and installed Ozeki XD Phone on your computer, you need to configure it to be registered to Ozeki Phone System.
First, you need to open the settings window by pressing the magnifier button on your 3D softphone.
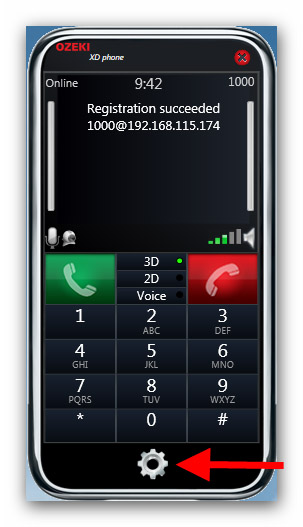
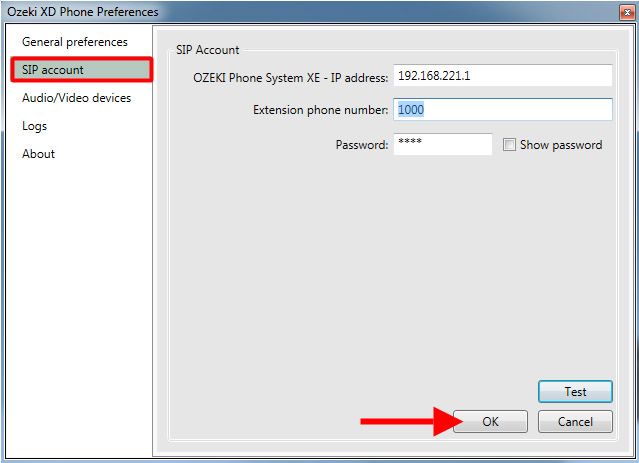
Now, the Ozeki XD Phone Preferences window has been opened, where you can setup your SIP account. Here, you need to specify the IP address of your previously configured PBX, the specified phone number and password.
Under the Audio/Video devices tab, you need to select the Microphone and the Speaker you want to use, and you need to select a 3D camera in the 3D camera settings section (if you use a 3D compatible camera, you will probably see the same camera as the left and right camera).
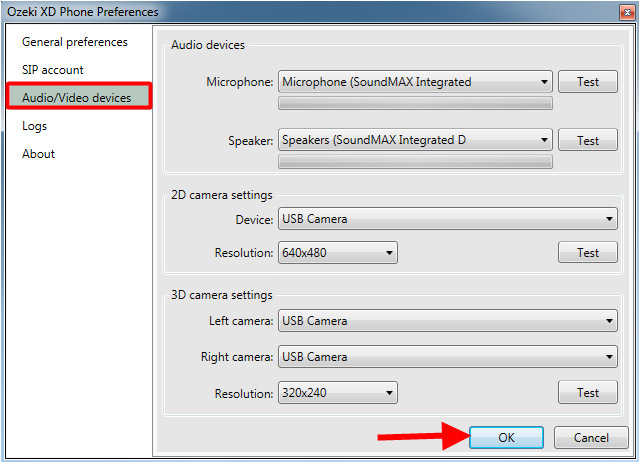
Then click on OK button to finish the configuration.
Step 4: Align your cameras
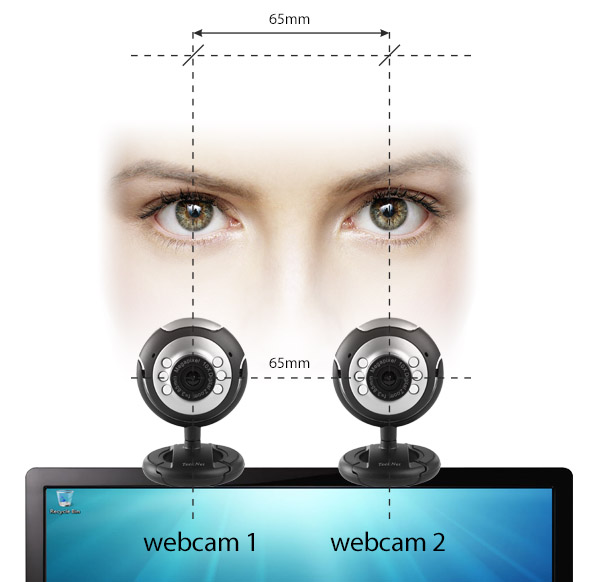
Now, it is time to align your cameras. If you use a 3D compatible webcamera, just put it on the top of your monitor and move on the next step. However, if you use two conventional webcameras, take a look at Figure 13 for our tip about the right camera placement. Be sure that the distance between your cameras is approximately 65 mm.
Step 4: Create an HTML file on your webserver
Code 1 shows an example about how to make a webphone on your website that can broadcast a 3D video call coming from an Ozeki XD Phone through Ozeki Phone System PBX. If you click on See full code button, you can see the whole source code. Scrolling down, you can read about the main parts and functions of the source code.
<html>
<head>
	<script type="text/javascript" src="http://192.168.115.174:7777/WebphoneAPI"></script>
	<script type="text/javascript" src="http://code.jquery.com/jquery-latest.min.js"></script>
	<script type="text/javascript">
		var call = null;
		var ConnectionInformation = null;

		$(document).ready(function(){
			OzWebClient.onConnectionStateChanged(connectionStateChanged);
			OzWebClient.connect("192.168.115.174", "Webphone1");
		});

		function connectionStateChanged(info) {
		    console.log("PhoneNumber: " + info.PhoneNumber);
			console.log("State: " + info.State);
			ConnectionInformation = info;
			if (ConnectionInformation.State == ConnectionState.ACCESS_GRANTED) {
				OzWebClient.onIncomingCall(incoming);
				document.getElementById("callButton").disabled = false;
				document.getElementById("phoneNumber").innerHTML = info.PhoneNumber;
			}
		}

		function startCall(info) {
			if (ConnectionInformation != null && ConnectionInformation.State == ConnectionState.ACCESS_GRANTED && call == null){
				call = OzWebClient.createCall("1000", CallType.VIDEO);
				if (call != null){
					call.onCallStateChanged(callStateChanged);
					call.start();
					console.log("calling " + call.getOtherParty() + "...");
				}
			}
		}

		function callStateChanged(state) {
			console.log(state);
			if (state == "IN_CALL") {
				call.setRemoteDisplay("remoteVideo");
				document.getElementById("callButton").disabled = true;
				document.getElementById("hangUpButton").disabled = false;
			}
			else if (state == "COMPLETED") {
				location.reload();
			}
		}

		function hangUpCall() {
			if (call) {
				call.hangUp();
				console.log("The call is hung up.");
				call = null;
				location.reload();
			}
			OzWebClient.disconnect();
		}

		function incoming(incomingCall) {
		    if (call)
				incomingCall.Reject();

			call = incomingCall;
			call.accept();
			document.getElementById("callButton").disabled = true;
			document.getElementById("hangUpButton").disabled = false;
			call.setRemoteDisplay("remoteVideo");
		}
	</script>
	<link rel="stylesheet" type="text/css" href="style.css" />
</head>

<body>
	<div>
		<div id="remoteVideo" class="videoDiv">
		</div>
		<div class="buttonDiv">
			<div class="left">
				<button id="callButton" class="buttonStyle" onclick="startCall(ConnectionInformation)" disabled>
					Make 3D Video Call
				</button>
			</div>
			<div class="right">
				<button id="hangUpButton" class="buttonStyle" onclick="hangUpCall()" disabled>
					Hang Up
				</button>
			</div>
		</div>
	</div>
</body>
</html>
Code example 1
- Full code of the downloadable example
To display a 3D call on your web browser, you need to develop a webphone that will be responsible for showing the remote video that is coming from the Ozeki XD Phone. In this step you can see a simple example about how to make a video call with your website.
For using WebPhoneAPI of Ozeki Phone System a webserver is needed that your code will be placed on. In this example, Wampserver and Apache are used. After that, open the folder where your Wamp has been installed, then select the www folder and create an index.html file with the following content in it:
<!DOCTYPE html>
<html>
<head>
	<script type="text/javascript">

	</script>
	<link rel="stylesheet" type="text/css" href="style.css" />
</head>

<body>
	<div>
		<div id="remoteVideo" class="videoDiv">
		</div>
		<div class="buttonDiv">
			<div class="left">
				<button id="callButton" class="buttonStyle"
				        onclick="startCall(ConnectionInformation)" disabled>
					Make 3D Video Call
				</button>
			</div>
			<div class="right">
				<button id="hangUpButton" class="buttonStyle"
				        onclick="hangUpCall()" disabled>
					Hang Up
				</button>
			</div>
		</div>
	</div>
</body>
</html>
Code example 2 - Basic HTML codes
The JavaScript code which you will write needs to be placed between <script type="text/javascript"> and </script> tags.
Now, add reference to the WebphoneAPI and jQuery into your source. Place the following rows after the </head> tag and change the IP address of your Ozeki Phone System:
<script type="text/javascript" src="http://192.168.115.174:7777/WebphoneAPI"></script>
<script type="text/javascript" src="http://code.jquery.com/jquery-latest.min.js"></script>
Code example 3 - HTML codes to complete </head> tag
Now, declare the call object, the ConnectionInformation object and use jQuery to wait for the website to be loaded. Then, we register to the onConnectionStateChanged event and try to connect to the webphone outside line. In the connect method, you need to specify the IP address of the PBX, and the name of the Webphone Outside Line.
var call = null;
var ConnectionInformation = null;

$(document).ready(function(){
	OzWebClient.onConnectionStateChanged(connectionStateChanged);
	OzWebClient.connect("192.168.115.174", "Webphone1");
});
Code example 4 - Connecting to Webphone
When an onConnectionStateChanged event occurs, the parameter of the event is called, which is the connectionStateChanged function. This function gets the current connection state in its state parameter and save it to the ConnectionInformation variable that will be used later. If the Connection State is ACCESS_GRANTED, it subscribe for incoming calls and activates the Button on the website that makes it possible to call the startCall() method for making calls.
function connectionStateChanged(info) {
    console.log("PhoneNumber: " + info.PhoneNumber);
	console.log("State: " + info.State);
	ConnectionInformation = info;
	if (ConnectionInformation.State == ConnectionState.ACCESS_GRANTED) {
		OzWebClient.onIncomingCall(incoming);
		document.getElementById("callButton").disabled = false;
	}
}
Code example 5 - Function which subscribe to the connection state change event
If you click on the Button on the website, the startCall method will be called. This is responsible for initiating a call. Use the phone number of the VoIP phone as a parameter in the createCall method and specify the calltype with the CallType.VIDEO. This method makes a call object that has the name ’call’. Run the start method on this object to call the VoIP phone. Then register on the onCallStateChanged event with the callStateChanged function.
function startCall(info) {
	if (ConnectionInformation != null && ConnectionInformation.State == ConnectionState.ACCESS_GRANTED && call == null){
		call = OzWebClient.createCall("1000", CallType.VIDEO);
		if (call != null){
			call.onCallStateChanged(callStateChanged);
			call.start();
			console.log("calling " + call.getOtherParty() + "...");
		}
	}
}
Code example 6 - Function that calls the phone number 1000
If you check the callStateChanged function, you can see that if the call is in IN_CALL state then the incoming 3D video will be displayed in the div with remoteVideo ID, furthermore it disables the Make call button, and enables the Hang up button.
function callStateChanged(state) {
	console.log(state);
	if (state == "IN_CALL") {
		call.setRemoteDisplay("remoteVideo");
		document.getElementById("callButton").disabled = true;
		document.getElementById("hangUpButton").disabled = false;
	}
	else if (state == "COMPLETED") {
		location.reload();
	}
}
Code example 7 - Function to get information about actual state of the call
The hangUpCall method can be used to hang up a call by pressing the Hang up button on the website.
function hangUpCall() {
	if (call) {
		call.hangUp();
		console.log("The call is hung up.");
		call = null;
		location.reload();
	}
	OzWebClient.disconnect();
}
Code example 8 - Function to hang up a call
The following code shows how to receive an incoming call. The accept() method can be used to accept an incoming call, and the previously used setRemoteDisplay can be used to show the incoming 3D picture. In addition, here you need to disable and enable the Make call and the Hang up buttons properly for the connection state.
function incoming(incomingCall) {
	if (call) {
		incomingCall.Reject();
		return;
	}

	call = incomingCall;
	call.accept();
	document.getElementById("callButton").disabled = true;
	document.getElementById("hangUpButton").disabled = false;
	call.setRemoteDisplay("remoteVideo");
}
Code example 9 - Function to receive incoming call
Step 5: Make a test 3D call between your Ozeki XD Phone and your website
Finally, we will make a test call between the web browser and the Ozeki XD Phone. It is also possible to call a 3D phone based on the previously provided phone number (in the createcall object), or receive a 3D video call from a 3D softphone. In this case, you need to add a new Outbound routing rule with the help of you can call a Webphone outside line from your Ozeki XD Phone. In this example you can see how to call a remote Ozeki XD Phone.
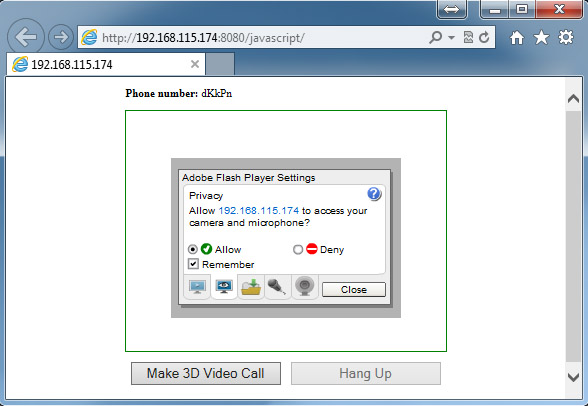
If you have opened and registered your 3D phone to your Ozeki Phone System XE, you only need to open the web page where the 3D video call will be streaming. Here, click on the Make 3D Video Call button, then allow the website to access your camera and microphone.
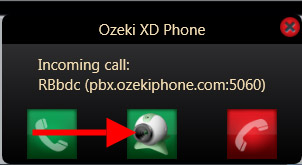
Then a pop-up window of the Ozeki XD Phone will appear, where you need to click on the Video Call button to accept the incoming call.
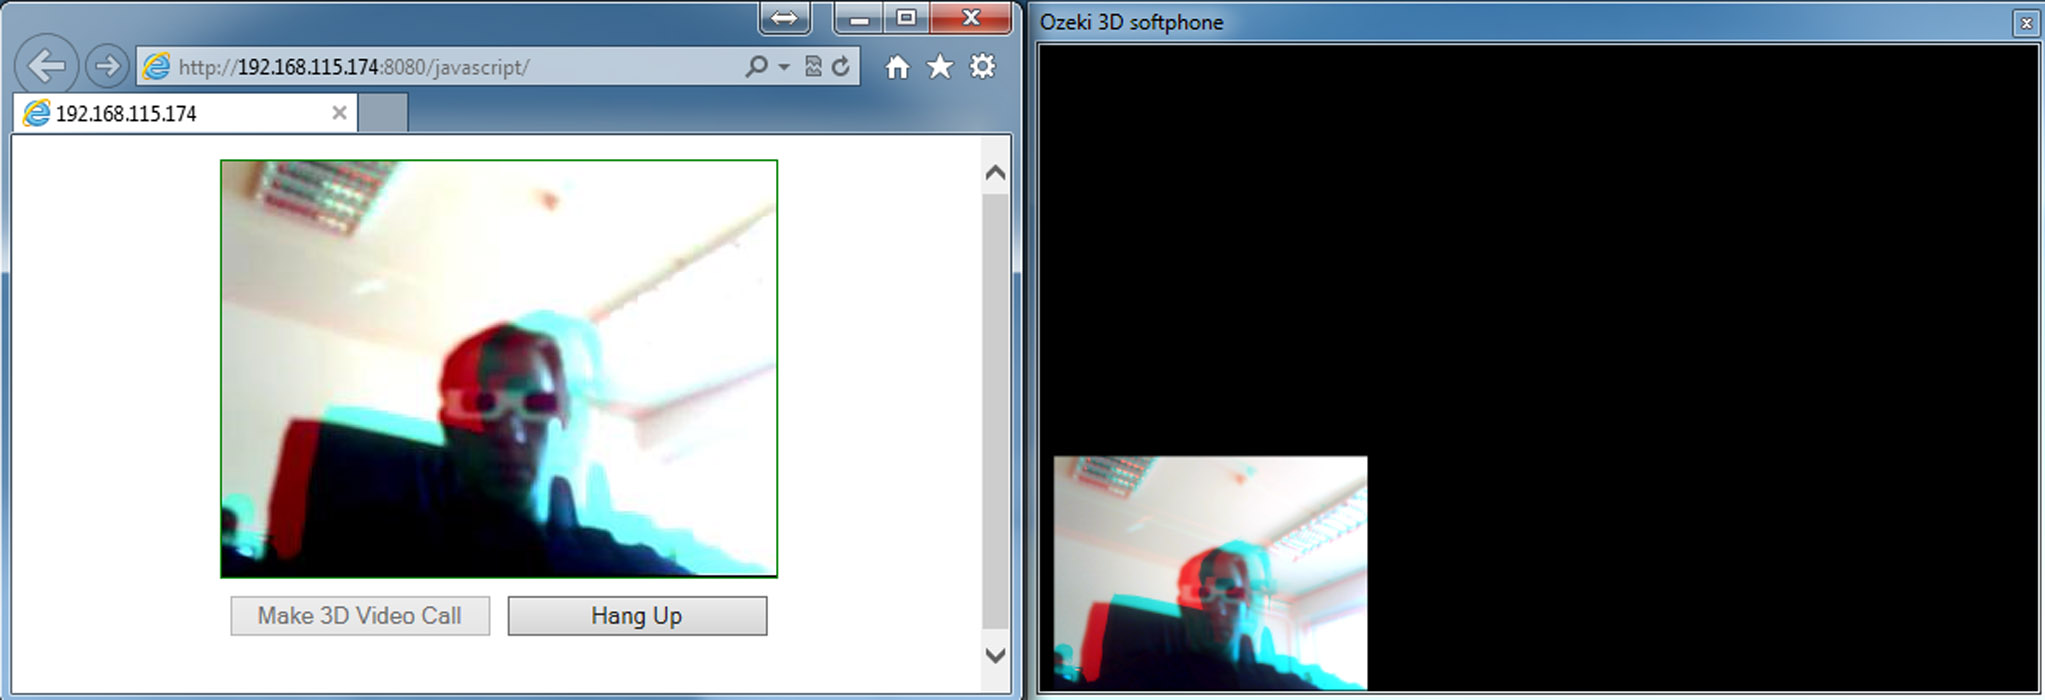
Then the local 3D video can be seen in the window of Ozeki XD Phone, and the remote video can also be seen in the web browser.
In this guide, you could see a breath-taking form of communication that can bring extra profit for your company. If you have any questions or need assistance, please contact us at info@ozekiphone.com
- Download Ozeki XD Phone
- How to make a 3D video call between two Ozeki XD Phones
- How to initiate live chat, voice calls or video call through your website
- Recommended 3D compatible webcamera: iTrax 3D Webcam
- Recommended 3D compatible webcamera: Minoru 3D Webcam
- How to connect a Softphone to Ozeki Phone System
