How to setup Ozeki Phone System with PBXpress
Ozeki Phone System offers the ability to connect your application to the VoIP network. On this page, you can learn how to make your first steps to achieve your goal and build a successful VoIP-based application. This guide will help you to setup Ozeki Phone System with your PBXpress server.
VoIP technology is continuously evolving nowadays. Voice over Internet Protocol offers the ability to place phone calls over your existing network. VoIP technology offers cheapness for your business and Ozeki Phone System offers the ability to enable VoIP support in your own application.
Ozeki Phone System utilizes the advantages of VoIP technology, and place your calls using your VoIP account or via your PBX.
In this guide you can learn about how to configure Ozeki Phone System with your PBXpress server.
System overview
If you follow the steps of this guide, you will have a system which is connected to your PBXpress server. The system will work as follows: First, you need to install your PBXpress server. After the installation is done, you can log into its web interface and create the extensions. Ozeki Phone System can use one of the created extension to register to PBXpress server. After the registration you can start your calls. Figure 1 demonstrates the process.

- Login to PBXpress and create an extension for Ozeki Phone System.
- Ozeki Phone System will register to PBXpress using the created extension.
- You can start to call your contacts.
- PBXpress will call your contacts via Ozeki Phone System.
Configuration steps
Before you start to configure this solution, it is assumed that you have already installed your PBXpress server and installed Ozeki Phone System into your computer.Step 1.) Install PBXpress
Connect your 3rd party PBX with Ozeki Phone System. The computer where you install PBX will be a virtual machine or a computer. Start with a simple installation to co-operate with Ozeki Phone System.
After you mount the installation disk and accept the licence agreement your can choose where would you like to install. Just assign which network interfaces you want to use and install from browser. To install 3rd party PBX open a web browser and type the IP address which is shown on your installation screen. Setup will automaticly install this PBX and just a few step for finalize the install.
Use the default username and password are "admin". After you logged in as an administrator, you are able to reach the administrator interface by clicking on the "advanced" tab here you can change the system’s global parameters like public IP address and SIP account.
Step 2.) Create a SIP account
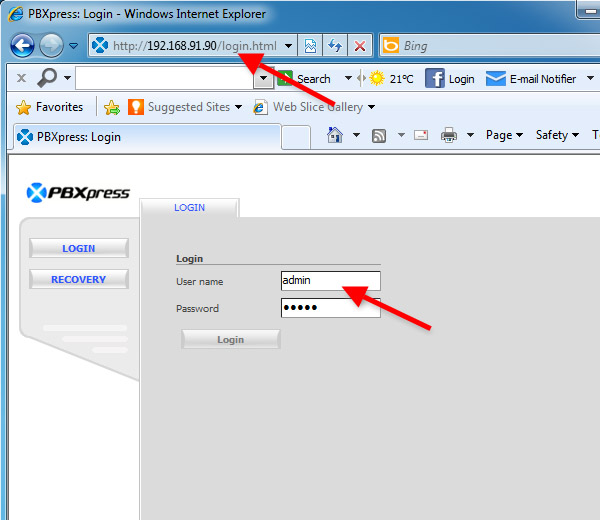
In order to configure PBXpress, you need to login to your PBXpress server using its web interface. In this example I installed PBXpress on a computer which has the following IP address: 192.168.91.90. The URL of the web interface will be : http://192.168.91.90/login.html Navigate to this page using your web browser and login as administrator (Figure 2).

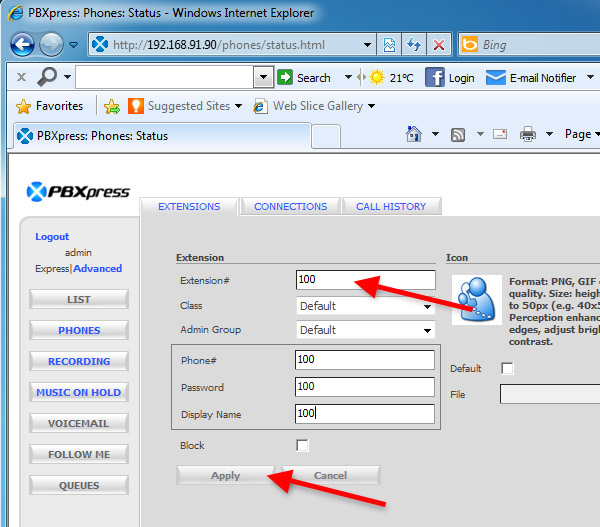
After login, the Extension screen will appear. Provide the details of the extension you wish to be created, and click on Apply. In this example I create an extension which name is 100 (Figure 3).

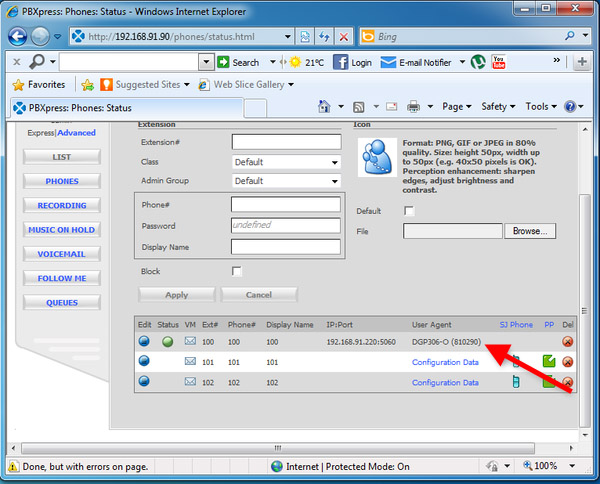
I have created three extensions. As you can see, I have registered a VoIP phone for extension 100 (Figure 4).

Step 3.) Configure Ozeki VoIP provider to use the created SIP account
If you have any questions or need assistance, please contact us at info@ozekiphone.com
Dig deeper!
People who read this also read...
