How to setup Ozeki Phone System with Avaya IP Office
This guide shows how you can connect Ozeki Phone System to your Avaya IP Office. This solution gives you a brief explanation about how you can configure Ozeki Phone System as Voip Provider connect with Avaya IP Office.
Ozeki Phone System uses Voice over IP to establish phone calls. Using VoIP technology is less expensive than traditional phone services. With Ozeki Phone System you can view your registered phone line and your active phone calls. You can establish calls using Ozeki Phone System. You can also select the codec to be used during the phone call.
This configuration guide demonstrates how you can connect Ozeki Phone System to your Avaya IP Office.System architecture
If you follow the configuration guide, you will have a telephone system that works as follows: First, rename the extension, that connects your Avaya IP Office to the Ozeki Phone System. Once Ozeki Phone System is connected, you can start your calls. The destination phone could be a VoIP phone, a land line phone or a mobile phone. You can see this process in Figure 1.

- Ozeki Phone System registers to Avaya IP Office.
- The call will be forwarded to Avaya IP Office using the created extension.
- The destination phone will be ringing.
- You can start talking using the Ozeki Phone System.
Configuration steps
Before you start to configure this solution it is assumed that you have already installed your Avaya IP Office and downloaded Ozeki Phone System installer from the download page.
Step 1.) Install Avaya IP Office
The Avaya IP Office is a "PBX in a box", meaning it comes with it's own hardware. You can install it with the help of the guide, that you receive together with the devices.Step 2.) Create a SIP account
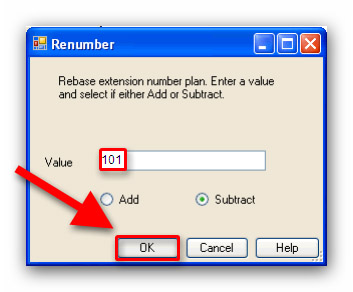
Because the Avaya IP Office is a hardware PBX if you want to add a SIP extension for the OPS XE you have to do it by connecting the PC which runs the Ozeki Phone System to the device of Avaya IP Office. You will have to rename the extension number of the connection to 101, because we are going to use it to connect the two PBX-es.When the installation finished log in to the IP Office Manager:
- Receive the configuration from the IP Office system.
- Select Tools | Extension Renumber
- Click on the save icon and save the updated configuration back to the IP Office system.

Once the updated configuration is saved, the configuration of Avaya IP Office is done and you can configure Ozeki Phone System.
Step 3.) Configure Ozeki VoIP provider to use the created SIP account
If you have any questions or need assistance, please contact us at info@ozekiphone.com
Dig deeper!
People who read this also read...
